English
39
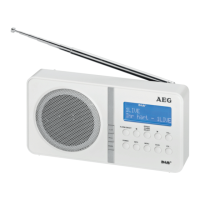
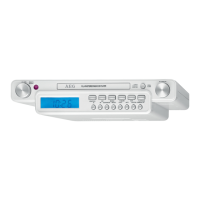
Overview of the components
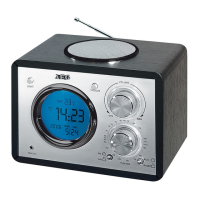
Front
1 Telescopic antenna
2 LCD display
3
/ buttons (Scan forwards/ backwards)
4 VOL+/VOL buttons (volume)
5 SCAN button (scan)
6 MENU button (open menu)
7 INFO button (show information)
8 POWER button (standby/ operation)
9 REPEAT ALARM/SELECT button (repeat alarm/ confirm)
10 ALARM ON/OFF button (alarm On/ Off)
11 SOURCE button
12 PRESET button
13 SLEEP button (snooze)
Rear view (without illustration)
Battery compartment
DC IN 6 V connector
OFF/ON switch (On / Off)
Installation
• Readthemanualthoroughlybeforeoperatingthede-
vice!
• Chooseasuitablelocationforthedevice.Suitableloca-
tions are dry, even and antislip surfaces on which you may
operate the device easily.
• Makesurethereisproperventilationforthedevice!
• Remove,ifnecessary,theprotectionsheetfromthe
display.
Power supply (Adaptor)
• Insertthegridplugintoaproperlyinstalledthreeprong
socket. Connect the device with the plug connector by
inserting its plug into the DC 6 V jack of the device.
• Makesurethegridvoltagecorrespondstothegureson
the rating plate.
CAUTION:
• Onlyusethesuppliedpoweradaptorforthisdevice.
Do not use for other devices.
• Only use power adaptor with 6 V (
), other
adaptors may cause damage to the device.
NOTE:
Disconnect from mains power supply during longer periods
of non-use.
Battery Operation
You also have the option of operating the unit with 4 Type R6
“AA” batteries.
1. Open the battery compartment on the back.
2. Insert 4 R6 “AA” batteries 1.5 V. Mind the correct polarity
(indicated on the bottom of the battery case)!
3. Close the battery case.
4. Ifthedeviceisnotusedforanextendedperiodoftime,
remove the batteries from the device to avoid any leaking
of battery acid.
CAUTION:
• Neverusedifferentbatterytypesornewandusedbat-
teries together.
• Batteriesmustnotbedisposedofinthegarbage.
Please bring used batteries to competent collection
centers or back to the dealer.
WARNING:
Donotexposebatteriestoanyhightemperaturessuchas
sunlight, fire, or the like. There is a danger of explosion!
NOTE:
• Ifyouhaveconnectedthepowersupply,thebatteries
are automatically deactivated.
• Alwaysswitchoffthedeviceduringnon-usewiththe
OFF ON switch on the back, to not unnecessarily
stress the batteries. To display the time as accurately as
possible, the device will synchronize the time with the
radio station in the background. This results in a higher
battery consumption. In the worst case scenario, the
batteries could be discharged prematurely.
When shutting off the device with the OFF ON switch,
the time/ alarm time will be lost.
Installation
1. Fullyextendthetelescopicantenna(1).Standitupright
for initial installation.
2. Switch the device on at the back of the device using the
OFF/ON switch. The device automatically searches for
DAB stations. SCANNING… and a progress bar appears
on the display. The figure on the right of the display
shows the number of radio stations found. The first alpha-
numeric DAB station is played.
When playing a radio station, the time and date is taken
from the broadcasting service. If the device does not re-
ceive DAB stations in your location, set the time manually
as described in “Settings menu”.
Changing the OSD language
TheOSDmenuissetinGermanexfactory.Tochangethe
language, proceed as follows:
1. Press the MENU button (6).
2. Select the menu option “SYSTEM” with the
/ buttons
(3). Set it with the REPEAT ALARM/SELECT button (9).
3. Select the menu option “LANGUAGE” with the / but-
tons. Set it with the REPEAT ALARM/SELECT button.
4. Select the desired language with the / buttons. Set it
with the REPEAT ALARM/SELECT button.