Do you have a question about the AEG IAE84421FB and is the answer not in the manual?
Safety precautions for children and individuals with reduced physical, sensory or mental capabilities.
General safety guidelines and warnings for appliance usage and its intended purpose.
Instructions and warnings related to the installation process for qualified persons.
Guidelines and warnings for connecting the appliance to the electrical supply.
Instructions and warnings for operating the appliance safely.
Guidelines for maintaining and cleaning the appliance to prevent surface deterioration.
Information on how to get the appliance repaired by an authorised service centre.
Instructions for safely disposing of the appliance at the end of its life.
Preparatory steps and information required before installing the hob.
Specific instructions for installing built-in hob units into work surfaces.
Details on the correct cable type and replacement for electrical connection.
Guidance on assembling the hob, especially when installed under a hood.
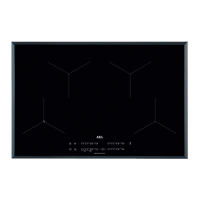
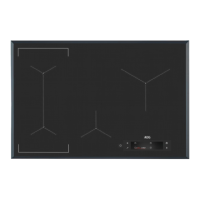
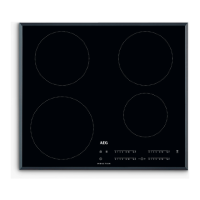
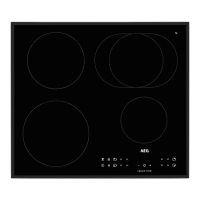
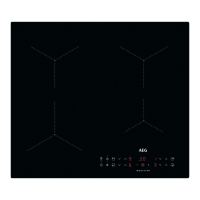
Diagram and explanation of the cooking zones on the hob surface.
Diagram and explanation of the control panel buttons and indicators.
Explanation of the different indicators for heat settings and functions.
Explanation of the residual heat indicator system for cooking zones.
Instructions on how to turn the hob on and off using the main control.
Explanation of the automatic deactivation features for safety and energy saving.
How to adjust and set the cooking zone's heat level using the control bar.
Description of the automatic boiling control function for water.
Guidance on placing cookware and using cooking zones efficiently.
Explanation of the function that links two left-side cooking zones.
How to use the function for faster heating to the desired setting.
Explanation of the function for increased power delivery to cooking zones.
Instructions for using the countdown and countup timers.
How to lock the control panel to prevent accidental changes.
How to activate and use the child lock feature to prevent accidental operation.
How to control the audible signals and sounds of the hob.
Explanation of how power is distributed across zones to manage consumption.
Details on the automatic hob-hood communication function.
Guidance on selecting and using appropriate cookware for induction hobs.
Explanation of normal operating noises and their causes.
Specific advice for optimizing the SenseBoil® function for best results.
Explanation of the eco-timer feature for energy saving during cooking.
Table showing heat settings, uses, time, and hints for various cooking applications.
Specific advice for using the Hob²Hood function effectively with the hood.
General advice on cleaning the hob after each use to maintain its surface.
Detailed instructions for removing different types of dirt and stains from the hob.
Common problems encountered and their immediate solutions.
Advice on what to do if problems persist or cannot be resolved by user.
Details found on the appliance's rating plate for identification.
Technical specifications for each cooking zone, including power and dimensions.
Regulatory information sheet regarding energy efficiency according to UK Ecodesign.
Tips and advice for saving energy while using the appliance.
This document is a user manual for an AEG IAE84421FB hob, providing instructions for its installation, daily use, maintenance, and troubleshooting.
The hob is designed for cooking purposes in an indoor environment, suitable for single household domestic use, and can also be used in offices, hotel guest rooms, bed & breakfast guest rooms, farm guest houses, and similar accommodations where usage levels do not exceed average domestic use. It features induction cooking zones that automatically adapt to the dimension of the cookware's bottom. The appliance has a control panel with sensor fields for operation, and displays, indicators, and sounds provide feedback on active functions.
The manual emphasizes safety, particularly regarding children and vulnerable people. Children aged 8 and above, and individuals with reduced physical, sensory, or mental capabilities, or lack of experience and knowledge, can use the appliance under supervision and after receiving instructions on safe use and understanding the hazards. Children under 8 and those with extensive disabilities should be continuously supervised. Packaging should be kept away from children and disposed of appropriately. The appliance and its accessible parts become hot during use, so children and pets should be kept away. If a child safety device is present, it should be activated. Cleaning and user maintenance by children require supervision.
General safety warnings include:
Installation must be performed by a qualified person. Before installation, the serial number from the rating plate (located on the bottom of the hob) should be noted. The hob must be assembled into correct built-in units and work surfaces that comply with standards. Minimum distances from other appliances and units must be maintained. Safety gloves and enclosed footwear should be worn when moving the heavy appliance. Cut surfaces should be sealed to prevent moisture. The bottom of the appliance must be protected from steam and moisture. The appliance should not be installed next to a door or under a window to prevent hot cookware from falling. Cooling fans are located on the bottom; if installed above a drawer, small items or paper that could obstruct the fans should not be stored there, and a minimum 2 cm distance between the appliance bottom and drawer contents should be maintained. Any separator panels in the cabinet below must be removed.
All electrical connections must be made by a qualified electrician, with the appliance disconnected from the power supply. Parameters on the rating plate must be compatible with the mains power supply. The appliance must be correctly installed, using the correct mains cable, ensuring it does not tangle, and that shock protection is installed. A strain relief clamp should be used on the cable. The mains cable or plug should not touch hot appliance parts or cookware. Multi-plug adapters and extension cables are prohibited. Damage to the mains plug or cable should be addressed by an Authorized Service Centre or electrician. Shock protection for live and insulated parts must be secured without tools. The mains plug should only be connected at the end of installation, ensuring accessibility. If the mains socket is loose, the plug should not be connected. The mains cable should not be pulled to disconnect the appliance; always pull the plug. Correct isolation devices (line protecting cut-outs, fuses, earth leakage trips, contactors) must be used, with an isolation device having a contact opening width of at least 3 mm. The appliance must be earthed.
The hob is activated or deactivated by touching the ON/OFF sensor field for 1 second. The hob features an Automatic Switch Off function that deactivates it if:
Heat settings are adjusted by touching or sliding a finger along the control bar.
This function automatically adjusts water temperature to prevent boiling over once it reaches the boiling point. It works best for boiling water and potatoes, but not with cast iron or non-stick cookware. Enamelled steel pots are recommended for best results. To use efficiently, fill the pot with cold tap water between half and three-quarters, leaving 4 cm from the rim, using 1-5 liters of water. The total weight of water (or water and potatoes) should be 1-5 kg. For potatoes, ensure they are completely covered but leave one-quarter of the pot empty. Cook only whole, unpeeled, medium-sized potatoes, not packed too tightly. External vibrations (e.g., from blenders or mobile phones) should be avoided. Salt should be added after the water boils. This function may not work properly for water kettles and espresso pots.
This function connects two left-side cooking zones to operate as one. It activates when a pot covers the centers of both zones and does not work with SenseBoil®. To activate, set the heat setting for one of the left zones, then touch the Bridge symbol. To deactivate, touch the Bridge symbol again; the zones then operate independently.
This function allows a desired heat setting to be reached faster by operating at the highest setting initially, then continuing at the selected setting. It can only be activated when the cooking zone is cold.
This function provides increased power to induction cooking zones for a limited time, after which the zone automatically reverts to its highest heat setting.
This function locks the control panel while cooking zones are active, preventing accidental changes to heat settings.
This function prevents accidental operation of the hob. To activate, activate the hob, do not set a heat setting, touch the Lock symbol for 4 seconds (L comes on), then deactivate the hob. To deactivate, activate the hob, do not set a heat setting, touch the Lock symbol for 4 seconds (L comes on), then deactivate the hob. To override for a single cooking time, activate the hob, L comes on, touch the Lock symbol for 4 seconds, and set the heat setting within 10 seconds. The hob can then be operated, but the function reactivates upon hob deactivation.
This function allows deactivating and activating the hob's sounds. To activate/deactivate, deactivate the hob, touch ON/OFF for 3 seconds (display comes on and goes out), touch the Lock symbol for 3 seconds (b0 or b1 comes on), then use the Timer + or - to select b0 (sounds off) or b1 (sounds on). Confirm by waiting for the hob to deactivate automatically. When set to b0, sounds are only heard when touching the ON/OFF symbol, Minute Minder counts down, Count Down Timer counts down, or something is placed on the control panel.
When multiple zones are active and consumed power exceeds the supply limit, this function distributes power among cooking zones. Each phase has a maximum electricity loading (3700 W). If a phase reaches its limit, the power of cooking zones will be automatically reduced. The last selected cooking zone is prioritized, and remaining power is divided among previously activated zones in reverse order of selection. Reduced zone displays will alternate between the initial and reduced heat settings. Users should wait for the display to stop flashing or manually reduce the heat setting of the last selected zone.
This advanced automatic function connects the hob to a special hood via infrared signals. The fan speed is automatically determined by the mode setting and the temperature of the hottest cookware. The fan can also be operated manually from the hob. For most hoods, the remote system is initially deactivated and must be activated before use. Refer to the hood user manual for more information.
Set the automatic mode to H1–H6 (hob is originally set to H5). The hood reacts to hob operation, recognizing cookware temperature and adjusting fan speed.
Touch the Hob²Hood symbol when the hob is active to deactivate automatic operation and manually adjust fan speed. Pressing the Hob²Hood symbol increases fan speed by one. Reaching an intensive level and pressing again sets fan speed to 0, deactivating the hood fan. To restart the fan at speed 1, touch the Hob²Hood symbol. To reactivate automatic operation, deactivate the hob and activate it again.
The hob can be set to activate the light automatically when the hob is activated by setting the automatic mode to H1–H6. The light on the hood deactivates 2 minutes after the hob is deactivated.
For induction cooking zones, a strong electromagnetic field rapidly creates heat in the cookware. Use suitable cookware with a thick, flat, clean, and dry base. To avoid scratches, do not slide or rub pots across the ceramic glass. Suitable materials include cast iron, steel, enamelled steel, stainless steel, and multi-layer bottom cookware with a correct manufacturer's marking. Unsuitable materials are aluminum, copper, brass, glass, ceramic, and porcelain. Cookware is suitable if water boils quickly on a zone set to the highest heat setting, or if a magnet sticks to its bottom. Induction cooking zones adapt to cookware dimensions automatically. Efficiency is related to cookware diameter; smaller diameters receive less power. Do not use cookware larger than specified in "Cooking zones specification." Avoid placing cookware near the control panel during cooking to prevent interference or accidental activation of hob functions.
Normal noises include:
The hob should be cleaned after each use. Always use cookware with a clean base. Scratches or dark stains do not affect hob operation. Use a special cleaner suitable for the hob surface and a special scraper for the glass.
The manual provides a troubleshooting guide for common issues:
| Hob type | Zone induction hob |
|---|---|
| Combi zone | Yes |
| Product color | Black |
| Hob width size | 80 cm |
| Top surface type | Glass |
| Appliance placement | Built-in |
| Cooking zone 1 boost | 3200 W |
| Cooking zone 1 power | 2300 W |
| Cooking zone 2 boost | 2500 W |
| Cooking zone 2 power | 1400 W |
| Cooking zone 4 boost | 3600 W |
| Cooking zone 1 diameter | 210 mm |
| Cooking zone 2 diameter | 145 mm |
| Cooking zone 3 diameter | 215 mm |
| Cooking zone 4 diameter | 240 mm |
| Number of cooking zones | 4 zone(s) |
| Number of gas cooking zones | 0 zone(s) |
| Control type | Touch |
| Built-in hood | No |
| Number of power levels | 15 |
| Depth | 520 mm |
|---|---|
| Width | 780 mm |
| Height | 23 mm |
| Cord length | 1500 m |
| Installation compartment depth | 490 mm |
| Installation compartment width | 750 mm |
| Installation compartment height | 28 mm |