EasyManua.ls Logo

Aegis ECS-180neo - User Manual

Aegis ECS-180neo
8 pages
Print Icon
To Next Page IconTo Next Page
Loading...
Operation and display panel
1.PRODUCT APPLICATION DESCRIPTION
ECS-180 neo temperature controller could be used in the middle and low
temperature medicine cabinet, kitchen cabinet, supermarket split cabinet, air
curtain cabinet, island counter, wine cabinet, etc.
The controller adopts building block design concept and users could select defrost,
fan, light/external alarm according to their demand.
The function of evaporator sensor, condenser sensor, door switch and buzzer is
optional.
Refrigeration relay output could reach to 30A/240VAC, which could directly drive single-
phase 1.5Hp compressor.
2. INDICATOR LIGHT STATUS DESCRIPTION
Indicator light Symbol Status Meaning
Setting Set
ON Parameter setting
OFF
Status of temperature
measuring and controlling
Refrigeration
ON Refrigeration work
Flash Refrigeration stop
Defrost
ON Refrigeration time delay
OFF Defrost work
Fan
ON Defrost stop
OFF Fan work
Defrost dripping drip
ON Fan stop
OFF Start defrost dripping
Dor switch
ON Cabinet door open
OFF Cabinet door close
3. PARAMETER LIST
Menu Functions Setting range Default Unit
Common user menu
St Temperature set value Upper limit ~ Lower Limit 4 °C °C/°F
Po Administrator menu Password 00 ~ 99
(password is 55 unmodied)
4 °C °C/°F
Administrator’s menu
C1 Hysteresis value 0.5 °C ~ 9 °C / 1 °F ~ 20 °F 4 °C °C/°F
C2 Compressor start Min. interval 0 ~ 60 5 min
C3 Compressor initial start Min.
interval
0 ~ 90 5 min
C4 Cabinet sensor calibration -10 °C ~ 10 °C / -20 °F ~ 20 °F 0.0 °C °C/°F
C5 Temperature set lower limit -50 °C ~ temperature set value -2 °C °C/°F
-58 °F ~ temperature set value
C6 Temperature set upper limit temperature set value ~ 85 °C 22 °C °C/°F
-temperature set value ~ 185 °F
C7 Max standby time after
nishing compressor start
Min. interval
00 ~ 99
0: Max.standby time
calculation is forbidden
9 min
C8 Refrigeration Min. running
time
00 ~ 99
0: Refrigeration Min. running
time calculation is forbiden
0 min
d1 Evaporator sensor selection 0: Disabled / 1: Enabled 1 -
d1 Evaporator sensor calibration -10 °C ~ 10 °C / -20 °F ~ 20 °F 0.0 °C °C/°F
Temperature Controller
ECS-180neo
USER MANUAL
1 Ivybrook Blvd, Unit 145R, Ivyland, PA 18974, USA
Tel: 1-800-796-2344 / Fax: 732 879 0248
WWW.AEGISFRIDGE.COM
Question and Answer IconNeed help?

Do you have a question about the Aegis ECS-180neo and is the answer not in the manual?

Summary

Product Application Description

Indicator Light Status

Indicator Light Functions

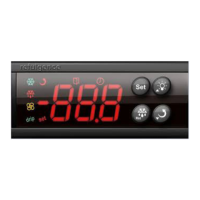
Describes the meaning of various indicator lights and their status.

Parameter List

Common User Menu Parameters

User-configurable settings for temperature and password.

Administrator Menu Parameters

Advanced settings requiring administrator access.

Key Functions and Operations

Key Roles and Navigation

Explains functions of Set, navigation, light, and data copy keys.

Menu and Parameter Adjustment Process

Guide to entering menus, selecting, adjusting, and saving parameters.

Internal Alarms and Safety Rules

Alarm Codes and Their Meanings

Lists internal alarm codes and their causes for troubleshooting.

General Safety Precautions

Covers electrical, environmental, and wiring safety guidelines.

Product Description

Component Overview

Lists key components of the refrigerator such as display, door switch, and shelves.

Operation Guide

Temperature Setting

Instructions on how to increase or decrease the set temperature.

Light Control

Details on how to turn the interior light on or off.

Maintenance and Troubleshooting

Cleaning Procedures

Guidelines for cleaning the appliance interior and exterior safely.

Fault Diagnosis Table

Table listing common faults, possible causes, and recommended actions.

Overview

The AEGIS ECS-180neo is a temperature controller designed for various refrigeration applications, including medicine cabinets, kitchen cabinets, supermarket split cabinets, air curtain cabinets, island counters, and wine cabinets. It features a building block design concept, allowing users to select defrost, fan, light, or external alarm functions based on their specific needs. The controller also offers optional functions for evaporator sensor, condenser sensor, door switch, and buzzer. A key technical specification is its refrigeration relay output, which can reach 30A/240VAC, enabling it to directly drive single-phase 1.5Hp compressors.

Indicator Light Status Description:

The device's front panel includes several indicator lights that provide visual feedback on its operational status:

  • Setting (Set):
    • ON: Parameter setting mode.
    • OFF: Temperature measuring and controlling status.
  • Refrigeration:
    • ON: Refrigeration work in progress.
    • Flash: Refrigeration stopped.
  • Defrost:
    • ON: Refrigeration time delay.
    • OFF: Defrost work in progress.
  • Fan:
    • ON: Defrost stopped.
    • OFF: Fan work in progress.
  • Defrost dripping (drip):
    • ON: Fan stopped.
    • OFF: Defrost dripping started.
  • Door switch:
    • ON: Cabinet door open.
    • OFF: Cabinet door closed.

Parameter List (Common User Menu):

  • St (Temperature set value): Adjustable from Upper limit to Lower Limit, with a default of 4°C. Unit can be °C/°F.
  • Po (Administrator menu Password): Range 00-99, with a default of 55 (unmodified). Unit can be °C/°F.

Parameter List (Administrator's Menu):

  • C1 (Hysteresis value): Range 0.5°C ~ 9°C / 1°F ~ 20°F, default 4°C. Unit can be °C/°F.
  • C2 (Compressor start Min. interval): Range 0-60, default 5 minutes.
  • C3 (Compressor initial start Min. interval): Range 0-90, default 5 minutes.
  • C4 (Cabinet sensor calibration): Range -10°C ~ 10°C / -20°F ~ 20°F, default 0.0°C. Unit can be °C/°F.
  • C5 (Temperature set lower limit): Range -50°C ~ temperature set value / -58°F ~ temperature set value, default -2°C. Unit can be °C/°F.
  • C6 (Temperature set upper limit): Range temperature set value ~ 85°C / -temperature set value ~ 185°F, default 22°C. Unit can be °C/°F.
  • C7 (Max standby time after finishing compressor start Min. interval): Range 00-99 (0: Max. standby time calculation is forbidden), default 9 minutes.
  • C8 (Refrigeration Min. running time): Range 00-99 (0: Refrigeration Min. running time calculation is forbidden), default 0 minutes.
  • d1 (Evaporator sensor selection): 0: Disabled / 1: Enabled, default 1.
  • d1 (Evaporator sensor calibration): Range -10°C ~ 10°C / -20°F ~ 20°F, default 0.0°C. Unit can be °C/°F.

Key Operation:

The device features several keys for navigation and setting adjustments:

  • Set Key:
    • Pressing for 3s: Enters parameter setting status.
    • Pressing: Switches between menu and parameter.
  • Up/Down Keys:
    • Pressing: Adjusts menu and parameters.
  • Light Key (only for models with light control):
    • Pressing: Opens/closes light.
  • Copy Card Upload Key:
    • Pressing for 3s: Uploads data to copy card.
  • Copy Card Download Key:
    • Pressing for 3s: Downloads data from copy card.
  • Evaporator Sensor Temperature View Key:
    • Pressing: Views evaporator sensor temperature.
  • Exit Parameter Setting Key:
    • Pressing: Exits from parameter setting.

Usage Features (Keys Operation):

  1. Entering User Menu: In the temperature measuring and controlling status, press the "Set" key for three seconds. The display will show "St." Press "Set" again to view the value of "St," which can be modified using the Up/Down keys.
  2. Entering Administrator Menu: When "St" is displayed, press the "Up" key to display "Po." Press "Set" to display "00." Use the Up/Down keys to input the administrator menu password.
  3. Confirming Password and Parameter Selection: Press "Set" again to confirm the password. The controller verifies the password. If correct, you can select parameter items (St, Po, C1, C2...U1) using the Up/Down keys. If incorrect, only "St" and "Po" will be available.
  4. Setting Item Values: Once a parameter item is selected, press "Set" to enter its setting. Use the Up/Down keys to modify the value, then press "Set" to return to the menu.
  5. Exiting Parameter Setting: In the parameter setting status, pressing any key or no key operation within 30 seconds will exit the setting and automatically save the current parameter value.

Internal Alarm Codes:

The device provides alarm codes to indicate potential issues:

  • E1: Cabinet temperature sensor failure.
  • E2: Evaporator sensor failure.
  • E3: Condenser sensor failure.
  • CH: Condenser high temperature alarm.
  • rH: Cabinet high temperature alarm.
  • rL: Cabinet low temperature alarm.
  • Er: Copy card programming failure.
  • EP: Inconsistent data between copy card and controller, programming failure.

Safety Rules:

  • Danger:
    • Strictly distinguish power wire, relay output, sensor down-lead, and data line. Do not overload the relay.
    • Prohibit connecting wire terminals without electricity cut-off.
  • Warning:
    • Do not use the unit in environments with excessive dampness, high temperature, strong electromagnetism interference, or strong corrosion.
    • The power supply must conform to the indicated voltage and maintain a steady supply.
    • To avoid interference, keep the sensor down-lead/data line and power wire at a proper distance.
    • If an evaporator sensor is installed, ensure it is well connected to the copper tube, 5cm away from the evaporator inlet.

Medical & Pharmacy Refrigerator (EL-RG-4M / EL-RG-4K) Specifics:

Installation:

  • Safety Information:
    • All electrical work must be performed by qualified persons.
    • Do not use for purposes other than a beverage/medical refrigerator.
    • Do not cover the front grille or block rear air entry.
    • Ensure adequate ventilation.
    • Do not probe openings or touch moving/hot parts.
    • Do not overload the power supply; check the rating label.
    • Consult a qualified electrician for problems; avoid extension leads or multiple adaptors.
    • Replace damaged mains supply cords with manufacturer-approved parts.
    • Disconnect mains power before cleaning or maintenance.
    • Do not store explosive substances.
    • Do not use mechanical devices to accelerate defrosting (defrosting is automatic).
    • Do not damage the refrigeration circuit.
    • Do not use electrical appliances inside the storage compartment.
  • Assembly:
    • Remove packaging and protective film.
    • Fit shelf support clips securely at the same height.
    • Position shelves carefully.
    • Dispose of waste packaging according to local recycling laws.
  • Positioning:
    • Position carefully to avoid bumping.
    • Power supply flex exits from the bottom right-hand side (front view); retrieve before final positioning.
    • Maximum recommended ambient temperature: 38°C.
    • Avoid direct sunlight or damp areas.
    • Allow adequate space for door(s) to open fully.
    • Ensure the unit is level for proper door sealing and evaporator tray drainage; adjust screw feet if necessary.
    • If the unit has not been stored or moved upright, let it stand upright for approximately 12 hours before operation.
  • Ventilation:
    • All models require clear, unobstructed ventilation from the entire front grille surface.
    • 2 and 3-door models can be built into an enclosure with front-only ventilation.
    • Single-door models require a minimum ventilation space of 20mm at the sides and rear.
    • Failure to provide minimum ventilation space can harm performance, cause fire, and invalidate the warranty.
    • Keep all ventilation openings clear of obstruction.
  • Power Supply:
    • Uses a three-pin plug that must be well grounded.
    • Do not ground through gas pipes, tap water pipes, or single-phase power supply grounded wire.
    • Do not share the circuit with other appliances.
    • Before plugging in, ensure the power cable is undamaged and voltage matches the serial plate.
    • Upon plugging in, the display shows the internal temperature, and the compressor will start after a delay.
    • If power is cut off, wait at least 5 minutes before plugging the unit back in to avoid compressor damage.

Product Description (EL-RG-4M / EL-RG-4K):

  • Front panel display
  • Remote alarm connector
  • Light switch
  • Door switch
  • Door
  • LED light
  • Shelves
  • Fan
  • Adjustable leg
  • Cable port

Operation (EL-RG-4M / EL-RG-4K):

  • Designed to operate at a recommended ambient temperature not more than 38°C.
  • Access to Power: Close the appliance door.
  • Setting Temperature:
    • Press "down" to decrease the set temperature.
    • Press "up" to increase the set temperature.
  • Turn on/off the light:
    • Light turns on when the door is opened and off when closed.
    • To turn on the light without opening the door, use the switch.

Cleaning (EL-RG-4M / EL-RG-4K):

  • WARNING: Disconnect the plug before cleaning or maintenance.
  • Do not use abrasive cleaning agents.
  • Wipe dry after cleaning.
  • Repairs must be carried out by an agent or qualified technician.
  • Clean the storage box with a soft cloth or sponge dipped in warm water (neutral detergent optional).
  • Do not spray or wash with water to avoid affecting electrical insulation.
  • Do not use hard brushes, wire brushes, detergents, gasoline, banana water, acetone, other organic solvents, hot water, acid, or alkali.

Out of Service (EL-RG-4M / EL-RG-4K):

  • If the storage box is out of service for a long time, cut off the power supply, clean it as described, and leave the door open to dry.
  • Generally, it's not necessary to stop using the storage box for a long time to avoid affecting its service life.

Maintenance (EL-RG-4M / EL-RG-4K):

Troubleshooting table for common faults:

  • Fault: The appliance is not working.
    • Possible Cause: Unit not plugged in correctly.
    • Action: Check if the unit is plugged in correctly.
    • Possible Cause: Plug or lead is damaged.
    • Action: Call agent or qualified technician.
    • Possible Cause: Power supply issue.
    • Action: Check power supply.
    • Possible Cause: Internal wiring fault.
    • Action: Call agent or qualified technician.
  • Fault: The appliance turns on, but the temperature is too high or too low.
    • Possible Cause: Filter or condenser blocked with dust.
    • Action: Clean filter or condenser.
    • Possible Cause: Doors not shut properly.
    • Action: Check doors are shut and seals are not damaged.
    • Possible Cause: Appliance located near a heat source or airflow to the condenser is interrupted.
    • Action: Move the appliance to a more suitable location.
    • Possible Cause: Ambient temperature is too high.
    • Action: Increase ventilation or move appliance to a Medical Refrigerator position.
    • Possible Cause: Insufficient airflow to the fans.
    • Action: Remove any blockages to the fans.
    • Possible Cause: Appliance is overloaded.
    • Action: Reduce the amount stored in the appliance.
    • Possible Cause: Factory default parameters adjusted.
    • Action: Call agent or qualified technician.
  • Fault: The LED lights not working.
    • Possible Cause: Led light short leaded damage.
    • Action: Call agent or qualified technician.
  • Fault: The appliance appears BT alarm.
    • Possible Cause: See description below.
    • Action: See description below.
  • Fault: The appliance is unusually loud.
    • Possible Cause: The appliance is touching a neighboring object.
    • Action: Check installation position and change if necessary.
    • Possible Cause: The appliance has not been installed in a level or stable position.
    • Action: Check installation position and change if necessary.

Disposal (EL-RG-4M / EL-RG-4K):

  • Consult your Local Authority, contact us, or contact the reseller for appliance disposal.
  • Discarded electric appliances are recyclable and should not be discarded in domestic waste. Support resource conservation and environmental protection by returning the appliance to collection centers (if available).

Aegis ECS-180neo Specifications

General IconGeneral
BrandAegis
ModelECS-180neo
CategoryTemperature Controller
LanguageEnglish