To perform the electrical installation for your Home Energy Meter (HEM), utilize the previous images to determine
the phase version of the HEM and to also illustrate the following steps 3 through 7.
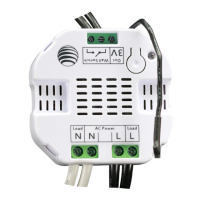
1. Turn off the home’s main electricity breaker and open the main circuit box panel.
2. Connect each clamp to the HEM using the clamp connector and screw them tight.
3. Clip the clamps of the HEM around the incoming electricity cables that connect to the main circuit breaker.
4. Connect AC Wire to the meter using the AC Wire Connector.
5. Insert the HEM’s neutral AC Wire into the main circuit breaker’s neutral bus terminal.
6. Insert the HEM’s live AC Wire into the main circuit breaker’s live terminal.
7. Replace the main circuit box panel.
8. Turn the main breaker back on.
It is now time to permanently affix the Home Energy Meter to a surface. Within each meter is a low-frequency radio
antenna that’s used for wireless communication. This must be taken into consideration when selecting a final
location for the meter. Thick concrete walls, metals, or motor devices will affect the signal strength of the controller
and the meter.
If the home’s circuit box is made of a metal, it is recommended that the Main Body of the meter be installed outside of
the circuit box. Placing the meter inside the circuit box could degrade the quality of the radio signal and negatively
impact its wireless range. To assist with such an installation, each meter is weatherized to the IP44 international
standard. This makes it resistant to rain and snow when installed vertically.
To place the Home Energy Meter (HEM):
1. Remove the backing plate from the back of the HEM.
2. Affix the plate to the selected wall space using the provided screws. The plate should be installed vertically and
aligned so that the wires of the HEM are at the bottom.
3. Attach the HEM to the backing plate.
Linking your meter to an existing Z-Wave network.
 Loading...