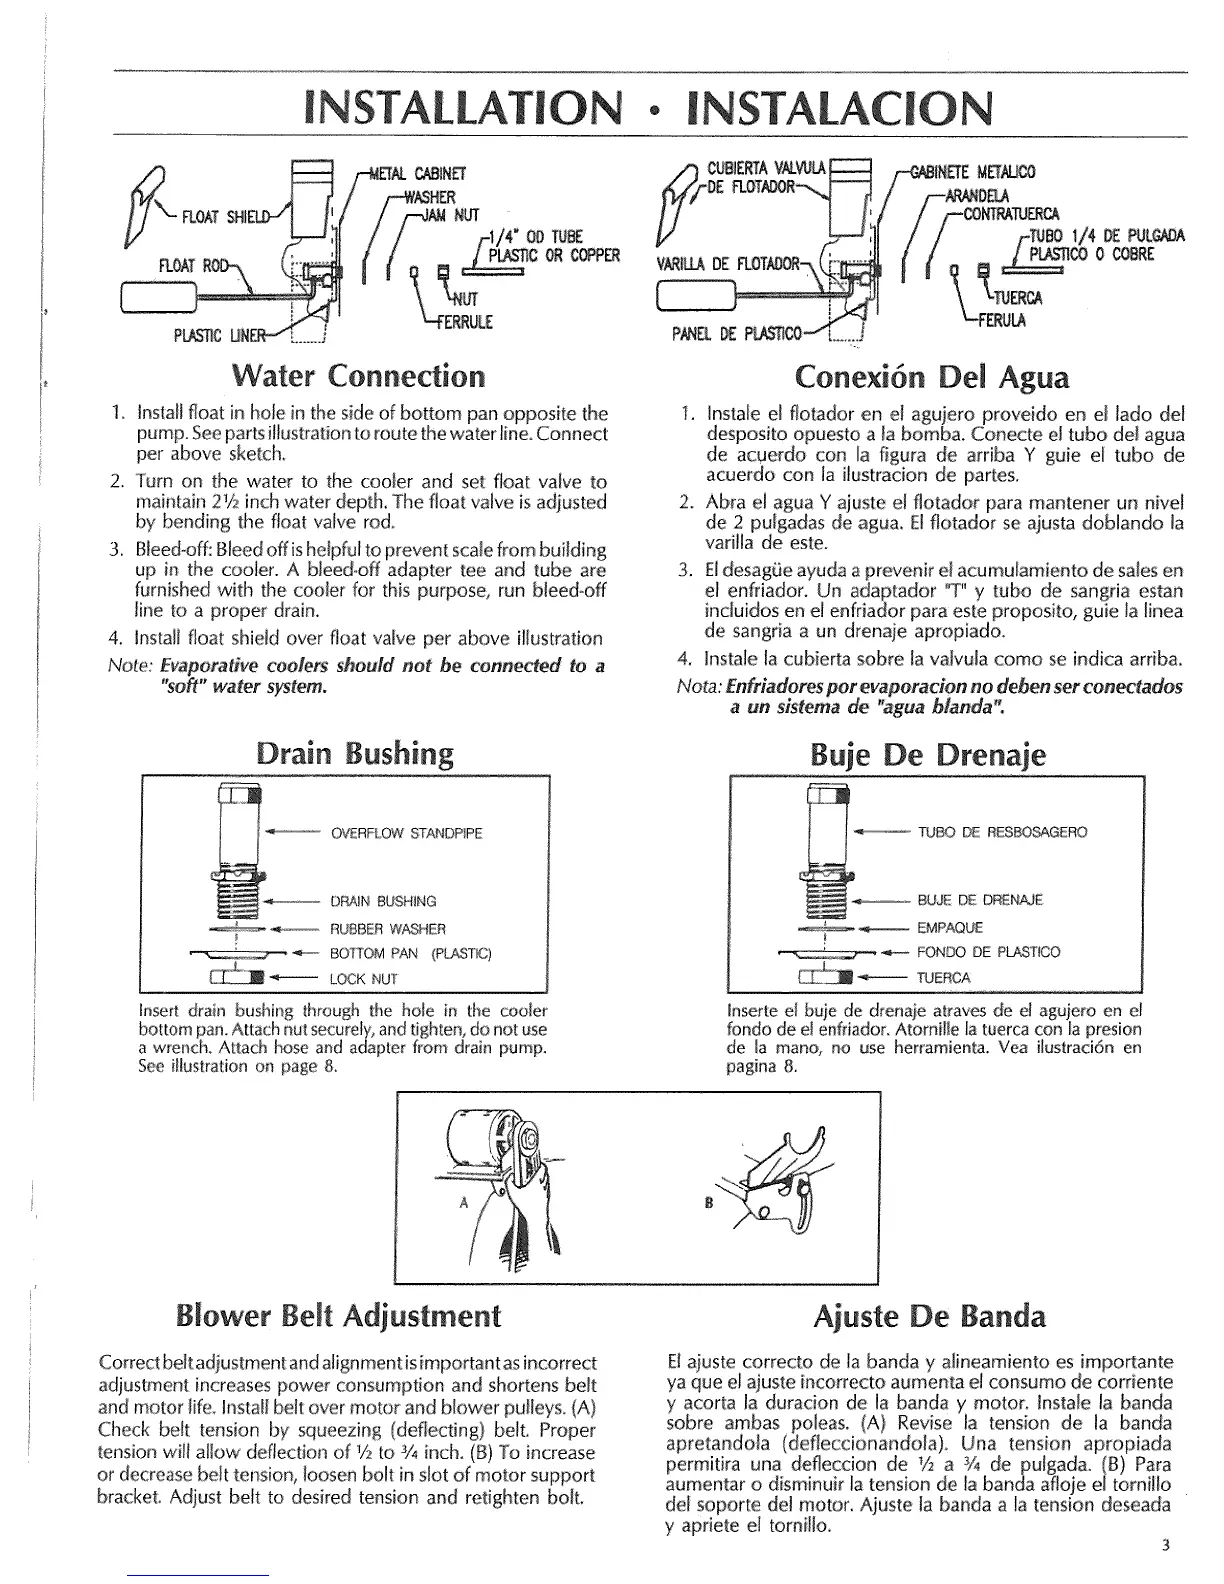
iNSTALLATION ° [NSTALAC[ON
Water Connection
i.Installfloatinhoieinthesideofbottom pan oppositethe
pump.SeepartsillustrationtOroutethewaterline.Connect
perabove sketch.
2.Turn on the watertothe coolerand setfloatvalveto
maintain21/_,inchwaterdepth.The floatvalveisadjusted
by bending the float valve rod,
3. B[eed-,off:Bleed off isheipful to prevent scalefrom building
up in the cooler. A bleed-off adapter tee and tube are
furnished with the cooler for this purpose, run bleedooff
line to a proper drain,
4. h_stallfloat shield over float valve per above illustration
Note: Evaporative coolers should not he connected to a
"so_" water system.
Drain Bushing
OVERFLOW STANDPIPE
DRA_N BUSHING
/ .........._ ...... RUBBER WASHER
"-'__ _,,_,.,. BOTTOM PAN (P]_STJC)
_"""_ LOCK NUT
Insert drain bushing through the hole in the cooler
bottompan,Attachnut securely,andtighten,do not use
a wrench,Attach hoseand adapterfrom drain pump.
See illustration on page 8,
Conexi6n De[ Agua
_. Instate el flotador en el agujero proveido en el [ado de[
desposito opuesto a la bomba, Conecte e! tubo del agua
de acuerdo con la figura de arriba Y guie el tubo de
acuerdo con la i_ustracion de partes,
2, Abra el agua Y ajuste el flotador para mantener un nive[
de 2: pu[gadas de agua, £1flotador se ajusta doblando [a
variila de este.
3. E[desagOeayuda a prevenir el acumutamiento de sales en
el enfriador. Un adaptador _'T"y tubo de sangria estan
induidos en el enfriador para este proposito, guie ta [inea
de sangria a un drenaie apropiado,
4, lnstale la cubierta sobre la vaivula como se indica ardba,
Nota: Eniriadores per eiVapOr_CiOnno,deben set cenec[ados
a un slstemade agua blanda,
Buje De Drena e
Z TU_ DE RESBOSAGERO
BUJE DE DRENAJE
--_' _ EMPAOUE
FC_DO DE PLASTtGO
_Z_ _ TUEBCA
de [a mano, no use herramien_. Yea ilustraci6n en
pagina 8.
[}lower Belt Adiustment
Correct belt adiustment and alignment isimportant as incorrect
adiustment increases power consumption and shortens belt
and motor life. hsta[t belt over motor and blower pulleys, (A)
Check belt tension by squeezing (deflecting)belt, Proper
tension wiii allow deflection of ]/_ to 3/1inch. (B) To increase
or decrease be[t tension, loosen bolt in slot of motor support
bracket. Adjust belt to desired tension and retighten bolt,
Ajuste De Banda
El ajuste correcto de Ia banda y alineamiento es importante
ya que el aiuste incorrecto aumenta el consumo de corriente
y acorta la duration de la banda y motor. [nstale [a banda
sobre ambas poleas, (A} Revise la tension de [a banda
apretando[a (defleccionandola), Una tension apropiada
permitira, una defleccion de V2 a % de putgada. (B) Para
aumentar o disminuir la tension de la banda afloje el tornillo
dei soporte de[ motor. Ajuste la banda a la tension deseada
y apriete el torniHo,
3
 Loading...