Grow Anything Kit Instructions
While the AeroGarden provides an ideal environment for growing
plants, there are many decisions you need to make that will impact the
success of your garden. This Guide will assist you in deciding what to
plant and how to plant it, as well as advice on starting cuttings and basic
plant care in the AeroGarden.
NOTE: AeroGarden pre-seeded kits give you the benefit of our years of
research and selecting seeds that grow well in AeroGardens with good
germination and appropriate plant height. Planting an AeroGarden with
your own seeds or cuttings can be a bit of an experiment. We hope your
efforts will be successful and you enjoy the discovery process.
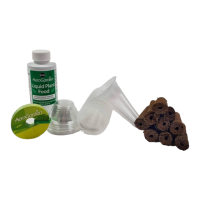
What’s Inside:
1. Sponges 2. Nutrient Packs
3. Split-Apart Baskets 4. Domes
1
2
3
4
The Grow Anything/Master Gardener kit let’s you plant your own seeds or root cuttings in an AeroGarden.
You can choose what you grow; you can experiment with tomato varieties, propagate houseplants or
explore the colorful world of flowers. Each kit includes the supplies needed to plant and grow one to
three custom gardens.
Selecting Seeds
Here are a few guidelines you can use when choosing the plants you
would like to grow in your AeroGarden:
•ThemaximumheightofthestandardAeroGarden Lamp Hood is 12”
from the Grow Surface and it is 24” for Deluxe, PRO200 and AeroGarden6
Elite+ models. Try plants that will not grow taller than this – or to choose
plants that can be easily pruned to stay within this height restriction,
such as basil.
•Plantsthatrequireverydryconditionsandhaveverylowwater
requirements,suchascactusandsucculents,maynotthriveinan
AeroGarden.
•Tuberousplants,orrootcropssuchascarrots,beets,potatoesor
peanuts should not be planted in an AeroGarden.
TIPS
•DwarforminiaturevarietiesoftenworkverywellintheAeroGarden.
•PlantsthatneedlesslightcanthriveinAeroGardensifthelighthoodis
kept on higher settings and well above the plants.
Planting your Garden
•AssembleSplit-Apart Baskets.
•Writethenameofseedsorplant
cutting on Label(s) with permanent
marker.
•Preheatirontoamoderate
temperature (between silk and
cotton settings on most irons, 300°-
400°F). Do not use steam.
•PlacePod Label on top of Split-Apart
Basket. Iron for a total of 10 seconds.
WARNING: Burns can occur from
touching hot metal parts, hot water or
steam. Extreme caution should be used near Children. Never leave iron
turned on or unattended, especially when children are present.
Seeds
1. Insert your seeds (seeds not included) in the Opening in the Grow
Spongeusingngertipsortweezers.PlantseveralseedsperGrow
Sponge.
2. Insert Grow Sponge into Split-Apart Basket.
3. Insert Grow Pods into Grow Surface Openings.
4. PlaceaDome on each Grow Pod.
5. Add cool tap water or purified water to the Bowl to the “Fill to Here”
indicator.Donotusewellorsoftenedwater.TheAeroGardenhasalow
water level indicator, but we encourage you to check the water level
frequentlyandkeeptheBowl full.
6. Add one nutrient pack, and press the “Reset” (hit “Select” instead on
3-Podmodels)button.
7. Make sure that the Lamp Hood is at the lowest setting on the Lamp
Arm.
8. Ifyourgardenhasa“PlantSelect”feature,setittothecorrectplant
type.
TIPS
•All Grow Surface Openings should contain a Grow Pod or be covered either
with an AeroGrow Plant Spacer or by a moisture-tolerant covering (e.g.,
plastic milk jug cap, poker chip or aluminum foil.)
Assembling Split-Apart Basket.
Continued on next page.
Whether this is the
first or fifth garden
you are planting in
your AeroGarden,
you will need to
reference your
Quick Start Guide.
If you have planted
a garden in your
AeroGarden prior
to this one, please
refer to “Replanting
Your AeroGarden” in
the Quick Start Guide
before you proceed.
If you no longer have your model’s Quick Start Guide, you can obtain the
latest version at www.aerogardensupport.com