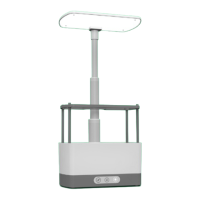
To raise and lower the Light Hood, wrap one hand around the bottom
of the Light Post just above the Grow Deck. Grasp the upper part of
the Light Post with your other hand and push up to raise the Light
Hood or push down to lower
the Light Hood. The Light Post
will move up or down a notch
at a time with a little pressure,
or you can move it up or down
several notches at a time with
more pressure.
When planting a new Seed
Pod Kit, the Light Hood should
be set to the lowest possible
position. For instructions and
tips about when to raise (or
not to raise) the Light Hood,
refer to Gardening Tips (on ip
side) and/or to Seed Pod Kit
Instruction booklet included in
each seed kit.
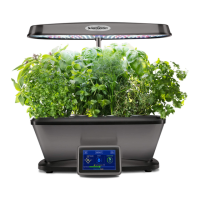
LIGHT
On/O
Press & Release to Temporarily
Turn Light On/O
Reset Nutrient Timer
When Nutrient Light is On,
Press & Hold
2 seconds
Sprout
-
Fill To Here
-
Add Water
Add Nutrient
LIGHT
On/O
Press & Release to Temporarily
Turn Light On/O
Reset Nutrient Timer
When Nutrient Light is On,
Press & Hold
2 seconds
Sprout
For more details on planting, growing and
harvesting your AeroGarden, please turn the page
➠
CFL Hood & Base
(Compact Fluorescent Light)
(not included with LED model)
Seed Pod Kit
Included in Package
Push CFL Grow Light straight into
socket inside Light Hood
DO NOT
TWIST
LIGHT!
Light Hood
(bottom view)
CONGRATULATIONS!
Your garden is ready to grow.
It really is that easy!
Check to be sure that Bowl
is securely seated on
Air Coupling in Base.
} Order replacement Grow Light, extra Seed Pod Kits and Accessories at www.aerogarden.com
Air
Coupling
2 Easy Steps
To Get Your AeroGarden Up and Growing
Place Your Garden...
• On a sturdy, water-tolerant surface
• Under a space that allows 16" (41cm) clearance
for the full height of raised Light Hood
• Near a standard electrical outlet, per local
regulations
• In a 65-76°F (16-26°C) environment (optimal)
• Away from reach of children or pets
• Away from direct sources of heat (e.g., stove,
furnace vents) or cold (e.g., window drafts, A/C vents)
• AeroGardens do not need additional light or a
sunny window. In fact, too much direct sunlight
can overheat your plants.
Light Post
Light Post
Note: Do not place beneath
under-cabinet lights.
Bowl & Grow Deck
Push up to raise
Light Hood,
push down to
lower Light Hood.
LED Hood & Base
(Light Emitting Diode)
- Front View -- Side View -
On/O
Press & Release to Temporarily
Turn Light On/O
Reset Nutrient Timer
When Nutrient Light is On,
Press & Hold 2 seconds
Set Bowl
into Base
1
2
Bowl
Base
Light Hood
CFL Grow Light
Grow Deck
Water Port Cover
View
Window
Quick Setup Guide
Simple Steps to Get Your AeroGarden Up and Growing (No tools required)
Keep this Guide!
Welcome to the world of
indoor gardening!
AeroGarden Sprout Model numbers: 100303-BLK/WHT/BLU/RD2/TEL Electrical Rating: 120V~60Hz, 0.45A
AeroGarden Sprout LED Model numbers: 100304-BLK/WHT/RED/TEL Electrical Rating: 120V~60Hz, 0.14A
Date Code
(Dependent on model)
Or
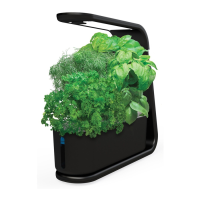
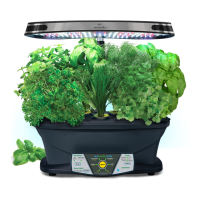
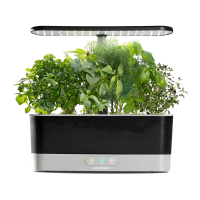
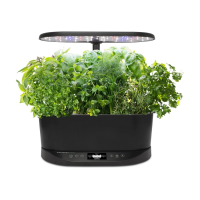
AeroGarden Sprout
AeroGarden
Sprout LED
Install CFL Grow Light into Light Hood
(If you have LED Grow Light,
skip this step)
(If you have LED Grow Light,
CFL Grow Light is not needed)
On/O
Press & Release to Temporarily
Turn Light On/O
Reset Nutrient Timer
When Nutrient Light is On,
Press & Hold 2 seconds
Sprout
Sprout
Sprout
How to Raise and Lower
the Light Hood
On/O
Press & Release to Temporarily
Turn Light On/O
Reset Nutrient Timer
When Nutrient Light is On,
Press & Hold 2 seconds
Sprout
When using this AeroGarden electrical furnishing, basic precautions should always be followed, including the following:
Read all instructions before using this AeroGarden furnishing.
1. To reduce the risk of electric shock, the AeroGarden has a specific plug.
Do not change the plug in any way.
DANGER
– to reduce risk of electric shock:
2. Always unplug the AeroGarden from electrical outlet before cleaning or
changing Grow Lights (light bulbs).
WARNING
– to reduce risk of burns, re,
electric shock, or injury to persons:
3. Unplug AeroGarden from outlet before putting on or taking off parts.
4. Close supervision is necessary when an AeroGarden is used by or near
children, invalids, or disabled persons.
5. Use AeroGarden only for its intended use as described in the instructions. Do
not use attachments not recommended by manufacturer.
6. Never operate AeroGarden if it has a damaged cord or plug, if it is not
working properly, if it has been dropped and damaged, or if it has been
dropped in water. If any of these conditions occur/exist, contact www.
AeroGardenSupport.com or your country’s local distributor for instructions.
7. Keep cord away from heated surfaces.
8. Never operate furnishing with air openings blocked. Keep air openings free
of lint, hair, and the like.
9. Never drop or insert any object into any electrical openings.
10. Do not use outdoors.
11. Do not operate where aerosol (spray) products are being used or where
oxygen is being administered.
12. Do not touch moving parts or hot parts such as pumps, lights, reflective
surfaces, and the like.
13. To disconnect, remove plug from outlet.
14. Do not place or submerge base, cord, plug, or Light Hood in water or other
liquid to clean it.
15. Do not allow water to contact hot Grow Lights.
16. Use only approved and supplied parts and accessories. Use only AeroGarden
Grow Lights with this AeroGarden model. Use of any other kind of accessory
is not recommended. Replacement parts can be ordered from www.
AeroGarden.com
17. Do not use AeroGarden for other than intended purpose.
18. This product is intended for household and residential use only. This product
is not approved for commercial applications.
19. If supply cord is damaged, it must be replaced by manufacturer, its service
agent, or similarly qualified technician in order to avoid a hazard.
20. Electrical wiring must be in accordance with local regulations.
21. This appliance is not intended for use by persons (including children) with
reduced physical, sensory or mental capabilities, or lack of experience
and knowledge, unless they have been given supervision or instruction
concerning use of appliance by a person responsible for their safety.
22. Children should be supervised to ensure they do not play with the appliance.
IMPORTANT SAFETY INSTRUCTIONS
SAVE THESE INSTRUCTIONS
CFL Grow Light
Model #100340
Warning: Changes or modifications to this unit not expressly approved by the party responsible for compliance could void the user’s authority to operate the equipment.
Note: This equipment has been tested and found to comply with the limits for a Class B digital device, pursuant to Part 15 of the FCC Rules. These limits are designed to
provide reasonable protection against harmful interference in a residential installation. This equipment generates, uses and can radiate radio frequency energy and, if not
installed and used in accordance with the instructions, may cause harmful interference to radio communications. However, there is no guarantee that interference will not
occur in a particular installation. If this equipment does cause harmful interference to radio or television reception, which can be determined by turning the equipment off
and on, the user is encouraged to try to correct the interference by one or more of the following measures:
—Reorient or relocate the receiving antenna. —Connect the equipment into an outlet on a circuit different from that to which the receiver is connected.
—Increase the separation between the equipment and receiver. —Consult the dealer or an experienced radio/TV technician for help.
LED
&