This document is a user and installation manual for the Aerpro FP9750 install kit, designed for Ford Falcon BA-BF and Territory SX-SY vehicles. The kit facilitates the installation of an aftermarket double DIN head unit, integrating it with the vehicle's existing HVAC (heating, ventilation, and air conditioning) and steering wheel controls.
Function Description:
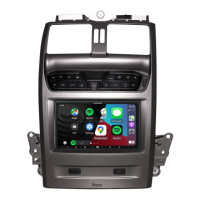
The Aerpro FP9750 install kit serves as an interface for upgrading the vehicle's infotainment system. It includes a double DIN fascia kit that replaces the factory head unit and climate control panel, a built-in HVAC and steering wheel control unit, and the necessary wiring harnesses and mounting hardware. The kit allows the user to retain control over essential vehicle functions such as temperature, fan speed, air circulation, demister functions, and steering wheel audio controls, all through the new integrated panel. It also provides passthrough for USB and reverse camera inputs, depending on the aftermarket head unit's capabilities.
Important Technical Specifications:
- Compatibility: Specifically designed for Ford Falcon BA-BF and Territory SX-SY models.
- Head Unit Type: Supports double DIN aftermarket head units.
- Included Components:
- 1 x Double DIN fascia kit
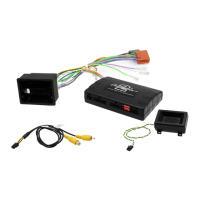
- 1 x Built-in HVAC and steering wheel control unit
- 1 x Main wiring harness
- 1 x Universal SWC (Steering Wheel Control) patch lead
- 1 x Video in/out lead
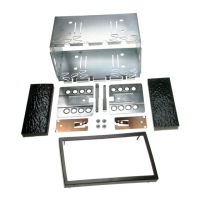
- 1 x Mounting kit
- 4 x M6 Bolts
- 1 x User/Install manual
- USB Passthrough: Integrated USB passthrough (head unit dependent).
- Reverse Camera Input: Supports reverse camera connection (head unit dependent).
- OEM Reverse Sensor Retention (Optional): Compatible with Aerpro AP1WAMP amplifier module and CBXS extension speaker (sold separately) for retaining OEM reverse sensor alerts.
- SWC Patch Harness Configuration: Configurable for various head unit brands including Alpine, Clarion, Pioneer, Sony, Philips, Nakamichi, Kenwood, JVC, and Zenec, using either a 3.5mm jack or bullet terminals for self-learn head units. DIP switches on the Infoadapter module allow for specific brand and camera settings.
Usage Features:
The integrated HVAC and steering wheel control unit provides a comprehensive set of controls:
- Temperature Control: Separate UP/DOWN buttons for passenger and driver sides (front & rear) to adjust heating and cooling temperature.
- Interior Light: Button to turn the vehicle's factory interior light on or off.
- Traction Control: Button to turn the vehicle's traction control on or off (works on supported models prior to upgrade).
- Auto Door Lock: Button to lock and unlock all doors.
- System Menu: Accesses the configuration menu for various settings.
- Rear Demister: Clears condensation from the rear back glass.
- Front Demister: Blows fresh air over the interior surface of the windshield.
- Air Circulation: Toggles between fresh air from outside or recirculation from inside the cabin.
- Auto Climate Control (Dual Zone): Automatically controls climate to a specified temperature (Dual Zone models only).
- Fan Speed Adjustment: UP/DOWN buttons for fan speed and menu navigation.
- Trip Computer: Displays average speed, average fuel use, trip time, and remaining fuel in kilometers. Can be reset by pressing and holding the button (Dual Zone models only, when not in climate control display or settings menu).
- Air Conditioner ON/OFF: Toggles the A/C. Holding down the A/C button completely turns off the heating and cooling system on Dual Zone models.
- Mode: Changes vent positions for heating and cooling.
- Temperature Sensor: Integrated sensor for climate control.
- Infodapter Settings:
- Retained Accessory Power: Controls head unit power behavior after ignition off (On/Off).
- Climate Screen Timeout: Adjusts the time before the Infoadapter screen returns to the head unit screen.
- A/C Panel Brightness: Adjusts the brightness of the LED backlight for climate control buttons.
- Restore Factory Settings: Resets all settings to default.
- Installer Menu (Accessed by holding Fan UP/DOWN buttons in configuration menu):
- Air Con Type: Selects between single or dual climate system (auto-corrects Invert AC Button setting).
- Screen Size / Position: Adjusts Infoadapter screen to fit the head unit display (Menu Position, Horizontal Size/Position, Vertical Size/Position).
- Camera Connected: Turns reverse camera function On or Off.
- Invert AC Button: Inverts the AC toggle if cold air is felt when AC is off.
- Diagnostics: Displays system information (MCU, Filesys, Stalkin, SWC, Temp, Air, A/C, CAN msg, Power, Acc, Park, Park Brake, Reverse Gear, Illumination, Radio).
Installation Features:
- Tools Needed: Panel remover, Phillips head screwdriver, 8mm ratchet, side cutters, small pick, cable ties, electrical tape.
- Disassembly Steps: Detailed instructions for removing the gear shift trim, side panels, tissue box and power socket, top panel trim, factory head unit face plate, factory head unit, FOB transceiver module, and vent from the factory fascia.
- Assembly Steps: Instructions for re-attaching the factory vent to the new fascia, mounting the FOB transceiver module, mounting the Body Control Module (BCM) with correct bracket orientation, mounting the aftermarket head unit (leaving screws loose for depth adjustment), connecting USB passthrough and reverse camera, connecting steering wheel controls (brand-specific patch lead required), connecting antenna (aerial extender may be needed), and installing the fascia kit.
- Important Notes:
- Do not use power tools during installation to avoid damaging the fascia kit.
- Ensure the BCM retaining bracket is fitted correctly to prevent interference and ensure plugs reach.
- Connect brand-specific or correctly modified universal patch lead to the module before powering up.
- Mechless head units (no CD/DVD player) are recommended due to limited depth.
- Climate control buttons, door lock, and in-cabin light functions require ignition power.
- Trip button only works when not in climate control display or settings menu.
- Auto function for climate control only works on Dual Zone models.
- With A/C on and fan speed at zero, a small amount of cold air may still be pushed through vents.
- Age and sun damage can make the top panel brittle, requiring careful removal.
- Steering wheel controls must be working in the vehicle previously to work with the control harnesses.
Maintenance Features:
- Firmware Updates: The manual advises checking the Aerpro website (aerpro.com) for the latest manuals and updates, suggesting that firmware updates for the Infoadapter module might be available.
- Factory Reset: The "Restore factory settings" option in the configuration menu allows users to reset all settings to default. Additionally, DIP switch #3 can be used to reset display settings if they become unmanageable.
- Diagnostics: The "Diagnostics" menu provides detailed system information, which can be useful for troubleshooting or verifying proper operation after installation.