Do you have a question about the AGame Paradise Peak WP-641 and is the answer not in the manual?
Specifies age range (3-10), weight limits, and mandatory adult supervision for safe play.
Details the need for level ground, obstacle-free zones, and recommended shock-absorbing surfacing materials.
Emphasizes periodic checks for wear, loose parts, and overall integrity to ensure safety.
Covers essential safety rules before assembly and use, including adult assembly requirement.
Guidelines for selecting a safe play location, ensuring adequate clearance from hazards.
Advice on safe usage during play, including weather conditions and avoiding entanglement hazards.
Details recommended surfacing materials, depths, and fall height protection for playground safety.
Best practices for choosing a location and implementing suitable protective surfacing for injury prevention.
Comprehensive checklist for inspecting hardware, wooden parts, ropes, seats, and metallic components for safety.
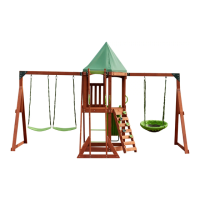
Visual representations of the swing set from the front and back for overall understanding.
Lists all necessary tools for assembly, distinguishing between included and not-included items.
Visual catalog of all wooden components with their respective part numbers and quantities.
Visual catalog of all hardware components with part numbers, sizes, and quantities.
Visual catalog of other essential components like seats, chains, and special fittings.
Connects initial structural components using specified hardware.
Assembles the main A-frame structure using specific parts and hardware.
Continues building the frame structure with additional wooden components.
Attaches horizontal support beams to the main frame structure.
Connects lower frame supports to the main structure.
Installs diagonal bracing and support members for stability.
Adds upper structural elements and supports for the play fort.
Assembles the base structure for the play fort floor.
Attaches the climbing ladder to the play fort structure.
Secures internal bracing and supports for the play fort.
Installs various floor boards and wall panels for the play fort.
Attaches floor supports and crossbeams within the play fort.
Installs vertical support posts and floor components.
Adds internal supports for the play fort deck.
Secures vertical support posts for the play fort.
Installs upper frame supports and bracing.
Attaches outer wall panels to the play fort structure.
Assembles the base for the flying saucer swing.
Connects supports and bracing for the flying saucer attachment.
Attaches swing supports and connection points to the main structure.
Assembles a triangular support frame for the swings.
Connects beams and swing supports using rivets and hardware.
Assembles the flying saucer component using tubes and chains.
Attaches swing supports to the main frame structure.
Secures accessory components to the main frame.
Attaches swing supports and connection points.
Attaches the swing seats to the suspension chains.
Mounts the slide onto the play fort structure.
Secures roof support beams to the play fort.
Installs the play fort roof structure.
Installs anchoring stakes for overall stability.
Provides tips on checking for wasp nests and applying water sealant for longevity.
Details the one-year limited warranty, exclusions, and responsibilities for the original purchaser.