EasyManua.ls Logo

AIC 11101 - User Manual

AIC 11101
2 pages
Print Icon
To Next Page IconTo Next Page
Loading...
Imported by:
AIC International - 44980 Ste Luce sur Loire - France
ENG Ephemeris Multi-language DST Calendar Clock #11101
This digital clock has great readability thanks to its yellow-orange LEDs with the date and
month displayed in words.
Characteristics:
- DST: automatic summer/winter time change thanks to its internal processor (the
last Sunday in March and last Sunday in October every year).
- Choice of 5 languages for the display of the month and day: French, English,
German, Dutch and Spanish
- Excellent readability thanks to its large characters and contrasting display of
yellow-orange LEDs against a black background
- Light intensity decreases from 10pm to 7am
- Easy to set with 3 buttons at the back of the clock
- Time and date figures are 3.8 cm high
- Month and day: 2 cm high,
- Power supply: Runs on 220V (adaptor supplied)
- Internal battery to memorise data, in the event of a power cut in particular
(CR2032 with a 4/5-year lifetime)
- Dimensions: 28*4.2*28 cm (approx.)
Setting up the clock for use:
Carefully remove the clock from its packaging.
Plug the adaptor into the clock (at the back of the clock in the bottom right hand corner)
and then into your electric socket.
Settings:
By default, due to the internal battery supplied, your clock will have retained the
manufacturer’s data: it will normally display the correct time and date.
In normal display mode, hold down button A (situated at the back of the clock):
- The hours flash: press B or C to set the hour and then A to
confirm the setting.
- The minutes flash: press B or C to set the minutes and then
A to confirm the setting.
- The year flashes: press button B or C to set the year. Press
button A again to validate the setting.
- The month flashes: press button B or C to set the month.
Press button A again to validate the setting.
Display of the Day
Display of the Date
Display of the Month
Display of the time and
year when setting
Buttons located at the back:
A
B
C
A: button to set the calendar
and time
B: +- button to scroll through setting
in ascending order
Activation / deactivation
of DST Mode
Display of the Year
Question and Answer IconNeed help?

Do you have a question about the AIC 11101 and is the answer not in the manual?

Overview

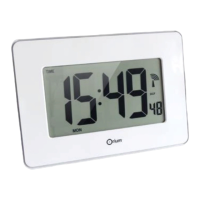
This document describes the Ephemeris Multi-language DST Calendar Clock #11101, a digital clock designed for clear readability with yellow-orange LED displays.

Function Description

The Ephemeris Multi-language DST Calendar Clock #11101 is a digital clock that displays the time, date (day, date, month, and year), and automatically adjusts for Daylight Saving Time (DST). Its primary function is to provide an easy-to-read display of essential time and date information in multiple languages.

Key Features:

  • Automatic DST Adjustment: The clock features an internal processor that automatically handles summer/winter time changes. This occurs on the last Sunday in March for summer time and the last Sunday in October for winter time, every year.
  • Multi-language Support: Users can select from five languages for the display of the month and day: French, English, German, Dutch, and Spanish.
  • High Readability: The clock boasts excellent readability due to its large, contrasting yellow-orange LED characters against a black background.
  • Adjustable Light Intensity: The light intensity of the display automatically decreases from 10 PM to 7 AM, making it less disruptive during nighttime hours.
  • Memory Function: An internal CR2032 button battery (with a 4/5-year lifetime) is included to memorize data, such as settings and time, in the event of a power cut. This ensures that the clock retains its settings even without continuous power.
  • Manual DST Override: Users have the option to activate or deactivate the automatic DST function. If deactivated, summer and winter time adjustments will need to be made manually, which is useful for regions that do not observe DST.

Important Technical Specifications

  • Display Type: Yellow-orange LEDs against a black background.
  • Character Height:
    • Time and date figures: 3.8 cm
    • Month and day: 2 cm
  • Power Supply: Runs on 220V (adaptor supplied).
  • Backup Battery: CR2032 button battery (estimated 4-5 year lifetime).
  • Dimensions: Approximately 28 cm (width) x 4.2 cm (depth) x 28 cm (height).
  • Languages Supported: French, English, German, Spanish, Dutch.

Usage Features

The clock is designed for ease of use with a straightforward setup and adjustment process.

Initial Setup:

  1. Carefully remove the clock from its packaging.
  2. Plug the supplied adaptor into the clock (located at the bottom right-hand corner of the back) and then into an electrical socket.
  3. By default, the clock should display the correct time and date, as it retains manufacturer's data via the internal battery.

Setting the Clock (Normal Display Mode): The clock is set using three buttons (A, B, C) located at the back.

  • Button A: Used to set the calendar and time, and to confirm settings.
  • Button B (+-): Used to scroll through settings in ascending order.
  • Button C (+-): Used to scroll through settings in descending order.

To enter setting mode, hold down Button A. The display will then guide you through the following steps:

  1. Set Hours: The hours will flash. Use Button B or C to adjust the hour, then press Button A to confirm.
  2. Set Minutes: The minutes will flash. Use Button B or C to adjust the minutes, then press Button A to confirm.
  3. Set Year: The year will flash. Use Button B or C to adjust the year, then press Button A to confirm.
  4. Set Month: The month will flash. Use Button B or C to adjust the month, then press Button A to confirm.
  5. Set Date: The date will flash. Use Button B or C to adjust the date, then press Button A to confirm.
  6. Set Language: The language will flash. Use Button B or C to select the desired language (French, English, German, Spanish, Dutch), then press Button A to confirm.

Note: Once the year, month, and date are set, the day of the week is automatically determined. If the day is incorrect, it indicates an incorrect year setting, and the adjustment process should be repeated from step 3. If no action is taken for 30 seconds during setting, the clock will revert to displaying the time.

Activating/Deactivating DST Mode:

  1. To activate or deactivate DST, hold down Button B for at least 3 seconds.
  2. Validate your choice by pressing Button B again.
  3. When DST is activated, a luminous yellow-orange dot will appear next to the time. If deactivated, this dot will disappear, and manual time adjustments will be necessary for summer/winter time changes.

Maintenance Features

Replacing the Battery: The clock includes a CR2032 button battery for data memory during power outages. This battery has an estimated life of 4 to 5 years and can be replaced.

Procedure for Battery Replacement:

  1. Unplug the jack plug from the clock.
  2. Remove all screws from the back of the clock.
  3. Carefully open the back casing.
  4. Carefully remove the depleted CR2032 battery.
  5. Replace it with a new CR2032 type battery, ensuring correct polarity.

Troubleshooting: The manual provides solutions for common issues:

  • Incorrect Day Display: If the clock is not displaying the correct day, check your settings, as an incorrect year may have been set. Repeat the setting process from the beginning.
  • Incorrect Language Display: If the clock is not displaying the required language, check your settings. Repeat the setting process up to the language selection step and ensure the correct language is chosen.

Environmental Considerations: The product complies with WEEE and ROHS Directives. Electrical and electronic products, including batteries, should not be disposed of with household waste. They should be taken to appropriate collection points for recycling in accordance with local regulations.

AIC 11101 Specifications

General IconGeneral
BrandAIC
Model11101
CategoryClock
LanguageEnglish

Related product manuals