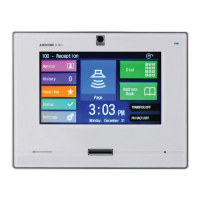
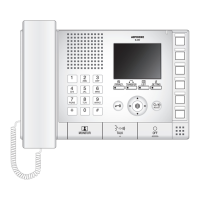
Installation of Master Station
Mounting height
(box center)
1,500 mm (5')
Main unit
Signature plate x1 (included*
1
)
Signature card x1 (included*
1
)
CAT5e/6 cable
3
Attach the main unit to the
mounting bracket.
2
3-gang box
Mounting bracket
(attached to the back of the main unit.)
Low voltage cable
Mounting bracket screws (included) x4
1
Attach the mounting bracket to
the wall.
Fill in name on signature card
(1) Remove the transparent signature plate
while pressing the top or bottom of the
plate.
*Remove the signature card.
(2) Fill in the registered station names onto
the white part of the signature card.
(3) Reattach the signature plate.
*1: The signature plate and signature card
are attached before shipment.
Connect the CAT5e/6 cable and low voltage cable to the main unit.
<Back wiring>
Wall Mounting
83.5 mm (3-5/16")
92 mm (3-5/8")
Mounting height
(equipment center)
1,500 mm (5')
Point
The supplied screws cannot be used on plaster or concrete
walls, please use anchors or concrete plugs (both are locally
available products).
Main unit
Wall mounting screws (included) x4
Connect the CAT5e/6 cable
and low voltage cable to the
main unit, wiring as shown in
the figure.
Mounting bracket
<
Surface wiring
>
Connect the CAT5e/6 cable and
low voltage cable to the main unit.
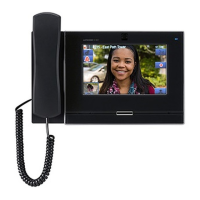
Assemble the Desk stand.
* Set the Desk stand on a flat surface to keep it stable.
If necessary, secure the Desk stand.
* The Desk stand can be adjusted in 3 angles. Fit the
legs into the grooves of the desired angle.
Attach the mounting
bracket to the Desk
stand.
Attach the main
unit to the
mounting bracket.
CAT5e/6 cable
Mounting
bracket
Desk stand
(included)
Weak current line
Desk stand screws x4 (included)
Point
•
Insert the Desk stand screws into the mounting bracket screw holes, then attach the mounting bracket to the Desk stand tightly.
• If necessary, secure the CAT5e/6 cable or low voltage cable using the included cable tie.
• When using the Desktop mounting, use the included Desk stand.
3
2
1
4
Main unit
30°
45°
60°
Leg
Unit
If mounting on the Desk stand
Connection Precautions
Cable
The cable is not included with the product.
CAT5e/6 cable
• Use a straight cable when connecting between equipment.
• Do not use a CAT5e/6 cable with a bending angle of less than a
25 mm (1”) radius. A radius of less than 25 mm (1”) could cause a
communication failure.
CAT5e/6 cableCAT5e/6 cable
Radius ≥ 25 mm (1")
Radius < 25 mm (1")
• Do not peel the jacket off the CAT5e/6 cable any more than is
necessary.
• Attach the RJ45 modular plugs using either EIA/TIA-568A or 568B.
Pair4
Pair3
Pair2
Pair1
T568A
Pair4
Pair2
Pair3
Pair1
T568B
12 3 45 6 7812 3 45 6 78
• Use the LAN tester to confi rm conduction before connecting the
CAT5e/6 cable.
• The RJ45 connector with cover cannot be connected to CAT5e/6 cable
terminals for Master Station or Door Stations. Use cables without covers
on the connectors.
• Do not pull the CAT5e/6 cable or apply excessive load.
Cable precautions
• Do not use separate conductors, twisted pair cables, or coaxial cables.
• Do not use an odd number cable.
How to attach and remove a low voltage cable
• Insert into the quick connection terminal.
• If it is diffi cult to insert the wire, hold down the disconnect button while
inserting the wire.
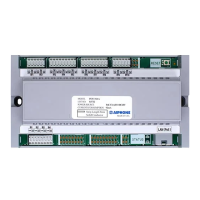
Example: Back of the IX-MV
Remove
button
8 mm(3/8")
Wiring Connection
LAN/PoE
10BASE-T
100BASE-TX
CAT5e/6 straight (UTP)
Relay output
*
1
Contact Input*
2
PoE-enabled switch
100 m (330')
L
L
S
SE
ϕ0.8mm(20AWG)-2C
IX-MV
Master Station
ϕ0.8mm(20AWG)-2C
Polarized
*
1
Relay Output Specifi cations
Output
method
Normally open dry contact
Voltage
between the
terminals
AC 24V, 0.5A (resistive load)
DC 24V, 0.5A (resistive load)
Minimum load (AC/DC): 100 mV, 0.1 mA
*
2
Contact Input Specifi cations
Input
method
Form C dry contact (N/O or N/C)
Level detection method
Fixed
detection
time
200 msec or more
Contact
resistance
Maximum closure resistance: 700 Ω or less
Minimum open resistance: 3 kΩ or more
Terminal
short-circuit
current
10 mA or less
Voltage
between the
terminals
DC5 V or less
(between open terminals)
How to InstallHow to Install How to ConnectHow to Connect
 Loading...