EasyManua.ls Logo

Airbus THR9 Ex - User Manual

Airbus THR9 Ex
2 pages
Print Icon
To Next Page IconTo Next Page
Loading...
This document is the property of
Airbus DS SLC
and should not be copied or circulated without permission.
www.airbusdefenceandspace.com
PS11619AENAA01
Description of the main icons
End/reject
a call
Access
corresponding
functions
displayed
on the screen
Navigate through
menu items or
keypad
Navigation
status
message
Access the list of
talkgroups
or the list of channels
Dial/accept a phone call
Write a text message
Access fast menu
Connect charger
Bottom
microphone
Loudspeaker
Icons Description
Transmitting a one-way call
Receiving a one-way call
Status message/s received
Battery bar icon
Signal strength bar icon
Loudspeaker in use
Loudspeaker and earpiece not in use
Top microphone selected
Speakers and tones muted
Keypad locked
Text message/s received
Scanning activated
Air interface encryption not in use
Transmission barring active
Connection to network lost, limited services
available
Positioning on
THR9 Ex
Quick Guide
PS11619AENAA01
11/2015
Getting familiar with your radio
Adjust
volume
Make a red key call
Activate/deactivate
loudspeaker
Select group
and channel, or
press to select
home group
(group selector,
back key)
Switch power
on/off
Push to talk
(PTT key)
Connect
accessories
Make e.g. a home
group call or
dispatcher call
depending on your
configuration
(duty key)
Earpiece
TRA/TR/APP/00100 01.01/EN
Quick_guide.fm Page 2 Jeudi, 5. novembre 2015 12:07 12

Other manuals for Airbus THR9 Ex

Question and Answer IconNeed help?

Do you have a question about the Airbus THR9 Ex and is the answer not in the manual?

Summary

Radio Controls and Interface

Front Panel Overview

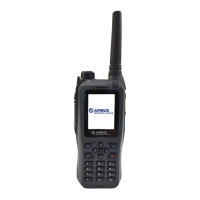
Details the layout and function of the radio's front panel, including keypad, navigation, and call buttons.

Side and Top Controls

Explains the functions of side and top controls like power, volume, PTT, earpiece, and accessory connections.

Main Icons Guide

Call Status and Signal Indicators

Describes icons related to call transmission, reception, status messages, battery, and signal strength.

Audio and Device Status Indicators

Details icons for loudspeaker status, muted speakers, and keypad lock status.

Network and Security Indicators

Explains icons for scanning, connection loss, transmission barring, and encryption status.

Getting Started with Your Radio

Initial Setup Procedures

Guides on installing the battery and antenna, and switching the radio on for the first time.

Making and Receiving Calls

Instructions for initiating and responding to group, express, and phone calls.

Sending Text Messages

Provides steps for sending status messages and text messages to recipients.

Overview

The Airbus THR9 Ex is a robust, intrinsically safe TETRA radio designed for use in hazardous environments. This quick guide provides an overview of its features, usage, and basic maintenance.

General Description

The THR9 Ex is a portable radio with a durable, red casing, indicating its intrinsically safe design. It features a clear display, a full keypad, and dedicated buttons for various functions, ensuring ease of use even with gloves. The device is equipped with a loudspeaker and earpiece for audio communication, and a bottom microphone for voice input. It supports both group and individual calls, as well as text and status message transmission.

Key Features and Functions

Communication Modes:

  • One-way call transmission (R): Indicated by an icon with an arrow pointing right.
  • One-way call reception (R): Indicated by an icon with an arrow pointing left.
  • Status messages received (0): An icon with an envelope.
  • Text messages received: An icon with a speech bubble.
  • Group calls: Allows communication with a predefined group of users.
  • Express calls: Direct calls to a TETRA number or a phone number.
  • Phone calls: Standard calls to phone numbers, supporting various number types (Private, Abbr. number, Phone, Office ext. no.).
  • Red key calls: Predefined destination calls initiated by pressing the red key.
  • Direct mode calls: Communication without network infrastructure.

Audio Features:

  • Loudspeaker in use (甲): An icon depicting a loudspeaker.
  • Loudspeaker and earpiece not in use: An icon with a crossed-out loudspeaker.
  • Top microphone selected (2): An icon showing a microphone with a "2".
  • Speakers and tones muted: An icon with a crossed-out speaker.
  • Adjust volume: Dedicated buttons for volume control.
  • Activate/deactivate loudspeaker: A dedicated button for loudspeaker control.

Navigation and Interface:

  • Access fast menu: A dedicated button for quick access to frequently used functions.
  • Write a text message: A dedicated button for composing messages.
  • Dial/accept a phone call: A dedicated button for call management.
  • End/reject a call: A dedicated button for call termination.
  • Navigation through menu items or keypad: Up/down arrow keys and numerical keypad.
  • Access corresponding functions displayed on the screen: Soft keys below the display.
  • Keypad locked: An icon with a padlock.

Status Indicators:

  • Battery bar icon (0): Displays remaining battery life.
  • Signal strength bar icon (甲): Shows network signal strength.
  • Scanning activated: An icon with a magnifying glass.
  • Connection to network lost, limited services: An icon with a crossed-out antenna.
  • Transmission barring active: An icon with a crossed-out microphone.
  • Air interface encryption not in use: An icon with a crossed-out key.
  • Positioning on: An icon with a compass.

Connectivity:

  • Connect charger: A dedicated port for charging the device.
  • Connect accessories: A port for external accessories.
  • Earpiece: A port for connecting an earpiece.

Usage Features

Getting Started:

  1. Install the battery: Slide the battery into the radio body, press the bottom part into position, and turn the bail clockwise until it locks.
  2. Install the antenna: Turn the antenna clockwise into its dedicated slot on top of the terminal.
  3. Switch the radio on: Press and hold the power on/off switch. If prompted, enter the phone or security code (initial code is 1234) and select OK.

Making Calls:

  • Group call: Press the group call button, scroll to the desired folder, choose Select, turn the group selector to the desired group, press and hold the PTT key, and start speaking after a short tone.
  • Express call: Type the TETRA or phone number, press the call button, and hold the PTT key.
  • Phone call: Enter the area code and phone number, press the call button, scroll to the relevant number type, and press the call button again.
  • Red key call: Press and hold the red key call button to dial the predefined destination.
  • Direct mode call: Select Menu > Settings > Phone settings > Active mode Direct, turn the group selector to the desired channel, press the back key, or enter the recipient's number, then press and hold the PTT key.

Responding to Calls:

  • Phone call: Press the call button.
  • Group or Express call: Press and hold the PTT key and start speaking after a short tone.

Sending Messages:

  • Status message: Press the status message button, scroll to the relevant status message, select OK, enter the phone number or search for the recipient, select OK, scroll to the relevant number type, and select Send.
  • Text message: Press the text message button, write the message, select Send, enter the phone number or search for the recipient, select OK, scroll to the relevant number type, and select Send.

Maintenance Features

  • Battery installation: Simple and secure battery installation mechanism with a locking bail.
  • Antenna installation: Easy screw-on antenna for quick setup.
  • Charging: Connects to a standard charger.

Important Technical Specifications (Inferred from manual)

  • Model: THR9 Ex
  • Intrinsic Safety: Designed for hazardous environments (indicated by "Ex" in the model name and red casing).
  • Operating System: TETRA (Terrestrial Trunked Radio) standard.
  • Power: Battery-operated.
  • Connectivity: Supports external accessories and earpieces.
  • User Interface: Full keypad, dedicated function buttons, and a display.

The THR9 Ex is designed for reliability and safety in demanding conditions, providing essential communication capabilities for professionals in various industries. For detailed information, users are directed to the full User Guide available at https://cinfodin-airbusds.com.

Airbus THR9 Ex Specifications

General IconGeneral
BrandAirbus
ModelTHR9 Ex
CategoryRadio
LanguageEnglish

Related product manuals