Do you have a question about the Airmux Airmux-200 and is the answer not in the manual?
Proprietary information notice and copyright statement from RAD Data Communications Ltd.
Details the warranty terms for the Airmux-200 hardware, including period and corrective actions.
Instructions for environmentally responsible disposal of the RAD product at the end of its lifecycle.
General guidelines for the safe installation and operation of telecommunications products.
Explanation of safety symbols used in the manual, indicating potential hazards like electric shock and laser radiation.
Precautions for safely handling products connected to power or telecommunication lines.
Guidelines for enhancing equipment performance and protection against interference through proper installation.
List of necessary equipment for installing an Airmux-200 link, including tools and cables.
Pre-installation steps, including verifying equipment availability and installing management software.
Procedure for mounting and connecting the ODU units, including grounding and cabling.
Step-by-step guide for aligning the ODUs using beeper feedback to establish the wireless link.
Instructions for connecting AC and DC power to the IDU, IDU-E, and O-PoE units.
Guidance on connecting user equipment like PBX or routers to the IDU and O-PoE units.
Introduction to the Airmux-200 system, its capabilities, and available product options.
Illustrates typical point-to-point and video surveillance applications of the Airmux-200 system.
Details the system's features, including Wireless Link, LAN Interface, TDM Interface, and Security.
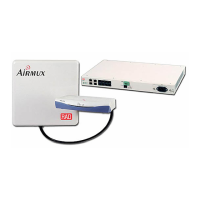
Describes the physical units of the Airmux-200 system, including IDU, IDU-E, IDU-R, ODU, PoE-8, and O-PoE.
Provides detailed technical specifications for the Airmux-200 system, including air interface and LAN details.
Essential safety practices for installing Airmux-200, including RF exposure, grounding, and lightning protection.
Specifies site requirements such as clearance, temperature, and humidity for proper installation.
Lists the items included in the Airmux-200 package, such as ODU, mounting kits, and software.
Lists extra hardware and tools needed for installing the Airmux-200 system.
Provides a step-by-step overview of the Airmux-200 system installation process.
Details the process of surveying installation sites, including preliminary, physical, and RF surveys.
Instructions for mounting the ODU or O-PoE units on a mast or wall, including grounding.
Guidance on connecting the ODU to the IDU or O-PoE using the ODU-IDU cable.
Steps for installing the Airmux-200 management application on a PC.
Procedure for aligning antennas using audible beeps to achieve optimal link quality.
Instructions on launching and logging into the Airmux Manager software.
Guides through the link installation process using the Link Installation Wizard.
Describes how to select operating channels, including Automatic Channel Select and DFS features.
Details on configuring the receiver jitter buffer for TDM services to manage interference and delay.
Instructions for configuring TDM clock modes, including Master clock source selection.
Steps for configuring TDM backup functionality using IDU-R units.
Guidance on connecting E1/T1 devices to the Airmux-200 via TRUNK ports.
Instructions for connecting Ethernet equipment via RJ-45 electrical or SFP ports.
Procedure for powering on the Airmux-200 unit by connecting power to the IDU.
Description of front panel LEDs and WAN/LAN indicators on IDU and IDU-E units.
Lists the default configuration parameters for the Airmux-200 system.
Guide to using the Airmux Manager utility for configuration and monitoring, including toolbar and pane descriptions.
Steps to verify that the Airmux-200 unit is running the required application software version.
Instructions for managing the Airmux-200 via Telnet, including supported commands.
Procedure for configuring link parameters using the Link Configuration Wizard.
Details on selecting operating channels, including automatic channel selection and DFS.
Steps to define required services like Ethernet Only or Ethernet with TDM.
Guide to configuring TDM jitter buffer depth for interference resistance and delay management.
Instructions for setting TDM clock modes and Master clock source selection.
Steps for setting up TDM backup functionality for IDU-R units.
Details on configuring cascaded links for automatic leased line backup.
Guidance on configuring the Airmux-200 for video surveillance applications.
Procedure for individually editing configuration parameters for each site.
Steps to configure management parameters like IP address, subnet mask, and gateway for each site.
Enables separation of user traffic from NMS traffic by configuring VLAN settings.
Details on configuring SNMP communities for managing the ODU and accessing system information.
Instructions for adjusting the transmit power level for each site.
Procedure to limit the maximum Ethernet throughput of the link.
Details on configuring Ethernet mode for line speed and duplex settings.
Steps for configuring the ODU bridge mode for network topologies like protection and ring applications.
Instructions for changing management and link passwords for system security.
Guidance on setting or synchronizing the ODU date and time, including NTP server configuration.
Procedure to mute the ODU beeper during installation or alignment.
Details on configuring Link Lock to prevent unauthorized ODU usage and ensure link security.
Instructions for resetting the Airmux-200 to factory defaults or restarting the link.
Details on monitoring system performance, collecting statistics, and viewing reports.
Methods for detecting problems, including self-test, LEDs, alarms, and link compatibility checks.
Information on handling system events, alarms, and traps, including saving event logs.
A guide to diagnosing and resolving common system faults and issues.
Instructions for activating internal and external loopbacks for diagnostic testing.
Procedure for replacing an ODU, including backup and manual configuration steps.
Answers to common questions regarding Airmux-200 performance, interference, protocols, and security.
Information on how to obtain technical support for the Airmux-200 product.
Steps to upgrade the software (firmware) of installed ODUs in a network using the SWU.
Tutorial on building a point-to-point wireless link, including calculations, installation, and configuration.
List of required equipment for setting up a typical point-to-point application.
Using the Link Budget Calculator to determine expected link performance and configurations.
Guidance on carefully surveying both sites to ensure proper equipment installation and interference-free operation.
Steps to install the Airmux-200 Manager software from the provided CD-ROM.
Instructions on aligning antennas when using a permanent cable connection instead of an air link.
Procedure for configuring the link using the Airmux-200 Manager's Link Installation Wizard.
Steps to change default IP addresses and configure local and remote sites separately.
Verifies installation and E1 traffic, and checks the operational status of the backup feature.
Describes collecting performance statistics and saving monitoring data and link information.
Tutorial on setting up multipoint-to-point applications using Hub Site Synchronization (HSS).
Instructions for installing the HSSU collocation hub and connecting local ODUs.
Details the HSS configuration procedure, including Hub Sync Master and Client settings.
Provides the pinout for the standard CAT-5, 4 twisted-pair ODU-IDU cable with RJ-45 connectors.
Describes the Trunk Port, LAN Port, and LAN Port for PoE-8 connectors and their pinouts.
Details the DC Power Terminal and Alarm Connector pinouts for the IDU-E.
Details the ODU mounting kit contents and procedures for mounting on a mast or wall.
Step-by-step instructions and diagrams for mounting the Airmux-200 unit onto a mast.
Step-by-step instructions and diagrams for mounting the Airmux-200 unit onto a wall.
Instructions for mounting an optional external antenna on a mast using the provided kit.
Guide on how to start the Link Budget Calculator utility from the Airmux Manager CD or application.
Details the parameters required for link budget calculations, including product, rate, and range.
Explains the formulas used for EIRP, Expected RSS, Fade Margin, and Range calculations.
Calculates recommended antenna height for line of sight based on Fresnel zone and boresight clearance.
Step-by-step guide on using the Link Budget Calculator for Airmux-200, including selecting products and parameters.
Lists the components of the lightning protection system: grounding, surge suppressors, and ESD circuits.
Instructions for connecting a grounding kit to the coax antenna cable and grounding it properly.
Details on grounding requirements for ODU and IDU units to ensure safety and lightning protection.
Illustrates the placement and grounding of surge arrestor units near ODU and at the building entry point.
How to calculate the expected signal level using the Link Budget Calculator utility.
Procedure for antenna alignment using a spectrum analyzer and beeper feedback.
Steps to configure the link using the Airmux-200 Manager's Installation Wizard and Link Budget Calculator.
Defines the recommended performance threshold (RSS) for an Airmux-200 link.
Steps to troubleshoot link alignment issues, including checking polarization and obstructions.
Field procedure for preloading a static IP address to an ODU using Airmux Manager.
Procedure for changing the ODU's factory-default band, applying to Multi-band feature.
Details on HSS hardware installation, connecting collocated units to the HSS Unit.
Explains Radio Frame Patterns (RFPs) and their selection based on product mix, services, and channel bandwidth.
Guide to configuring HSS links via the Link Configuration Wizard for collocated units.
Procedure for activating Airmux-200-BRS system links before use, involving independent ODU configuration.
Steps for reconfiguring BRS links using the Link Installation or Configuration wizards.
Describes the Airmux Manager's role in configuration and monitoring via SNMP agent.
Illustrates the sections in the private RADWIN MIB and their location in the MIB tree.
Details MIB parameters, following a naming convention and describing their access and function.
Lists MIB traps indicating various events, alarms, and status changes in the Airmux-200 system.
Procedure to activate FCC/IC 5.4/5.3 GHz links, involving default channel fixed installation channel.
Guide to configuring FCC/IC 5.4/5.3 GHz links using the configuration wizard.
Lists additional items required for implementing a hot standby link.
Procedure for installing a hot standby link, including connecting IDUs to patch panels and configuring.
Instructions on setting up desktop icons to monitor both primary and secondary links simultaneously.
Describes the logic behind link switchover between primary and secondary links.
Guidance on maintaining a hot standby link, including IDU and ODU replacement procedures.
| Category | Multiplexer |
|---|---|
| Product Name | Airmux-200 |
| Manufacturer | RAD |
| Data Rate | Up to 200 Mbps |
| Modulation | OFDM |
| Interface | Ethernet |
| Throughput | Up to 200 Mbps |
| Power Supply | 48 VDC |
| Frequency Band | 4.9 GHz - 5.9 GHz |
| Frequency Range | 4.9 GHz - 5.9 GHz |