Do you have a question about the Airxcel MAXXFAN Plus 4500K and is the answer not in the manual?
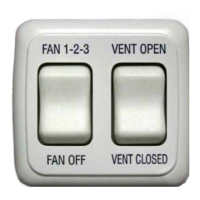
Turns fan ON at last selected speed & OPENS Vent Lid. Cycles LOW/MED/HIGH speeds.
Turns the Fan Motor OFF and CLOSES the Vent Lid.
OPENS the Vent Lid. Fan motor remains in its previous state.
CLOSES the Vent Lid. If fan is ON, enters Ceiling Fan Mode.
Cut a 1 5/8" x 2 7/16" rectangular hole in the wall for mounting.
Plug one end of RJ-11 cable into the GRAY RJ-11 jack on the MAXXFAN PCB at the ceiling.
Route the RJ-11 cable through the wall to the pre-cut hole.
Plug the other end of the RJ-11 cable into the RJ-11 jack on the 2-Switch Wall Control PCB.
Attach the Wall Control to the wall using appropriate screws.
Snap the Bezel onto the Wall Control.
The MAXXFAN® 2-Switch Wall Control, part of the Model Series 02000K, is an installation and operation guide designed for use with MAXXFAN® Plus Models 4500K through 4801K and MAXXFAN® Deluxe Models 7000K through 8501K. This wall control allows users to manage their MAXXFAN® from a convenient wall location, offering a range of features for enhanced comfort and control.
The MAXXFAN® 2-Switch Wall Control provides comprehensive control over your MAXXFAN® unit, enabling you to turn the fan ON or OFF, adjust fan speeds, and manage the vent lid. It integrates seamlessly with the existing MAXXFAN® system, allowing for remote operation without needing to access the controls at the ceiling. The wall control features two primary switches: one for fan operation and speed selection, and another for vent lid control.
The "FAN 1-2-3" button serves multiple purposes related to fan operation. When pressed, it turns the fan motor ON at the last selected speed and simultaneously OPENS the Vent Lid. Once the fan is running, subsequent presses of this button cycle through the fan speeds: LOW, MEDIUM, and HIGH. After reaching HIGH speed, the fan motor cycles back to LOW speed, providing a continuous loop for speed adjustment. This intuitive cycling allows users to easily find their desired airflow.
The "FAN OFF" button is dedicated to stopping the fan and closing the vent. Pressing this button turns the fan motor OFF and CLOSES the Vent Lid, ensuring that the system is completely shut down and sealed when not in use.
The "VENT OPEN" button is specifically for controlling the vent lid independently of the fan. When pressed, it OPENS the Vent Lid. During this operation, the fan motor remains in its previous state. This means if the fan was off, it stays off; if it was running, it continues to run at its current speed. This feature is useful for users who wish to open the vent for passive ventilation without activating the fan.
The "VENT CLOSED" button is used to close the vent lid. Pressing this button CLOSES the Vent Lid. Similar to the "VENT OPEN" function, the fan motor's state remains unchanged during this action. An important additional function of the "VENT CLOSED" button is its ability to engage the Ceiling Fan Mode. If the fan motor is ON when "VENT CLOSED" is pressed, the MAXXFAN® enters Ceiling Fan Mode. This mode likely optimizes the fan's operation for air circulation within the RV or space, even with the vent lid closed.
The MAXXFAN® 2-Switch Wall Control is designed for ease of use and convenience. Its primary feature is allowing fan control from a convenient wall location, eliminating the need to reach for controls on the ceiling unit. This is particularly beneficial in RVs or spaces where the ceiling unit might be difficult to access.
The control offers clear and distinct buttons for each function: "FAN 1-2-3," "VENT OPEN," "FAN OFF," and "VENT CLOSED." This intuitive layout makes it easy for users to understand and operate the system without confusion. The ability to select Low, Medium, or High speeds provides flexibility in managing airflow and comfort levels.
A key advantage of this wall control is its integration with the existing MAXXFAN® system. The keypad controls at the ceiling remain active, meaning users still have the option to operate the fan directly from the unit if they prefer or if the wall control is not immediately accessible. This redundancy ensures continuous functionality and user choice.
The installation process is straightforward, involving cutting a rectangular hole in the wall, routing an RJ-11 cable from the MAXXFAN® PCB (at the ceiling) to the wall control, plugging the cable into the wall control PCB, attaching the control to the wall, and finally snapping the bezel onto the wall control. The guide specifies using the GRAY RJ-11 jack on the MAXXFAN® PCB and notes that the black RJ-11 jack is for other controls, preventing incorrect connections. The wall control PCB has an arrow and 'Up' marking for proper orientation, and either RJ-11 jack on the wall control can be used as they are identical.
The manual primarily focuses on installation and operation, suggesting that the device itself is designed for reliability with minimal user maintenance. The use of standard RJ-11 cables implies a robust and widely adopted connection method, simplifying potential troubleshooting if connectivity issues arise. The guide's clear instructions for installation help ensure proper setup, which is crucial for the long-term performance of any electronic device. While specific maintenance steps for the wall control itself are not detailed, the overall design points to a "set it and forget it" approach, with the main maintenance likely revolving around the MAXXFAN® unit it controls. The durable construction implied by the installation steps, such as attaching the control to the wall with appropriate screws, suggests a design intended for longevity in various environments, including RVs where vibrations and movement are common.
| Model | MAXXFAN Plus 4500K |
|---|---|
| Category | Control Unit |
| Voltage | 12 VDC |
| Fan Speed | Variable |
| Fan Speeds | 10 |
| Thermostat | Yes |
| Material | Plastic |
| Fan Blade Size | 14" |