Do you have a question about the Airxcel SW6DEA and is the answer not in the manual?
Immediate actions and contact procedures if gas is detected.
Covers freeze protection, installation hazards, combustible materials, and user supervision.
Instructions for proper installation and manual retention.
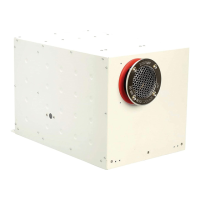
Key technical data including capacity, pressure, and dimensions.
Guidelines on location, door direction, vent clearance, and combustible material separation.
Details on water pressure regulators, gas line checks, and combustion air.
Step-by-step instructions for fitting the unit with a hinged door.
Procedures for connecting water lines, fittings, and gas supply.
How to connect the gas supply line securely and check for leaks.
Instructions for connecting both DC and AC power supplies.
Procedures for adjusting the burner flame and cleaning components.
Importance of the anode rod for tank longevity and warranty.
How the P&T valve works, normal operation, and maintenance.
Steps for draining the unit for storage or freezing temperatures.
Adjustments needed for operation at high altitudes.
Step-by-step guide for lighting the gas burner.
Instructions for operating the electric heating element.
Proper procedure for turning off the water heater.
Guide to identify and resolve common problems like sooting or lack of hot water.
Visual guides for 12V DC and 240V AC electrical connections.
List of part numbers and descriptions for various components.
Details on how to order replacement parts and required information.
Details of the limited warranty, coverage, and exclusions.
Steps to follow if a product problem occurs, including contact information.
This document provides comprehensive operating, installation, and service instructions for the Suburban Gas Hot Water Storage Heater, specifically models SW4DA, SW6DA, SW4DEA, and SW6DEA, designed for recreational vehicles and mobile housing.
The primary function of this device is to provide hot water for recreational vehicles and mobile homes. It operates using either gas or, for specific models (SW4DEA and SW6DEA), an additional 240 Volt A.C. electric heating element. The heater is designed for outdoor installation, with a balanced flue system ensuring that air for combustion is drawn from outside the structure and combustion products are vented externally.
Before operating the water heater, it is crucial to ensure the tank is completely filled with water. Operating the heater without water can cause significant damage to the tank and controls, which is not covered by the limited warranty. To fill the tank, all cold and hot water faucets in the vehicle should be opened to allow air pockets to escape. Once water flows from the faucets, they can be closed.
For gas operation, the unit is equipped with an automatic ignition device, eliminating the need for manual lighting. Users should first ensure the gas supply is "ON" and the 12-volt electrical power to the appliance is "ON." The switch for the gas burner should then be turned to the "ON" position. If the burner does not light immediately, the system will automatically attempt ignition two more times before locking out. Each ignition cycle includes a 15-second purge before the spark cycle. If lockout occurs, the switch should be turned "OFF," wait five seconds, and then turned "ON" again to restart the ignition cycle. Initial start-up may require several cycles to purge air from the gas lines.
For models with an electric heating element (SW4DEA and SW6DEA), the electric element can be energized by turning its dedicated switch to "ON." This switch is located behind the water heater door in the lower left corner of the control housing. The water temperature is regulated by a thermostat. It is important to avoid simultaneous operation of the 240 V electric element and gas heating. The electric element should only be turned on after the water heater tank is filled.
A critical safety feature is the temperature and pressure relief valve. This valve is designed to open if the water temperature reaches 98.9 degrees Celsius or if the water pressure exceeds 850 kPa. This is a normal function in closed water systems where water expands when heated, causing pressure to build up. Water weeping or dripping from this valve is typically an indication of this pressure relief and does not necessarily mean the valve is defective. To reduce the frequency of weeping, an air pocket can be maintained at the top of the tank by following a specific procedure: turn off the water heater and cold water supply, open an RV tap, pull the handle of the P & T Valve to allow water to flow until it stops, release the handle, close the tap, and turn on the cold water supply.
The water heater is equipped with a high-temperature limit device that acts as a cut-off if the temperature exceeds 82°C, shutting down the main burner (for all models) or the electric element (for SW4DEA and SW6DEA). To reactivate, the water temperature must be below 37°C, and the manual reset button must be pushed.
Regular maintenance is essential for the safe and efficient operation of the water heater. All repairs should be performed by a qualified service agency.
The burner air shutters are factory pre-set for a blue or orange-blue flame. If adjustment is needed, it's crucial to maintain this flame color and prevent yellow or sooting, which indicates incomplete combustion. If sooting occurs or the flame remains yellow after adjustment, check for obstructions in the burner or flue box. A stiff brush is recommended for removing soot deposits.
The grommet on the gas inlet should be checked frequently to ensure a tight seal, preventing moisture and harmful flue products from entering the living area. Wiring and connections should be periodically inspected for damage, fraying, and tightness.
The water heater tank is protected by a magnesium or aluminum anode to prolong its life. This anode is a low-cost replacement part and must be inspected every six months. It should be replaced if its diameter is reduced by 50% or more. Removal of the anode will decrease tank life and void the warranty. Only genuine Suburban anode rods should be used. To prevent leaks when replacing the anode rod, a pipe thread sealant approved for potable water, such as Teflon Tape, should be applied to the threads.
The pressure relief valve should be operated at least once every six months to remove lime deposits and verify it is not blocked. Failure to do so can lead to the heater exploding.
For storage during winter months or when subjected to freezing temperatures, the heater must be drained to prevent damage. This involves turning off the gas supply and pressure pump, opening both hot and cold water taps, and opening the drain on the water heater (by removing the anode rod). If antifreeze is used in the plumbing system, and the heater is not bypassed, the anode rod should be removed and stored for the winter, replaced with a 19mm drain plug.
Odor from the hot water system, often described as a "rotten egg" or "sulfur" smell, is not a service problem but can be caused by sulfur content in water or bacteria. This can be remedied by chlorinating the water system: add about 17.75 cL of common household liquid bleach to each 38 liters in the water tank, run the chlorinated water through the system until chlorine is smelled, let it sit for a few days, and then flush the system with fresh water. This process may need to be repeated. A filtering system can also be considered to remove chlorine and prevent sulfur water.
The water heater is certified for operation without modifications at altitudes up to 4,500 feet. For operation above this elevation, derating may be required (4 percent for every 1,000 feet above sea level). Failure to properly derate can lead to improper burner operation, pilot outage, sooting, and reduced heating efficiency. Any derating or orifice change-out should be performed by a dealer or authorized service agency. If the unit returns to lower elevations, these adjustments must be reversed.
| Dimensions | 18.5 x 18.5 x 24 inches |
|---|---|
| Weight | 38 lbs |
| Fuel Type | Propane |
| Capacity | 6 Gallons |
| Ignition Type | Electronic Ignition |
| Voltage | 12 Volts |
| Amperage | 12 Amps |
| Thermostat | Yes |
| Material | Steel |