EasyManua.ls Logo

Akai CAU-7380

Akai CAU-7380
2 pages
To Next Page IconTo Next Page
Loading...
Short User Manual
(Fi g. 1)
1
2
3
(Fig.3)
2
1
3
1
2
3
4
5
6
7
(Fig.2)
02
3
2
2
03
Treble
Press VOL/SEL button (2) twice. You can adjust the treble tone here.
04
Fastening the unit to the factory radio
mounting bracket
1. Select a position where the screw holes of
the bracket and the screw holes of the main
unit become aligned (are fitted), and tighten
the screws at 2 places on each side. Use
either truss screws (5 x 5mm) or flush
surface screws (4 x 5mm).
2. Screw
3. Dashboard or Console
FRONT PANEL LAYOUT
Installation
Precautions
Before finally installing the unit, connect the wiring temporarily and make sure it is all
connected up properly and the unit and the system work properly.
Avoid installing the unit where it would be subject to high temperature, such as
from direct sunlight, or from hot air, form the heater, or where it would be subject
to dust, dirt or excessive vibration.
Use only the parts included with the unit to ensure proper installation. The use of
unauthorized parts can cause malfunctions.
Consult with your nearest dealer if installati on requires the drilling of holes or
other modifications of the vehicle.
Installing the unit
Front Mount
1. Dashboard
2.
Holder
After inserting the holder into the dashboard,
select the appropriate tab according to the
thickness of the dashboard material and bend
them inwards to secure the holder in place.(Fig. 1)
3.
Screw
Under power off status,short press is power on,
Under power on status,short press is switching mode, long press is power off.
Sound Adjustment
Press SEL button (2) and choose from the options.
Volume
You can adjust the volume of the device with the
VOL(+) and VOL(-) buttons.
Bass
Press VOL/SEL button (2). You can adjust the bass tone here.
Fader
Press SEL button (2) three times. Adjust sound balance
between front and rear speakers
CAU-7380 CAR RADIO
MP3 USB/SD/AUX PLAYER
15
14
13
12
11
10
9
8
7
6
5
4
3
2
1
1177
Power/AV Button
Volume/Select
(VOL/SEL) Button
Mute Button
LCD Display
Automatic Memory Storing
Tune Seek,
Track Forward
Tune Seek, Track Backward
Play/Pause Button
Intro Button
Repeat Button
Random Button
Previous Button -
Next Button +
AUX
IN
USB
Plug
SD/MMC slot
Band Selection
Reset Button
Function Selection Button
POWER ON
16
For the detailed user manual please visit the akai-atd.com website.
The user manual can be downloaded in PDF format. To read the file a PDF reader
application is needed.
Question and Answer IconNeed help?

Do you have a question about the Akai CAU-7380 and is the answer not in the manual?

Akai CAU-7380 Specifications

General IconGeneral
BrandAkai
ModelCAU-7380
CategoryCar Receiver
LanguageEnglish

Summary

Installation and Precautions

Installation Precautions

Guidelines for safe and proper installation, avoiding high temperatures, dust, and vibration.

Installing the Unit

Step-by-step instructions for securely mounting the car radio in the dashboard.

Powering On and Off

Procedure for turning the car radio on, switching modes, and powering it off.

Sound Adjustment Options

How to adjust volume, bass, treble, and fader for optimal audio.

Front Panel Layout and Functions

Control Buttons Overview

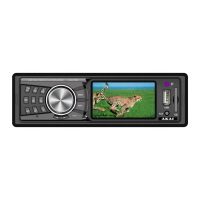
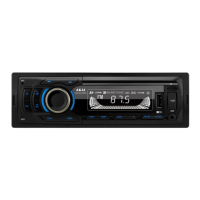
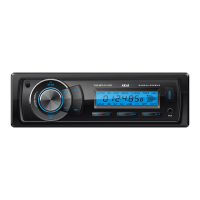
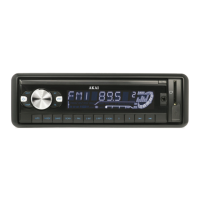
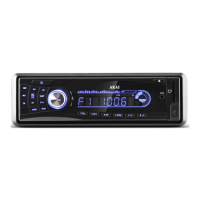
Detailed description of each button on the front panel and its function.

InputOutput Ports

Location and purpose of AUX IN, USB, and SD/MMC card slots.

Audio Modes and Operations

EQ and Loudness Control

Enabling/disabling Equalizer and Loudness modes for enhanced sound.

Mute Functionality

How to temporarily silence the audio and resume normal playback.

Radio Operations

Selecting radio bands and performing manual tuning or seek operations.

Automatic Memory Storage

Storing up to 6 strongest radio stations automatically.

USBSD MP3 Playback

Playing MP3 files from USB drives and SD cards with playback controls.

Playback Modes (Intro, Repeat, Random)

Using INT, RPT, and RDM functions for music playback.

SD Card Usage

Inserting, using, and formatting SD cards for the device.

General Specifications and Connectivity

Technical Specifications

Details on power supply, output power, load impedance, and sound ratings.

FM and AM Tuner Specs

Frequency coverage, sensitivity, and distortion for FM and AM bands.

Wiring Connector Guide

Diagram and explanation of the rear connector pinout for installation.

Related product manuals