• Thefancanoperateinoscillationorstaticmode.
• Tomakethefanheadoscillate,pushdowntheOscillationKnob.
• Tostopthefanheadfromoscillating,pull-uptheOscillationKnob.
• Theheadofthefancanbeadjustedupordown,todothisloosentheadjusting
knob, adjust the fan to the desired angle, to secure tighten the adjusting knob.
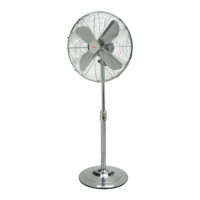
PART NAME:
1. Screw Nut 2. Front guard 3. Blade 4. Position screw 5. Rear guard
6.Powerswitch7.OscillationKnob8.Motor9.Powercord
10. Tube 11. Joint screw 12. Base Addition part 13. Base
ASSEMBLY:
If your fan comes ready assembled
ignore this part.
1 After removing everything from
the carton, locate the motor unit
(item8)andseparatethefrontguard
(item 2) and back guard (item 5) if they
are connected.
2 Locate the rear guard (item 5) and
align with 4 protruding indents on
themotorunit(item8).Thesafety
grille will only t one way over the
pro-truding intents with the handle
facing up. insert 4 locking screws (item 4)
and tighten to secure the rear guard to the motor unit.
 Loading...