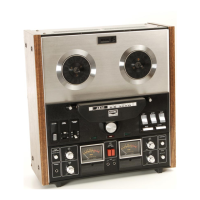
1. INDEX COUNTER & RESET BUTTON
2.
MICROPHONE JACKS
3.
RECORDING
SAFETY
BUTTONS
Depress
both
buttons
simultaneously
for
stereo
recording,
or
individually
for
monaural
recording.
4.
REEL RETAINER
To
lock
reel
firmly
into
place
pull
tip
of
retainer
on
reel
shaft
outward
and
turn
to
left
or
right.
5.
SUPPLYREEL TABLE
6.
RECORDING INDICATOR LAMP
Lights
when
Recording
Safety
Button(s)
is
depressed.
7.
PINCH WHEEL
Presses against
Capstan
to
transport
tape.
8.
SENSING POLE/TENSION ARM
Sensing
Pole
for
reversing
the
direction
of
the
tape
automati-
cally
from
normal
to
reverse
direction.
9.
HEAD COVER
Houses
from
left,
normal
Recording/Erase
and
Playback,
reverse
Playback
and
Recording/Erase
Heads.
10. DIRECTION INDICATOR LAMP
Lights
to
indicate
direction
of
motor
rotation.
11. POWER SWITCH
12. SPEED SELECTOR SWITCH
Set
to
7-1/2
or
3-3/4(ips)
according
to
desired
tape
speed.
For
high
fidelity
recording,
the
faster
tape
speed
is
recommended_
~he
recording
time
using
a
1800
ft.
tape
is as
follows:
STEREO:
3hrs
at
3-3/4
ips;
1.S hrs.
at
7-1/2
ipso
MONAURAL:
6 hrs.
at
3·3/4
ips;
3
hrs.
at
7-1/2
ipso .
13. TAPE SELECTOR SWITCH
Set
to
S.R.T,
position
when
using
Akai
Super
Range
Tape
or
other
make
low
noise
tape,
and
to
NOR!AL
position
when
'using
regular
tape.
14. MICROPHONE RECORDING LEVEL CO TROL
Con
trois
microphone
input
level. Also use
to
adjust
the
in
put
level
when
using
the
Din
Jack
for
connection
with
an
external
amplifier.
15.
HEADPHONE JACK
Connect
an
8
.n
impedance
stereo
headphones
for
monitoring
or private
headphonelistening.
16.
UNE
RECORDING LEVEL CONTROL
17. REVERSE MODE
SELECTOR
SWITCH
Please
refer
to
AUTOMA
TIC
/
MANUAL
REVERSE
RECORD-
ING
(PLAYBACK)
procedure.
18. DIRECTION INDICATOR
LAMP
Lights
to
indicate
direction
of
motor
rotation.
19. AUTOMATIC STOP
LEVER
Works
to
automatically
stop
tape
travel
at
end
of
tape.
When
automatic
stop
is
desired,
be
sure
to
thread
tape
under
this
lever.
The
machine
will
not
operate
if
this
lever is
not
at
tifted
position.
20. REEL RETAINER
Ta
lock
reel
firmly
into
place
pull
tip
of
retainer
on
reel
shaft
28. FAST FORWARD BUTTON
Advances
tape
at
high
speed.
29. MICROPHONE RECORDING LEVEL CONTROL
Controls
microphone
input
level. Aiso use
to
adjust
the
input
level
wh
en
using
the
Din
Jack
for
connection
with
an
external
amplifier.
30. MONITOR SELECTOR SWITCH
To
monitor
program
source,
depress
to
SOURCE
position.
To
monitor
recorded
signais
or
for
playback,
set
to
TAPE
position.
31.
UNE
RECORDING LEVEL CONTROL
32. SOUND-ON-SOUND SWITCH
Please
refer
to
SOUND·ON·SOUND
RECORDING
procedure.
33.
VU
METERS
Indicates
recording
or
playback
levels.
34. CYCLE CONVERSION SWITCHES
Set
to
50
Hz
or
60
Hz
to
correspond
with
area
power
source.
35. DlN JACK
Enables
inter-connection
with
external
am
plifier
by
use
of
a
single Din
connection
cord.
When
using
this
jack
for
recording,
the
input
level is
adjusted
with
the
Microphone
Recording
Leve!
Control.
36.
UNE
INPUT JACKS
c.onnects
to
outputs
of
external
source.
37.
DIN JACK INPUT SELECTOR SWITCH
When using
Din
jack
connection,
if
output
leve!
of
external
amplifier
is
high,
set
to
HIGH
position,
and
if
low,
set
to
LOW
position.
38.
A.C.OUTLET
This
unswitched
A.C.
OutIet
is
provided
for
extra
convenience.
It
is
not
interlocked
with
the
front
panel
power
switch
50
that
power
is
applie~
even
with
the
~nit
turned
off.
300
W
maXimum
power
Input.
1
39.
UNIVERSAL VOLTAGE SELECTOR & FUSE POST
Please
refer
to
VOLT
AGE
&
CYCLE
CONVERSION
pro·
cedure.
40.
UNE
OUTPUT JACKS
Connects
to
inputs
of
external
source.
41.
UNE
OUTPUT LEVEL CONTROL
Adjust
according
to
the
input
level
of
your
amplifier.
outward
and
turn
ta
left
or
right.
21. TAKE-UP REEL TABLE
22. SENSING POLE
For
changing
the
direction
of
the
tape
from
23. REVERSE BUTTON
For
effecting
manual
reverse
playback.
24. REWIND BUTTON
Rewinds
tape
at
high
speed.
25. TENSION ARM
26. STOP BUTTON
Depress
to
stop
tape
travel.
27. FORWARD BUTTON
Advances
tape
for
recording
or
playback.
reverse
to
normal.
1

 Loading...