21
4
MASTER / MONITORAGGIO
Interruttore d'accensione: inserire il dispositivo di connessione alla rete c.a. alla presa della
parete. Azionando una volta il commutatore POWER l'apparecchio si accenderà. Azionando una
seconda volta il commutatore l'apparecchio si spegnerà. Il led corrispondente si accenderà
quando l'apparecchio si trova in funzionamento. È importante segnalare che questo led non si
spegnerà immediatamente dopo lo spegnimento dell'apparecchio, poiché prima si deve scaricare
il condensatore.
Attenzione: per evitare che il rumore della connessione danneggi gli altoparlanti, accendere
sempre prima il mixer, quindi l'amplificatore. Per spegnere l'apparecchio, spegnere prima
l'amplificatore, quindi il mixer.
Controllo di livello Booth: controlla, indipendentemente dal Master, un amplificatore esterno. È
importante segnalare che il segnale non viene mostrato nel misuratore del livello del segnale
d'uscita. Di conseguenza bisogna essere prudenti e non sovraccaricare l'amplificatore..
Controllo di livello Balance: mediante il controllo Balance Master è possibile inviare il segnale
al canale sinistro o destro delle due piste stereo.
Livello del segnale d'uscita: ci sono due indicatori di picco. Misurano il livello del segnale in un
range da -20 a +9 dB. Ci sono due modi di monitoraggio:
I - Selettore Stereo/Split in posizione STEREO: misura il livello del segnale MASTER. Ogni
indicatore di picco misura il segnale di un canale (sinistro e destro, rispettivamente).
Permette di controllare il segnale d'uscita, in modo che non ci sia distorsione durante il processo di
miscelazione.
II - Selettore Stereo/Split in posizione SPLIT: l'indicatore di picco di sinistra misurerà il livello del
segnale della fonte assegnata a CUE mentre l'indicatore di picco di destra misurerà il livello del
segnale del BUS MASTER in modo Mono. In questo modo potremo comparare entrambi i
segnali.
Selettore Mono/Stereo: permette di trasformare il segnale d'uscita, normalmente stereo, in
mono.
Commutatore Stereo/Split per cuffie: in posizione stereo permetterà di ascoltare il segnale
preselezionato mediante CUE in stereo. In posizione Split permetterà di ascoltare in un auricolare
il segnale preselezionato mediante CUE e nell'altro il segnale Master (entrambi in mono).
Controllo panoramico di CUE: mediante questa funzione si potrà ascoltare una miscela dei
segnali in ingresso (segnale preselezionato CUE) e il segnale d'uscita Master (pre pot).
I - Selettore Stereo/Split in posizione STEREO: si ascolterà una miscela stereo di entrambi i
segnali.
II - Selettore Stereo/Split in posizione SPLIT: nell'auricolare sinistro si ascolterà il segnale in
ingresso e nell'auricolare destro il segnale Master (entrambi in mono). Ruotando il controllo si
potrà graduare il livello di entrambi i segnali.
Controllo del volume delle cuffie: permette di controllare il volume di una cuffia stereo
collegata al mixer. Si consiglia di accertarsi che l'impedenza della cuffia sia di almeno 32 . Si
deve inoltre aver cura con le cuffie ad elevata impedenza, perché ridurranno il livello massimo
d'uscita agli auricolari. Si consiglia di scegliere delle cuffiecon un'impedenza non superiore a 200
.
Attenzione, si consiglia di mantenere il volume al minimo prima di iniziare la riproduzione.
Ω
Ω
Faderdi Master: determina il livello totale del segnale d'uscita del mixer.
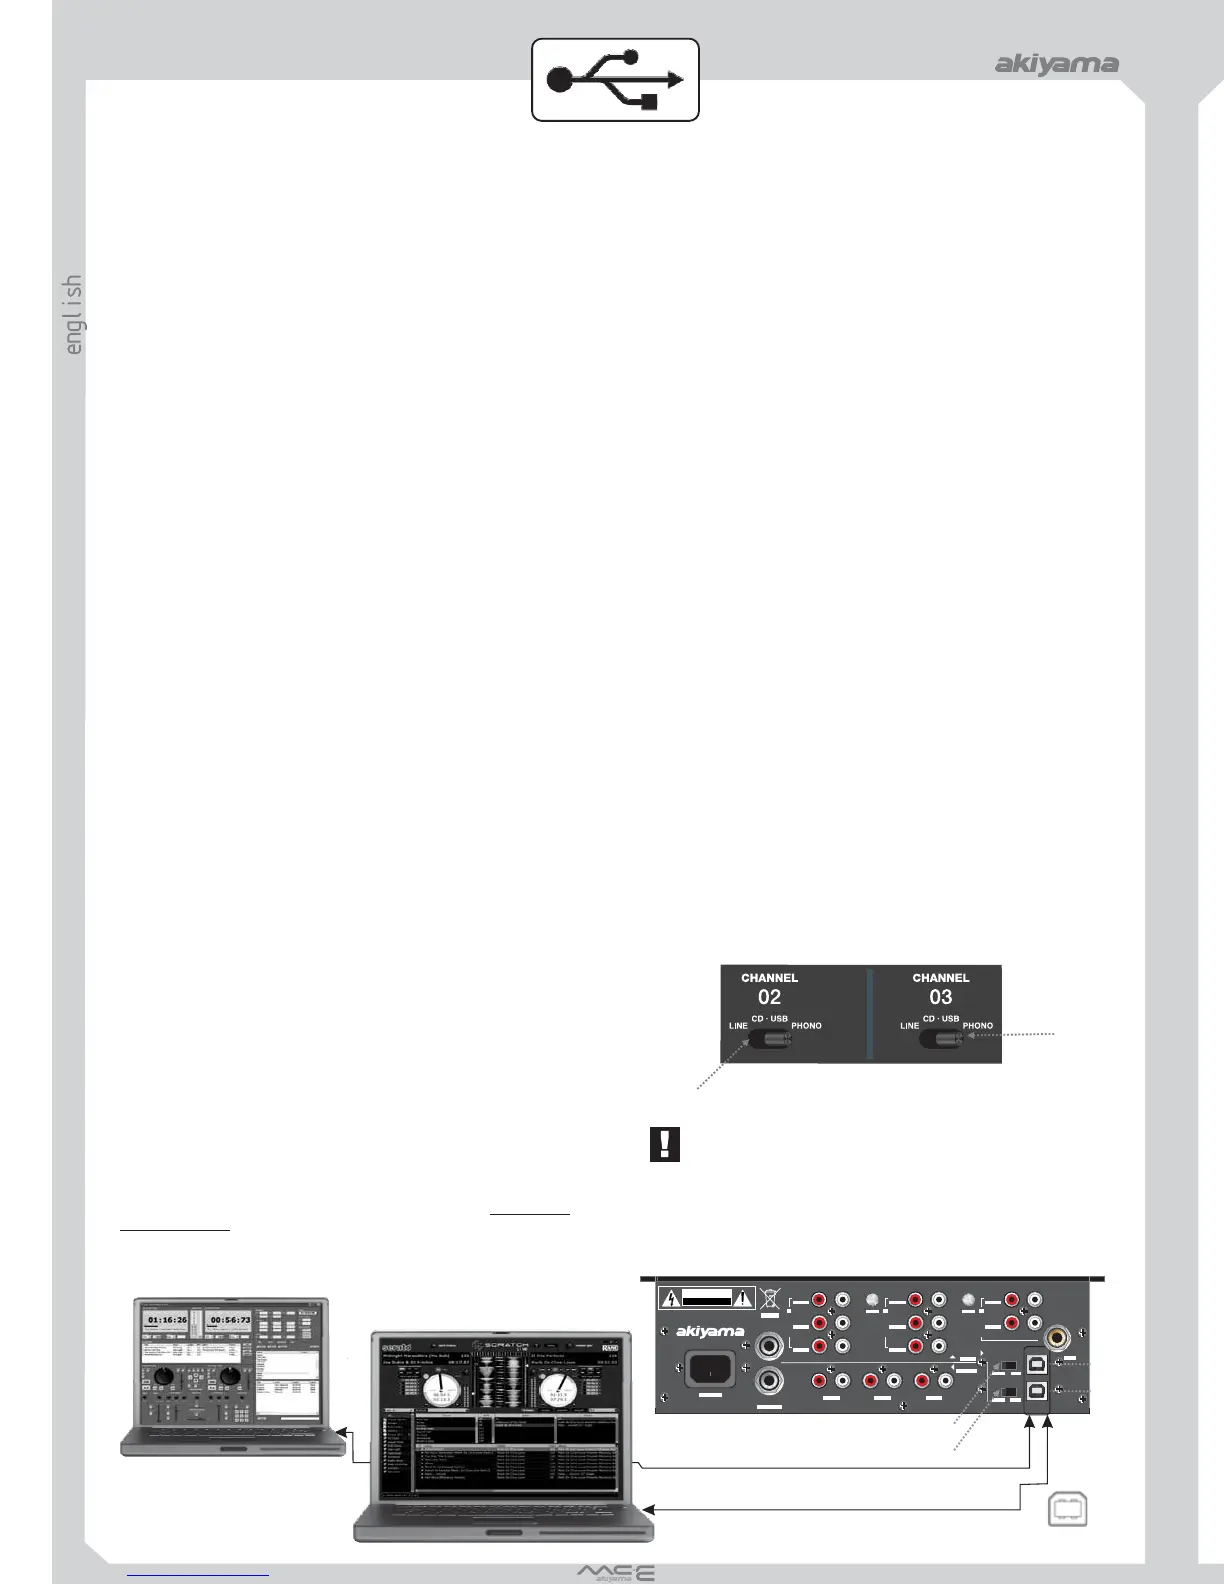
CONNECTIONS PANEL
A-
B - USB OPERATION: (USB cable limitwithin 3m. )
SYSTEM REQUIREMENTS:
The MCE-3 USB & MCE-4 USB features two USB PORTS (5,6) to
connect the mixer to any Mac or PC USB 1.1 ports allowing the DJ to either
record a session onto any wave form editing software program or add
computer based DJing or audio programs, .MP3, .WMA, .WAV, or .AIFF
formatted music into the mix. The USB PORTS (5,6) inputs receive audio
playback signals from a computer.
The MCE-3 USB & MCE-4 USB is compatible with any audio software
program & media player. You can utilize the USB PORTS (5,6) to play files
stored on your computer through the mixer . Or you can record a live session
onto almost any audio software program to burn on a CD at a later time. Each
port can record & play at the same time.
- PC WindowsXP,or XPProfessional with at least one USB port
- Mac OS X with at least one USB port
- USB 1.1
NOTE: PLEASE CHECK THAT THE MIXER CHASSIS & COMPUTER
CHASSISARE CONNECTEDTOGETHERIN THE GROUNDING
SIGNAL ASSIGN TO MIXER CHANNELS
1
2
To select between CD2-USB A and CD3-
USB B first we must select source signal
from rear panel slide switches (3) and (4).
Once source signal choosen - CD-2 or
USB-A for cannel 2 and CD-3 or USB-B
for cannel 3 - the choosen source will be
selected to channel 2 or 3 by means of the
standard lever switch selectors (1) and (2).
Same as we do with normal analogue
signals.
SYSTEM FOR MAC:
1.Turn on your computer & mixer.
2. Connect the ( ) on your mixer to the ports on your computer via
cable.
3. Select the icon.
4. Select
5. Select the icon.
6. Select box to monitor the computer through the mixer or box to
record onto the computer through the mixer.
7. Select or
8. You can begin playing audio from iTunes, Quicktime, or any other media player
available on your system. To eliminate your computer's sound effects from running
through the mixer transfer the computer's signal to the internal speakers:
1. Select the icon.
2. Select
3. Select icon.
4. Select
5. Select scroll down menu.
6. Select
USB PORTS USB
USB
APPLE
SYSTEM PREFERENCES.
SOUND
OUTPUT INPUT
USB CODEC USBAUDIO DEVICE.
APPLE
SYSTEM PREFERENCES.
SOUND
SOUND EFFECTS.
PLAYALERTS & SOUND EFFECTSTHROUGH
INTERNALSPEAKERS.
MCE-3 USB/MCE-4 USB
5,6
SYSTEM FOR PC:
1.Turn on your computer & mixer.
2. Connect the ( ) on your mixer to the ports on your computer via
cable. Windows will recognize & automatically install the necessary drivers & you
can begin playing audio from any other media. If sound is not playing through the mixer:
1. Select menu.
2. Select
3. Select
4. Select tab.
5. Select for computer sounds through the mixer & choose
or if more than one device is connected.
6. Select for external sounds recorded through the mixer into the
computer & choose or if more than one
device is connected.
7. Be sure the is not checked.
8. thesettings.
9. Keep the open to access this area often. To eliminate your
computer's sound effects from running through the mixer transfer the computer's signal to
the internal speakers:
1. In the select
2. Select tab.
3. In the scroll down menu for select
4. thesettings.
5. Select
You can begin playing audio from any other media player available on your system.
MCE-3 USB/MCE-4 USB
5,6
USB PORTS USB
USB
START
CONTROLPANELS.
SOUNDS &AUDIO DEVICES.
AUDIO
SOUND PLAYBACK USB
AUDIO CODEC USBAUDIO CODEC [2]
SOUND RECORDING
USBAUDIO CODEC USBAUDIO CODEC [2]
USE ONLY DEFAULTDEVICES
APPLY
CONTROL PANEL
CONTROLPANELS SOUNDS &AUDIO DEVICES.
SOUNDS
SOUND SCHEME NO SOUND.
APPLY
OK.
NOTE: WHEN USING AUDIO SOFTWARE YOU MUST ADJUST THE
PREFERENCES OFTHE SOFTWARE PROGRAM.
NOTE: WHEN ADDING THE MCE-3/4 USB TO YOUR SOUND DEVICE THE
COMPUTER'S DEFAULT HAS THE VOLUME LEVELS SET AT HALF. ENTER
YOUR AUDIO SETTINGS & ADJUST THE VOLUME ACCORDING TO YOUR
NEEDS.
RECORDINGVIAUSB:
This mixer is compatible with most wave editing software programs. You may
record from each (5,6) simultaneously onto the computer
regardless of the assignment. The signal coming from outputs
will be sent to the computer via and (5,6). When the
(3,4) are you may still record onto the computer.
USB PORT
USB RECORD
USB A B PORTS USB
ASSIGN SWITCHES OFF
MCE-3/MCE-4 USB
INPUTS
OUTPUTS
RL
CAUTION
RISK OF ELECTRIC SHOCK
DO NOT OPEN
CAUTION,RISK OF ELECTRICSHOCK, DONOT OPEN.
ATENTION: TO REDUCE RISK OF ELECTRIC SHOCK DO NOT OPERATE
INSIDE THE EQUIPMENT. FOR MAINTENANCE CONTACT YOUR DEALER
ORQUALIFIED PERSONNEL.
INPUTS
RL RL
PHONO PHONO
LINE LINE
CD CD
PHONOPHONO
CDCD
LINELINE
RL RL
CHANNEL 3
CHANNEL 2
PHONO
PHONO
LINE
LINE
CHANNEL 1
GND
GND
AC INPUT
AC INPUT
MASTER BAL
MASTER BAL
L
R
MIC
USB A
CD 2
USB B
CD 3
USB A
CD 2
USB B
CD 3
GND
GND
MIC
MASTER RECBOOTH
MASTER
BOOTHREC
OUTPUTS
RL
3
4
5
6
USB A
USB B
A- INPUTS/
OUTPUTS (Recording)
CONNECTOR TYPE B
R/L
PC/MAC
PC/MAC
USB
B- INPUTS/
OUTPUTS (Recording)
R/L
USB
When using a laptop for Playback and mixing using any of the programs
available at the market we can deliver the signal IN/OUT to any of the mixer
USB connections (USB 1 or USB 2). In this scenario we can
.
Playback and
Record the session
A sizeable portion of laptops show a poor shielding between audio signal
and power supply. As a result of this the laptop output is
with noise. To avoid this noise plug your laptop to an outlet
without earth connection.
NOTE: Avoiding noise induced by yourlaptop.
audio
deteriorated
 Loading...