The document is an operating manual for an Aladdin Blue Flame Heater, providing instructions for its use, maintenance, and spare parts.
Function Description
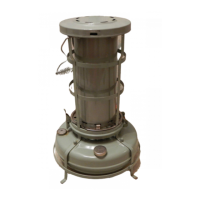
The Aladdin Blue Flame Heater is a portable oil heater designed for space heating. It operates by burning kerosine (paraffin) to produce a blue flame, which indicates efficient and clean combustion. The heater is manufactured to British Standard 3300:1963, ensuring safety and odourless operation when used correctly. It is designed to provide heat for extended periods, with a single filling lasting at least 16 hours. The device features a "floating" gallery and chimney assembly, which allows for free movement within the frame and is not a defect.
Important Technical Specifications
- Fuel Type: Best quality kerosine (paraffin) only. Specifically recommends ALADDIN PINK paraffin. Strictly warns against using vaporising oil, power kerosine, motor fuel (gasolene, benzine, essence), or other dangerous fuels.
- Tank Capacity: 1 gallon (4.5 litres).
- Burn Time: At least 16 hours per filling.
- Heat Output:
- B.Th.Us. per hr.: 5,870-9,320
- Kilogram Calories per hr.: 1,470-2,330
- Equivalent to: 1-2 kilowatts
- Consumption: 25-16 hours per gallon.
- Safety Standard: British Standard 3300:1963.
- Construction: Features a "floating" gallery (H.219) and chimney assembly.
Usage Features
- Unpacking: Before first use, all cardboard packing pieces must be removed. The top of the heater (H.201) can be lowered by releasing the spring clip (H.208) to expose the burner and remove packing.
- Filling: Unscrew the filler cap (H.216) on top of the tank (H.213), opposite the wick winder 'W'. Fill with one gallon (4.5 litres) of recommended kerosine. Replace the filler cap and wipe the tank clean.
- First Use/New Wick: When lighting for the first time or after fitting a new wick (H.210), leave the heater unlit for one hour to allow the wick to soak thoroughly.
- Oil Gauge (H.217): Indicates approximate fuel levels: (a) full, (b) ¾ full, (c) ½ full, (d) ¼ full, (e) empty.
- Lighting:
- Release the spring clip and lower the top of the heater.
- Ensure the flame spreader (H.212) is correctly positioned and pushed fully home.
- Turn the wick winder 'W' clockwise until about ¼ inch of wick is visible above the burner basket flange 'A'.
- Light the wick.
- Close the top of the heater and ensure the spring clip is properly fastened.
- Adjust the flame within the burner's limits to achieve the desired heat.
- Flame Colour: The flame MUST be blue. A slightly reddish glow or intermittent red flecks in a dusty atmosphere are normal.
- Too Low: Wholly or partly yellow flame (Fig. 5).
- Too High: Distinct yellow spikes (Fig. 6).
- Correct: Completely blue flame (Fig. 4). Operating with a yellow flame indicates incorrect use and can lead to smoking or overheating.
- Flame Adjustment: For maximum heat, turn the wick up until yellow spikes appear, then turn it down slightly until a completely blue flame is obtained. Once set, it should operate without further attention until refilling.
- Extinguishing: Turn the wick down, lower the top of the heater, and blow out the flame. Turn the wick up again to ensure it is completely out. A low yellow flame can overheat the burner and cause smoking.
- Ventilation: Always ensure the room is adequately ventilated when using the heater.
- Placement: Do not use in a draught or place where it can be knocked over.
- Drying Clothes: Do not dry clothes or anything else over or near the heater.
- Refilling: Do not fill the heater when it is alight. Fill the tank regularly and never let it burn dry.
- Fuel Additives: Do not add salt, vinegar, camphor, or any other substance to the kerosine, as this can damage the heater.
- Fixing: Screw holes are provided in the feet for securing the heater. A securing chain is also available.
- Spare Parts: Only use genuine Aladdin spare parts. Reference numbers are provided for ordering.
Maintenance Features
- Wick Cleaning:
- Frequency: Varies with oil quality and flame height; necessary when flame deteriorates, at least once a week with continuous use.
- Procedure: Lower the top of the heater, remove the flame spreader (H.212). Turn the wick down below the burner basket flange. Place the wick cleaner (H.211) on the burner in place of the flame spreader, resting on the burner basket flange. With one hand, turn the wick cleaner clockwise, pressing down on the burner basket flange. With the other hand, slowly turn the wick up. Continue until no more black carbon appears through the gaps. A perfectly cleaned and shaped wick will result.
- Tools: Only use the provided wick cleaner (H.211). NEVER use scissors, razor blades, etc.
- Burner Cleaning:
- After cleaning the wick, check for fluff or dirt in the burner basket (H.209), flame spreader (H.212), or the gap at the bottom of the chimney. Clean these parts as necessary, as blocked holes can impair proper function.
- The flame spreader and burner basket are rustproof and can be washed in warm soapy water.
- Neither the wick nor the tank should be washed with water. The tank should be rinsed out occasionally with clean kerosine (paraffin).
- Ensure the burner is dry before replacing. Avoid direct heat.
- Re-charring Wick:
- Necessary if the wick is uneven due to partial starvation, incorrect cleaning, or allowing the tank to run dry.
- Procedure: Empty the tank as much as possible. Lower the top of the heater and adjust the wick so the lowest part of the burning edge is level with the burner basket flange. Light the wick, close the top of the heater, and allow it to burn dry. Do not blow it out.
- After re-charring, reshape the wick as in cleaning. Refill the tank and allow the wick to soak for at least one hour before lighting. An unpleasant smell will occur during re-charring.
- Replacing Wick (H.210):
- When the wick cannot be raised further without force, it needs replacing.
- To avoid handling a kerosine-soaked wick, it is better to allow the heater to burn dry (though not essential).
- Procedure: Lower the top of the heater, remove the flame spreader and burner basket. Raise the wick to its fullest extent. Detach the two wick carrier arms 'C' from the brass studs 'B' on the wick by springing them outwards, then pulling one arm towards you and pushing the other away. Remove the old wick.
- Replace the flame spreader to prevent the yellow tape inside the wick from catching on the wick tube.
- Fit the new wick over the inner wick tube so that when lowered, the brass studs 'B' engage with the wick carrier arms. Gently ease the wick down until the brass studs are level with the wick carrier arms, avoiding damage to the top surface.
- Ensure both tails of the wick reach the bottom of the tank; this requires pushing one tail through the stirrup-like carrier arms. Failure to do so will result in uneven burning.
- Engage the wick carrier arms with the brass studs 'B' and replace the burner basket.
- Allow the wick to soak for at least one hour before lighting.