EasyManua.ls Logo

ALAULM 01SNDK23-GREY - User Manual

ALAULM 01SNDK23-GREY
18 pages
Print Icon
To Next Page IconTo Next Page
Loading...
If you have any questions about the outdoot dog cage, please feel free to contact us.
Customer Service Email: Service@alaulm.com
INSTRUCTION
IMPORTANT
PLEASE READ BEFORE YOU COMMENCE ASSEMBLY
Follow the guidelines in this user guide to ensure correct
assembly and care for this product.
01SNDK23-GREY
Outdoor Dog Cage
Question and Answer IconNeed help?

Do you have a question about the ALAULM 01SNDK23-GREY and is the answer not in the manual?

Summary

Specifications

Before You Begin

Owners Manual

Advice on understanding the manual for easier construction.

Assembly Instructions

Guidance on reviewing and following assembly steps carefully for correct results.

Parts and Parts List

Instructions to check for all necessary parts and review the parts list.

Plan Ahead

Tips on choosing the right weather and having teamwork for assembly.

Exploded Views

Part List

Extra

Installation Steps

Step 1: Connect the bottom frame rod(B) with a tee connector(K2) and a corner tee connector(K3).

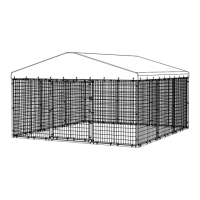
Connect bottom frame rods with tee and corner tee connectors, do not fully tighten screws.

Step 2: Insert the support rod(A, E and G) against the connector and connect with screws(P).

Insert support rods against connectors and secure with screws, tightening all screws.

Step 3: Connect the upper top frame connecting rod(B and C) with a multi-interface connector(K2, K4 and K5) and screws(P).

Connect upper top frame rods with multi-interface connectors and screws, do not fully tighten.

Step 4: Insert the top bezel connector(J2) into the long bar(A) and connect with screws(P).

Insert top bezel connectors into long bars and secure with screws, tightening all screws.

Step 5: Insert the corner connectors(J1) into the long bar(A) and connect with screws(P).

Insert corner connectors into long bars and secure with screws, tightening all screws.

Step 6: Insert the top middle connector(J3) into the long bar(A) and connect with screws(P).

Insert top middle connectors into long bars and secure with screws, tightening all screws.

Step 7: Insert the corner connectors(J1) into the long bar(A) and connect with screws(P).

Insert corner connectors into long bars and secure with screws, tightening all screws.

Step 8: Connect the roof edge frame and the support bar(I) with a four-way corner connector(K5).

Connect roof edge frame and support bar using a four-way corner connector, do not fully tighten screws.

Step 9: Connect the assembled side canopy parts and the middle canopy parts with connecting rods(H).

Connect side and middle canopy parts using connecting rods, do not fully tighten screws.

Step 10: Insert the assembled canopy parts into the connecting rod(H) and connect them with screws(P).

Insert canopy parts into connecting rods and secure with screws, tightening all screws.

Step 11: Insert the assembled canopy into the top connector of the frame and attach it with screws(P).

Insert assembled canopy into top frame connector and secure with screws, tightening all screws.

Step 12: Connect the horizontal rod of the door frame(D) and the right door frame bar(F) with door corner connector(K1).

Connect door frame horizontal rod and door frame bar with door corner connector, do not fully tighten screws.

Step 13: Connect door frames with door corner connector(K1).

Connect door frames using a door corner connector, lift rod, lock screw, and adjust for complete closure.

Step 14: Place the ground nails(U) in the middle of the bottom frame bar and insert it into the ground.

Place ground nails in middle of bottom frame bar, insert into ground, do not insert fully.

Step 15: Attach the monaural clips(M1) to the frame bar with long screws(P).

Attach monaural clips to frame bar using long screws, do not fully tighten screws.

Step 16: Clamp the fencing with the monaural clips and lock it with short screws(O).

Clamp fencing with monaural clips and secure with short screws, do not fully tighten screws.

ALAULM 01SNDK23-GREY Specifications

General IconGeneral
BrandALAULM
Model01SNDK23-GREY
CategoryPet Care Product
LanguageEnglish