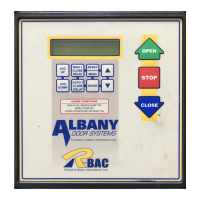
The UltraSmart control panel is designed for the operation and maintenance of Albany Door Systems, a brand of Albany International Corp. It provides a user-friendly interface for controlling door movement, setting operational parameters, and diagnosing potential issues.
Function Description
The control panel allows for comprehensive management of door functions, including opening, closing, and stopping. It features dedicated buttons for "OPEN," "STOP," and "CLOSE" to facilitate basic door operations. The "JOG UP" and "JOG DOWN" buttons enable precise, incremental movement of the door, which is particularly useful during setup and maintenance.
The panel also includes a display screen that provides real-time feedback on door status, settings, and alarm conditions. This display is central to navigating the device's various menus and options.
Key operational modes can be selected via the "MAN 1 CLOSE DELAY" and "AUTO 1 CLOSE DELAY" buttons, allowing for manual or automatic closing delays. The "RESET MENU" button serves multiple purposes, including accessing setup menus, resetting faults, and returning to the main "DOOR READY" screen. The "ENTER" button is used to confirm selections and save settings within the menu system.
Usage Features
The UltraSmart panel offers several features to customize door operation and enhance safety.
Setting Door Travel Limits
This crucial setup procedure defines the door's fully closed, fully open, partial open, and breakaway reset positions.
- Accessing Limit Setup: Press and hold "RESET MENU" until "LIMIT SETUP" appears on the display, then press "ENTER."
- Closed Limit: The display will show "Closed Limit." Use "JOG UP" or "JOG DOWN" to move the door to its desired fully closed position, then press "ENTER."
- Full Open Limit: The display will show "Full Open Limit." Use "JOG UP" or "JOG DOWN" to move the door to its desired fully open position, then press "ENTER."
- Partial Open Limit: The display will show "Partial Open Limit." Use "JOG UP" or "JOG DOWN" to move the door to its desired partial open position, then press "ENTER."
- Breakaway/Reset Limit: The display will show "Breakaway/Reset Limit." Use "JOG UP" or "JOG DOWN" to move the door to its desired breakaway reset position, then press "ENTER."
- Finalizing Setup: Press "RESET MENU" until "DOOR READY" is displayed.
Important Note: The "Open," "Partial," and "Breakaway Limit" settings are relative to the "Closed Limit." If the "Closed Limit" is reset, all other limits will adjust accordingly.
Setting System Options
This allows for configuration of various system behaviors.
- Accessing System Options: Press and hold "RESET MENU" until "LIMIT SETUP" is shown, then press "UP ARROW" until "SYSTEM OPTIONS" appears, and press "ENTER."
- Navigating Options: Use "UP ARROW" or "DOWN ARROW" to cycle through available options, then press "ENTER" to edit.
- Changing Values: Use "UP ARROW" or "DOWN ARROW" to change the value, then press "ENTER" to store.
- Exiting: Press "RESET MENU" until "DOOR READY" is displayed.
Commonly changed options include: "Rev Edge Auto Close?", "Photoeye Auto Close," and "Panel Open Man 1 Auto Close?"
Setting Timers
This feature enables adjustment of various timing parameters for door operation.
- Accessing Timers: Press and hold "RESET MENU" until "LIMIT SETUP" is shown, then press "UP ARROW" until "SET TIMERS" appears, and press "ENTER."
- Navigating Timers: Use "UP ARROW" or "DOWN ARROW" to cycle through available timers, then press "ENTER" to edit.
- Changing Values: Use "UP ARROW" or "DOWN ARROW" to change the value, then press "ENTER" to store.
- Exiting: Press "RESET MENU" until "DOOR READY" is displayed.
Commonly changed timers include: "Close Delay Auto 1," "Door Open Alarm Timer," "Delay To Close Output," "Defrost Cycle On," and "Defrost Cycle Off."
Turning On Automatic Close Feature for Front Open Button
This allows the door to automatically close after being opened by the front "OPEN" button.
- Accessing System Options: Follow steps 1 and 2 from "Setting System Options."
- Locating Setting: The display will show "Panel Open & Close Disable?". Press "DOWN ARROW" until "Panel Open Man1 Auto Close?" is displayed.
- Enabling Auto Close: Press "UP ARROW" to change "NO" to "YES."
- Saving: Press "ENTER."
- Exiting: Press "RESET MENU" twice to return to "DOOR READY."
De-activating and Re-activating Breakaway (Wireless)
This feature manages the wireless breakaway sensor, which detects if the door has been impacted and dislodged from its tracks.
- Accessing Module Configuration: Press and hold "RESET MENU" for 3-5 seconds. Press "UP ARROW" until "MODULE CONFIGURATION" is displayed, then press "ENTER."
- Navigating to MOD Z: Press "UP ARROW" until "MOD Z..." is displayed.
- Selecting Breakaway Input: Press "ENTER" twice. The display will show "Breakaway I 1." Use "UP ARROW" to select "Breakaway I 2" if needed (I1 is left side, I2 is right side). Press "ENTER."
- De-activating: The cursor will flash under "Breakaway." Press "UP ARROW" to change it to "Not Assigned." Press "ENTER." The second line will show "NO."
- Saving and Exiting: Press "ENTER" twice. Press "RESET MENU" twice to return to "DOOR READY."
To re-activate, follow the same steps, but change "NOT ASSIGNED" back to "BREAKAWAY."
De-activating and Re-activating Reversing Edge (Wireless)
This feature manages the wireless reversing edge sensor, which detects obstructions during door closure and reverses the door.
- Accessing Module Configuration: Follow steps 1 and 2 from "De-activating Breakaway (Wireless)."
- Navigating to Reversing Edge: Press "UP ARROW" until "Reversing Edge .. I 3" is displayed, then press "ENTER."
- De-activating: The cursor will flash under "Reversing edge." Press "UP ARROW" to change it to "Not assigned." Press "ENTER." The second line will show "NO."
- Saving and Exiting: Press "ENTER" twice. Press "RESET MENU" twice to return to "DOOR READY."
To re-activate, follow the same steps, but change "NOT ASSIGNED" back to "REVERSING EDGE." The second line will show "NO Secure."
De-activating and Re-activating PE 1 (Front Photo Eye)
This manages the front photo eye, a safety sensor that prevents the door from closing if an obstruction is detected.
- Accessing Module Configuration: Follow steps 1 and 2 from "De-activating Breakaway (Wireless)."
- Navigating to PHOTO 1 (Front): Press "UP ARROW" until "MOD B..." is displayed, then press "ENTER" twice. The display will show "PHOTO 1 (Front)."
- De-activating: Press "ENTER." The cursor will flash under "PHOTO 1 (FRONT)." Press "UP ARROW" until "NOT ASSIGNED" is displayed. Press "ENTER." The cursor will blink in the lower left corner. If "NC" is displayed, press "UP ARROW" to change it to "NO." If "NO" is displayed, proceed.
- Saving and Exiting: Press "ENTER." The display will show "NOT ASSIGNED" and "NO" in the lower left corner. Press "RESET MENU" twice to return to "DOOR READY."
To re-activate, follow the same steps, but change "Not Assigned" back to "Photo 1(front)." The cursor will flash under "NO." Press "UP ARROW" to change it to "NC."
De-activating and Re-activating PE 2 (Rear Photo Eye)
This manages the rear photo eye, another safety sensor.
- Accessing Module Configuration: Follow steps 1 and 2 from "De-activating Breakaway (Wireless)."
- Navigating to PHOTO 2 (Rear): Press "UP ARROW" until "MODB..." is displayed, then press "ENTER" twice. The display will show "PHOTO 1 (FRONT)." Press "UP ARROW" to change this to "PHOTO 2 (REAR)."
- De-activating: Press "ENTER." The cursor will flash under "PHOTO 2 (REAR)." Press "UP ARROW" until "NOT ASSIGNED" is displayed. Press "ENTER." The cursor will blink in the lower left corner. If "NC" is displayed, press "UP ARROW" to change it to "NO." If "NO" is displayed, proceed.
- Saving and Exiting: Press "ENTER." The display will show "NOT ASSIGNED" and "NO" in the lower left corner. Press "RESET MENU" twice to return to "DOOR READY."
To re-activate, follow the same steps, but change "Not Assigned I2" back to "Photo 2 (REAR)." The cursor will flash under "NO." Press "UP ARROW" to change it to "NC."
Adjusting Defrost Heat Cycle Time
This feature allows customization of the defrost heater's operational duration.
- Accessing Module Configuration: Follow steps 1 and 2 from "De-activating Breakaway (Wireless)."
- Navigating to MOD H DEFROST: Press "DOWN ARROW" until "MOD H DEFROST" is displayed, then press "ENTER" twice.
- Navigating to DEFROST HEATER: Press "UP ARROW" until "DEFROST HEATER" is displayed, then press "ENTER" three times.
- Selecting CYCLE: The cursor will be blinking. Press "UP ARROW" until "CYCLE" is displayed, then press "ENTER."
- Accessing Set Timers: Press "RESET MENU." Press "UP ARROW" until "SET TIMERS" is displayed, then press "ENTER."
- Navigating to DEFROST CYCLE ON: Press "DOWN ARROW" until "DEFROST CYCLE ON" is displayed, then press "ENTER."
- Adjusting Time: The cursor will flash on the number in the lower right corner (time in minutes). Use "UP ARROW" or "DOWN ARROW" to change the time. Press "ENTER" to save.
- Exiting: Press "RESET MENU" twice to return to "DOOR READY."
To adjust "DEFROST CYCLE OFF," repeat steps 1-6, then navigate to "DEFROST CYCLE OFF" and adjust the time.
Operating Blower Only When the Door is Closed
This feature ensures the blower operates only when the door is in the closed position.
- Accessing Module Configuration: Follow steps 1 and 2 from "De-activating Breakaway (Wireless)."
- Navigating to MOD H DEFROST: Press "UP ARROW" until "MOD H DEFROST" is displayed, then press "ENTER" twice.
- Navigating to O3...: Press "UP ARROW" until "O3...." is displayed in the upper right corner, then press "ENTER."
- Navigating to DOOR NOT CLOSED: The cursor will flash. Press "UP ARROW" until "DOOR NOT CLOSED" is displayed.
- Changing Setting: Press "ENTER." The cursor will flash under "NO." Press "UP ARROW" to change it to "NC."
- Saving and Exiting: Press "ENTER." The cursor should no longer be flashing. Press "RESET MENU" until "DOOR READY" is displayed.
Maintenance Features
The UltraSmart control panel includes features to assist with troubleshooting and ensure proper operation.
Viewing Fault History
This allows technicians to review past errors, aiding in diagnosis and repair.
- Accessing Fault History: Press and hold "RESET MENU" for 3-5 seconds. The display will show "LIMIT SETUP." Press "UP ARROW" until "VIEW FAULT HISTORY" is displayed, then press "ENTER."
- Understanding Display:
- Top Line: Shows "Fault #/# of total faults" (e.g., 1/64) and "Cycle cont" (cycle count when the fault occurred). The system stores up to 64 faults, with the oldest being deleted when the limit is reached.
- Bottom Line: Displays the "Fault description" or error code.
- Scrolling Through Faults: Use "UP ARROW" or "DOWN ARROW" to scroll through the fault history.
- Exiting: Press "RESET MENU" once to return to the main menu, then press "RESET MENU" again to display "DOOR READY."
Alarm Conditions
The control panel's display will indicate the type of alarm when a fault occurs. This prompts the user to inspect the door for proper operation before attempting to reset the system. This immediate feedback is crucial for preventing further damage or unsafe conditions.
The "RESET MENU" button is a critical maintenance tool, used not only for accessing setup menus but also for clearing fault conditions and bringing the door back to an operational state ("DOOR READY"). This ensures that after any adjustments or repairs, the system can be quickly re-initialized.