Do you have a question about the Alfa Network MINI and is the answer not in the manual?
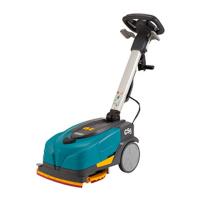
Unpack the main floor scrubber unit and identify the handle assembly for attachment.
Step onto the machine to ensure proper positioning and stability before operation.
Connect and secure the handle assembly to the main floor scrubber unit.
Open the designated cover to access the solution tank for filling.
Insert the brush or squeegee component into the machine's cleaning mechanism.
Press the indicated button to lock the inserted cleaning component securely in place.
Securely attach the rollers or wheels to the designated points on the machine.
Cut and remove any shipping restraints or securing tape from the machine.
Fill the clean water tank with water and the chemical tank with the appropriate cleaning solution.
Verify that the cleaning component is correctly installed, indicated by a checkmark.
Observe the battery indicator, showing an approximate runtime of 1.5 hours.
Ensure the solution tanks are filled and the machine is ready for use.
Add the specified amount of water and chemical solution to the respective tanks.
Turn the power switch to the 'ON' position to activate the floor scrubber.
Rotate the control dial to adjust the brush speed or other operational settings.
Adjust the handle position and begin operating the floor scrubber.
Choose the desired cleaning mode, such as ECO or AUTO, from the control panel.
Operate the machine by pushing it forward to clean the floor.
Recharge the battery when depleted, indicated by the battery level icon.
Clean the brush, squeegee, and tanks after use for maintenance.
Empty and rinse the clean water and recovery tanks after each use.
Store the machine in a suitable location after cleaning and drying.
Perform regular maintenance checks and follow safety guidelines for machine longevity.
| Brand | Alfa Network |
|---|---|
| Model | MINI |
| Category | Scrubber |
| Language | English |