Do you have a question about the Alpine Spas Cedar Barrel Sauna and is the answer not in the manual?
Consider where to place the sauna, ensuring power access is available and confirmed.
Details on maintaining cedar timber with UV protectant oil for external surfaces, before or after assembly.
Specific parts like staves, capping, benches, and accessories need oiling on exterior surfaces.
Details on installing the sauna light, requiring an electrician for cable and switch setup.
Information on installing the Sawo Sauna Heater 4.5kW, requiring a registered electrician for wiring and safety.
Read all health and safety instructions, consult physician, exit immediately if unwell, and follow usage precautions.
Information on the natural characteristics of cedar wood, its resistance to elements, and potential water seepage.
Details on warranty periods for indoor and outdoor saunas, including coverage for workmanship and parts.
Comprehensive list of installation and accessory parts with labels, quantities, and sizes for reference.
Diagram showing labeled parts of the sauna for easy identification during assembly.
Guidance on creating a stable foundation, recommending concrete slab or pile foundation for weight support.
List of essential tools and recommended resources like timber oil and sealant for assembly.
Steps 1-4 detail assembling the cradle bases and support beams using bolts and screws.
Steps 5-7 cover securing cradle supports with double-ended screws and fixing them tightly with washers and nuts.
Steps 8-11 guide on fitting the bottom stave and laying/securing the initial staves using screws.
Steps 12-15 cover laying out back panels, securing them, and taking measurements for front panel placement.
Steps 16-19 cover front panel placement, securing pieces, and preparing for sauna light cable installation.
Steps 20-23 detail securing the front panel assembly and installing more staves using screws and a rubber mallet.
Steps 24-27 cover fitting the remaining staves and applying the steel straps for structural integrity.
Steps 28-31 explain tightening steel straps, fitting dome hex caps, and installing the glass door with hinges.
Steps 32-35 cover installing the door handle, lock, and fixing outdoor bench support beams.
Steps 36-39 guide on securing outdoor and indoor bench seats, legs, and installing the towel rack.
Steps 40-43 cover shelf and outside floor panel installation, and assembling the heater fence.
Steps 44-47 detail attaching the heater back panel, positioning the heater unit, and securing it.
Steps 48-51 cover vent placement, floor panel fixing, back rests, and securing triangular roof beams.
Steps 52-54 explain installing bitumen roofing pieces, using silicon for waterproofing, and fixing the final row.
Steps 54-55 cover adding capping to front/back and installing remaining accessories like magazine rack and hygrometer.
Provides contact details for assistance via phone or email, and links to digital copies of the guide.
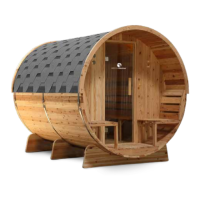
| Shape | Barrel |
|---|---|
| Capacity | 4-6 people |
| Heater Type | Electric |
| Heater Power | 6 kW |
| Warranty | 5 years |
| Material | Western Red Cedar |