7-EN
01GB04-US_EN.fm
ALPINE iLX-F411/iLX-F409 M3514702010 (EN)
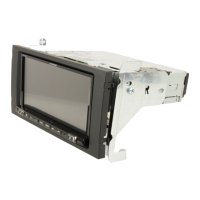
2) After adjustment, tightly fix the display with the 4 Flush head
screws (M4×13) for up-down adjustment.
3) Adjust the angle of the display.
4) After adjustment, secure the display with the 2 angle
adjustment screws (M4×6) (left and right) that were removed
in Step 1 on page 5.
Flush head screw(M4×13)
(left and right)
0° -20°
45°20°
2-b
2-a
Refer to the illustration below to use the screw holes for angle
adjustment.
•Example:
To install the display at the angle of 20°, use the screw holes 2
and b.
2-c
a
b
c
2
1
Angle adjustment screws (M4×6)
(left and right)
01GB00-US.book Page 7 Monday, April 27, 2020 5:11 PM
 Loading...