Caution: Before assembling and operating please
read the entire manual
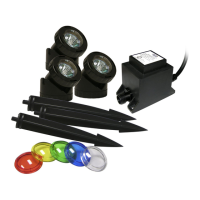
Must be operated with a transformer (included):
Before reading instructions below, this light MUST BE used with a transformer.
Use with Alpine multi-light transformer which comes included in the packaging.
Please use a transformer with the correct wattage and never exceed the
maximum wattage indicated on the transformer.
Operating Instructions:
• Before plugging in the unit, be sure the input voltage indicated on your
transformer is the same as your local power supply. If not, please do not
operate the light until you obtain the appropriate transformer from your
local dealer.
• To reduce the risk of electrical shock, inspect all cords for damage before
installation.
• Plug the connector of the Power Beam™ Light into the socket on the
transformer and screw the coupling until tight.
• Plug the transformer into the nearest 120-volt outlet. Your Power Beam™
Light should light up.
Changing the MR11 Bulb or Colored Lenses to your Power Beam™:
• To replace the MR11 volt 10 watt halogen bulb, first make sure to unplug
the transformer and remove it from the water (if submerged).
• After allowing a sufficient amount of time for the light to cool down, let it
dry and remove the lens retainer from the Power Beam™ light by pushing
on it and turning counter-clockwise quickly.
• Remove the lens carefully and make sure the “O” ring stays in place and
is not lost during this process.
• Gently pull out the socket and remove the MR11 bulb and replace with
the new MR11 12 volt 10 watt bulb by aligning the pins of the bulb into
the socket. Gently push the new bulb down, DO NOT force it. Turn the
MR11 12 volt 10 watt bulb around if it does not fit easily.
• Re-Install the lens and lens retainer ensuring the “O” ring remains in the
correct position in the groove of the Power Beam™ light.
• To maintain a good water tight seal, make sure the lens is flush with the
front lip of the rubber seal.
• To charge your Power Beam™ color lens, remove the lens and replace it
with a colored lens of your choice.
• Make sure the lens is on the rubber seal then take the cover and place it
correctly onto the slots of the Power Beam™ turning tightly clockwise.
• Make sure the cover is tightly locked.
Limited Warranty Information:
For complete limited warranty information and details,
please visit our website at www.alpine4u.com
Troubleshooting your Power Beam™:
If light fails to illuminate, please check the following:
• Check that the light set is getting power by testing another applicant in the power
outlet that the lights use.
• Check to ensure that your light bulb has not burned out from usage.
• If water gets into any of your Power Beam™ lights, lift it out of the water, remove the
lens and empty the water until dry.
Caution & Warning:
• Always handle the light from the base. The light housing can and will become HOT!
• Operating the lights with missing or damaged covers can result in risk of fire or
electrical shock.
• Use ONLY recommended MR11 12 volt 10 watt halogen bulbs.
• Do not exceed the voltage & wattage indicated on the transformer.
• Keep away from flammable and/or children.
• This light assembly has not been tested or designed for use in swimming pools and
hot tubs.
 Loading...