USE DRY FIREWOOD
THE FLUE PIPES ARE THE MOST IMPORTANT COMPONENTS WITH REGARD TO FIREPLACE SAFETY.
THEY MUST BE INSTALLED STRICTLY ACCORDING TO THE INSTRUCTIONS AND KEPT AWAY
FROM ANY FLAMMABLE MATERIAL. IN ADDITION, LOCAL BUILDING REGULATIONS AND SAFETY
STANDARDS MUST BE RESPECTED.
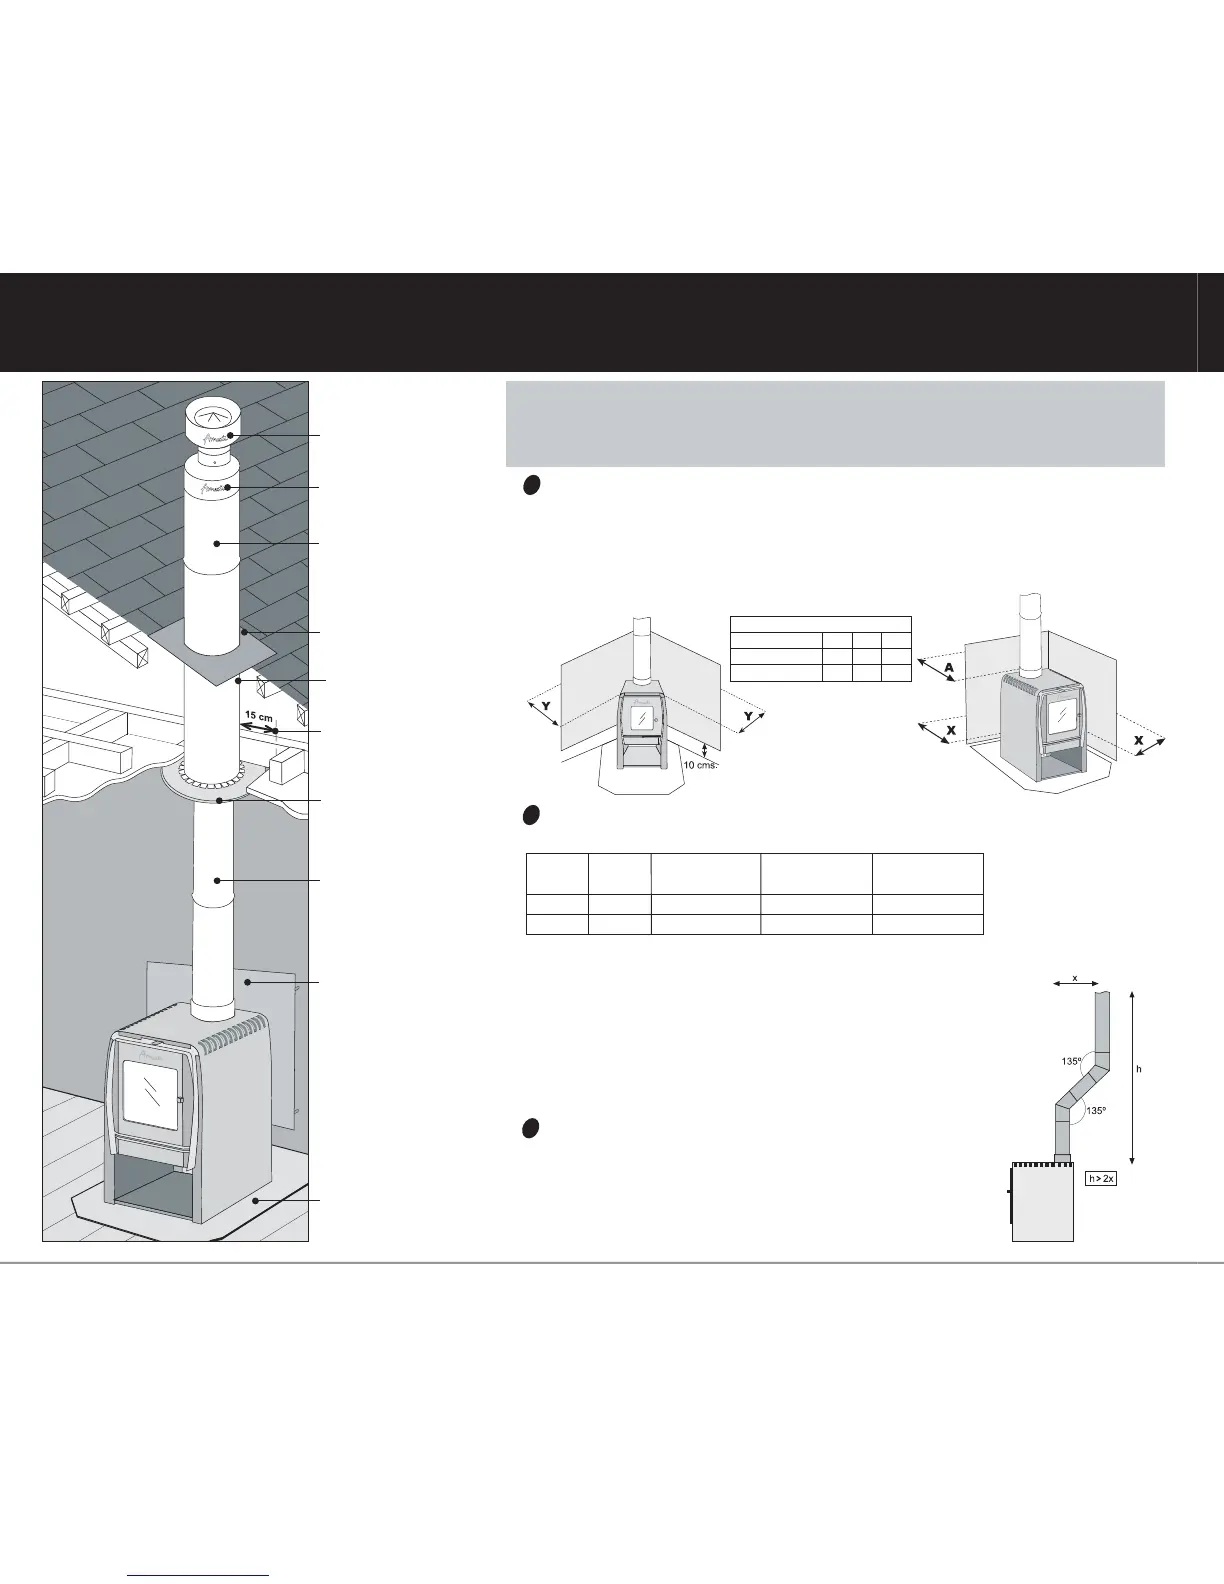
1 Choose the location for the fireplace. We recommend that it be positioned close to the center of the
room that will be heated. If your floor finish is wood, carpet, plastic or any other flammable material, you
must place a steel (or other non-flammable material) base plate under the fireplace.
If the wall is made of a flammable material, you must apply the minimum distances shown in the table
below. If you want to position the fireplace closer to the wall, you need to protect the wall with a metal
or non-flammable plate, 10 cm wider and 30 cm higher than the fireplace itself, and separated from the
wall by 3 cm in order to allow free circulation of air.
2 Locate the center of the main flue in the ceiling and drill a hole through it and roof. Based on the Flue
Kit diameter that you are using, follow the instructions in the table below:
If the roof is made of wood, the hole must be covered by a sheet of
non-flammable material (fibre cement or similar, not included in the Flue
Kit). Otherwise, follow the guidelines in the table above closely for the
diameter of the holes in the ceiling and roof. In the attic section, place
the outer flue over the main flue and fill the space between the main
and outer flue pipes with the rock wool supplied. No flammable material
should be within a 15 cm range of the outer flue. The outer flue should
rest on the ceiling plate and be supported by the roof structure with steel
bracing (not provided).
3 The flue pipe should be as straight and vertical as possible. If required,
you can use up to two 135º bends. The vertical path should be twice as
long as the horizontal. All bends should be after the first length of flue
and before the outer flue commences. To ensure optimal performance,
the length of the main flue should be between 4 meters and 11 meters in
length. Do not place any turnbuckles or regulators on the main flue, since
they can alter the fireplace’s performance.
A
X
Y
with protection
without protection
Installation
14
7
5
28
20
15
Outer
Flue
Hole diameter in
Outer Roof
Hole diameter
in Flammable
Ceiling
Hole diameter
in Non-flammable
ceiling
8’’
10’’
21 cm
26 cm
50 cm
55 cm
21 cm
26 cm
INSTALLATION INSTRUCTIONS
Distances to Walls (cms)
Cowl
(stainless steel)
Funnel
(stainless steel)
Outer Flue
(zinc-alum or galvanized)
It covers the main flue from
the ceiling to the cowl.
Flashing
(zinc-alum)
Rock Wool
Rock wool is inserted between
the main flue and the outer flue
for insulation.
Distance from Flammable
Material
Any flammable material must be
a minimum distance of 15 cm
from the outer flue
Ceiling plate
(stainless steel)
Main Flue
(stainless steel)
It extends from the top of the
fireplace to the cowl.
Protection (refer to table)
If your wall is flammable and you
want to put the fireplace close to
the wall, place a metal or other
non flammable plate on the wall,
leaving space behind it for air
circulation.
Metal Base
This must be used if the floor
finish is wood, carpet or any
other flammable material.
Flue
Kit
Diameter
5’’
6’’
 Loading...