Do you have a question about the Amulet Hotkey DXP4 and is the answer not in the manual?
Regulatory compliance statement for radio frequency emissions according to FCC rules.
Compliance with EMC and Low Voltage Directives, listing harmonized standards.
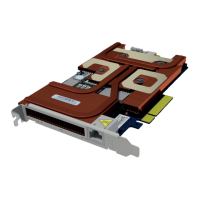
Details the DXP4 and DXP4-M models, including network and thermal solution options.
Explains the potential need for auxiliary power connection for the DXP4 card.
Information on supported SFP modules for the DXP4-M, including fiber and copper options.
Guidance on noting down IP and MAC addresses for host and zero client setup.
How to configure Wake on LAN and use the Remote Power Cable for host power management.
Describes the components on the DXP4's I/O bracket, including LEDs, network port, and button.
Explains the conventions used for LED status indications like color, flash, blink, and wink.
Details the meaning of the STATUS (link) LED for network connection type and status.
Explains the function of the ACTIVITY and SPEED LEDs for network status and firmware updates.
Describes the simultaneous white flash of all LEDs upon BSM power-up or reset.
Outlines functions of the recessed button for factory reset and toggling local monitor/BSM interface.
Notes the availability of a local DisplayPort for setup and troubleshooting on Active Thermal Solutions.
Details internal sockets and jumpers on the DXP4 card, including reset jumper and power sockets.
Steps to prepare the host computer before installing the DXP4, including power off and safety precautions.
Procedure for physically installing the DXP4 into a PCIe slot, emphasizing anti-static precautions.
Instructions for connecting auxiliary PCIe power if required by the DXP4 or GPU.
Guidance on connecting the RPC cable for remote power cycling functionality.
How to fit an SFP module into the DXP4-M's network socket.
Steps to connect the DXP4 to the network using a network cable.
Final steps including re-assembling the PC, restarting, and installing drivers.
How to connect a zero client to the DXP4 to establish a PCoIP session.
Recommends changing the default password for security and provides the default password.
Pre-installation checks for dual DXP4 setup, including network and power supply requirements.
Steps to install the first DXP4, including connecting interlink and power cables.
Steps to install the second DXP4, connecting interlink and power cables.
Details on connecting the DXP4s to the network for dual card configurations.
How to connect zero clients to the host PC after installing dual DXP4 cards.
Verifying Ethernet connectivity and functionality for dual DXP4 setups.
Pre-installation checks for installing the DXEC, including PC shutdown and safety measures.
Steps for installing the DXP4 card into the host PC or workstation.
Procedure for installing the DXEC and connecting it to the DXP4.
Steps to connect a zero client to the DXP4 after installing the DXEC.
Verifying the Ethernet connection between the DXEC and DXP4, and checking LED indicators.
Explains the PCoIP protocol, its function, and core features like host rendering.
Details how PCoIP renders display images on the host PC, preserving the environment.
How PCoIP analyzes and encodes different image elements for efficient transmission.
How PCoIP adjusts image quality to manage bandwidth use based on network conditions.
Describes PCoIP hosts, their function, and types like the DXP4 card.
Information on PCoIP zero clients, their security, and data handling capabilities.
Outlines advantages of zero clients: increased security, low maintenance, and cost savings.
Describes the console for managing multiple PCoIP devices, viewing status, and updating firmware.
Explains the embedded web interface for configuring individual PCoIP hosts and zero clients.
Describes the OSD interface that appears on the zero client when no PCoIP session is active.
Initial steps to power on the zero client and access its OSD connection screen.
Configures the zero client to automatically detect and connect to available servers.
Method to connect the zero client directly to a known host using its IP address or DNS name.
How to discover and connect to PCoIP hosts on the same subnet using SLP Discovery.
Using a Connection Manager for central administration of multiple PCoIP devices.
Setting up automatic connection and logon using a PCoIP Connection Manager.
Configuring zero clients to connect to virtual desktops within a VMware View environment.
Establishing automatic connections to VMware View using credentials.
How to use a connection broker for dynamic host assignment to zero clients.
Configuring zero clients for automatic connection upon user login, simplifying end-user experience.
Procedure to safely disconnect a PCoIP session from the zero client's control panel.
Points to additional resources for zero client security and administration guides.
Discusses factors affecting network bandwidth requirements for PCoIP and provides usage estimates.
Explains how dual network links provide redundancy and recovery mechanisms for interrupted sessions.
Information on selecting and configuring third-party connection brokers for managing PCoIP systems.
Steps to check and update the DXP4's firmware using the Administrative Web Interface.
Guidance on inspecting and maintaining the fan on the Active Thermal Solution DXP4 for proper cooling.
Procedure to verify Ethernet connectivity and LED status when using dual DXP4s in an octal setup.
States the warranty period for the DXP4 host cards.
Lists key technological specifications, including PCoIP processor, MXM GPU support, and video outputs.
Provides environmental specifications like power consumption, cooling, form factor, and operating temperature range.
| GPU Architecture | NVIDIA Ampere |
|---|---|
| Memory | 16GB GDDR6 |
| Outputs | 4x DisplayPort |
| GPU | NVIDIA RTX A4000 |
| Memory Interface | 256-bit |
| Architecture | NVIDIA Ampere |