This document, titled "ADRV902X GUI Troubleshooting Guide," provides comprehensive instructions and steps for troubleshooting common issues encountered when connecting to and operating the ADRV902X evaluation board via its Graphical User Interface (GUI). It is designed to assist users in resolving connectivity and operational problems, particularly during initial setup or when unexpected behavior occurs.
Function Description:
The ADRV902X GUI Troubleshooting Guide serves as a diagnostic and resolution tool for users of the ADRV902X evaluation board. It outlines a systematic approach to identify and fix problems related to serial console port connection, LED status, IP ping, GUI connectivity, platform file updates, and command server operation. The guide emphasizes initial setup procedures, including referring to the user guide UG-1727 for first-time connections and allowing sufficient boot time for the EVB setup.
The core function of the guide is to provide step-by-step troubleshooting for specific symptoms. These symptoms range from basic hardware indicators like the D3 Boot Status LED not turning off or blinking, to more complex software-related issues such as the GUI failing to connect despite a normal boot sequence and constant ping, or problems arising after updating platform files. It also addresses scenarios where the command server is not running, offering manual execution and EEPROM update solutions.
Important Technical Specifications (implied from troubleshooting steps):
- Boot Sequence Time: Approximately 3-4 minutes for the EVB setup to complete its boot sequence. Users are advised to wait at least 4 minutes before attempting to connect the GUI to the board.
- Serial Console Port: Requires a USB cable connection to read the serial port console log. Serial port settings typically include:
- Serial engine: PuTTY (allows manual COM port setting)
- Data bits: 8
- Stop bits: 1
- Parity: None
- Flow control: Xon/Xoff
- Speed (bps): 115200
- IP Configuration (for Ethernet connection dedicated to ADS9 platform):
- IPv4 address: 192.168.1.2
- IPv4 subnet mask: 255.255.255.0
- ADS9 IP address (default): 192.168.1.10
- Firewall Ports: The following ports must not be blocked by firewall software on the PC:
- Port 22: SSH protocol
- Port 55556: Access to the evaluation software on ADS9 platform
- D3 Boot Status LED: This LED indicates the boot status. A normal state is "Turned OFF" after 3-4 minutes. Blinking or remaining ON indicates a problem.
- S1 Switch Position: Must be in the "OFF" position for continuous operation, especially if the board is restarting continuously.
- SD Card Image: Re-flashing the SD Card Image may be required if the boot sequence is not normal. A download link for Zynq images and instructions for using a win32 disk imager are provided.
- Command Server: The ADRV902x Command server is a critical component for GUI connectivity. Its process can be checked using
ps ax | grep server or netstat -lptu commands. It typically runs on port 55556.
- EEPROM Binary File: Updating the EEPROM binary file may be necessary if errors occur during manual execution of the command server.
Usage Features:
- Systematic Troubleshooting: The guide provides a structured approach, starting with initial checks for first-time connections and progressing through specific symptoms with corresponding troubleshooting steps.
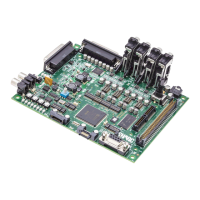
- Visual Aids: Includes a diagram of the ADS9 Mother Board with key components labeled (e.g., S4 Power On, DS13 12V_PIN, J6 MicroSD Card Slot, J1 Ethernet Connection, SW1 Shutdown, D3 Boot Status, S1 switch) to help users locate relevant hardware.
- Command Line Instructions: Provides specific Linux commands (e.g.,
ps ax | grep server, netstat -lptu) for diagnosing command server status and network connections.
- Software Configuration Guidance: Details how to configure serial port settings (using PuTTY as an example) and network adapter IP settings on a PC.
- Resource Links: Directs users to external resources such as the UG-1727 user guide, wiki pages for Zynq images and SD card flashing tools, and ADI Support forums for further assistance.
- Demo Mode Entry: Instructs users to enter "Demo Mode" by providing the correct part number (e.g., 9025) and updating platform files via the GUI when facing GUI connectivity issues despite a constant ping.
Maintenance Features:
- SD Card Re-flashing: The guide suggests re-flashing the SD Card Image as a maintenance step if the boot sequence is abnormal, ensuring the board's operating system is correctly installed.
- Platform File Updates: Users are instructed to update platform files via the GUI as part of the troubleshooting process, which helps ensure the board's firmware and software components are up-to-date and compatible.
- EEPROM Update: The guide highlights the need to update the EEPROM binary file if specific errors occur during command server execution, indicating a crucial firmware maintenance task.
- Board Swapping: In cases where boot sequence issues persist and are suspected to be hardware-related (ADS9 board itself), the guide recommends swapping the board, which is a key diagnostic and maintenance action.
- ADI Support Contact: For unresolved issues, the guide directs users to contact ADI Support, providing a clear escalation path for complex problems that may require expert intervention or hardware replacement. This ensures that users have access to professional assistance for advanced maintenance and repair.