Do you have a question about the Analog way LivePremier Aquilon RS alpha and is the answer not in the manual?
Details Analog Way's ownership of software and prohibits unauthorized copying or alteration.
Outlines the product warranty terms and conditions, including exclusions and limitations.
Specifies Analog Way's limited liability regarding the software and hardware's utility or content.
Excludes Analog Way's liability for circumstances beyond its control.
Provides critical safety warnings and guidelines for operating the LivePremier unit.
Safety and operating instructions in English for product use.
Consignes de sécurité et de fonctionnement en français pour l'utilisation du produit.
Istruzioni di sicurezza e funzionamento in italiano per l'uso del prodotto.
Sicherheits- und Betriebsanweisungen auf Deutsch für den Produktgebrauch.
Instrucciones de seguridad y operación en español para el uso del producto.
Details operating temperature, humidity, and safety standards for all models.
Specifies compatibility requirements for Uninterruptible Power Supply (UPS) systems.
Lists all items included in the LivePremier sales package.
Provides information regarding rack mounting procedures and related documentation.
Explains the modular design and fixed/customizable models of the LivePremier.
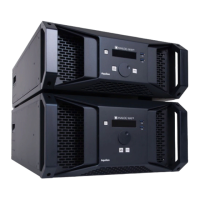
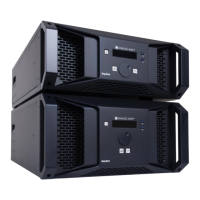
Describes the components and functions of the LivePremier unit's front panel.
Illustrates and identifies the input and output connectors on the rear panel.
Details the available input/output card options and their specifications.
Identifies components that are fixed and not removable on the LivePremier unit.
Provides instructions for safely starting up and shutting down the LivePremier unit.
Offers guidance on safe mounting practices to ensure proper airflow and operation.
Explains how to access and start the LivePremier's web-based remote control software.
Lists the necessary hardware and software requirements for using the Web RCS.
Details the default IP address and network configuration for connecting to the unit.
Describes how to establish a connection to the LivePremier unit via the Web RCS.
Information regarding the login process for accessing the Web RCS.
Introduces the simulator for practicing LivePremier operations and Web RCS.
Offers useful tips and recommendations for navigating and using the Web RCS interface.
Highlights features managed by the Web RCS that mimic standard web browser functionalities.
Explains how to access a simplified Web RCS version on mobile devices.
Describes the functionality of copy, paste, and reset buttons within Web RCS sections.
Details the methods for setting and adjusting numerical values within the Web RCS.
Explains how to use the search bar for quickly accessing features and settings.
Describes how alarms and notifications are displayed and managed within the Web RCS.
Information on accessing virtual back panel and connector settings via shortcuts.
Instructions on how to put the unit into standby or restart it using the Web RCS.
Overview of system settings and device status checks available in the Dashboard.
Settings for device identification, front/back panel LEDs, and date/time configuration.
Procedures for updating the unit's firmware via Web RCS or front panel.
Configuration options for network adapter settings, IP addresses, and DHCP.
Information on device temperature monitoring and automatic shutdown procedures.
Settings related to power management, including standby mode and Wake on LAN.
Options for enabling password protection and controlling access via external devices.
Details on exporting, importing, and saving/loading device configurations internally.
Procedures for resetting the unit's configuration to default or factory settings.
Explains the concept of capacity as maximum bandwidth allocation within the unit.
Shows a table correlating common formats with their required capacity levels.
Illustrates how capacity is assigned to inputs, image slots, layers, and outputs.
Details compatibility rules for using content with different capacity levels in layers.
Describes the two layer modes available for Screens: Mixing layers and Split layers.
Lists the types of content that can be used as sources for Screen and Aux Screen layers.
Explains the default layer mode offering spectacular transition effects.
Details the layer mode that consumes half the resources and doubles layer availability.
Describes Aux Screens, which display content without consuming processing resources.
Explains rules for Aux layer quantity and how capacity affects layer preemption.
Lists features not supported by Aux layers, such as seamless transitions or alpha channels.
Introduction to Video Processing Units (VPUs) and scaling engines for performance.
Explains VPUs, their links, and how capacity affects layer management.
Describes how VPUs rearrange links based on Screen configuration (outputs, layers, capacity).
Explains how VPUs and Screens can manage layers of capacity 1 and 2 simultaneously.
Details the optimization of VPU layer spreading over output links.
Explains how Screens using more than 8 outputs utilize additional VPUs.
Describes Optimized mode enabling best performance for capacity 2 layers.
Explains the Cut & Fill effect and its resource requirements for layers.
Provides a table showing the number of VPUs per LivePremier model.
Explains Image Processing cards (IPUs) for creating image content for layers.
Details how LivePremier manages HDR conversion for inputs and outputs.
Information on the optimized low latency performance of the LivePremier series.
Configure internal rate, framelock, color space, and quick HDCP settings.
Sets the internal operating frame rate for all Program outputs.
Procedure to manually set the refresh rate for the unit.
Configures the unit's refresh rate based on a framelock reference source.
Settings for synchronizing video signals when Framelock is enabled.
Configures the Framelock output to loop or use the internal rate.
Sets the color space for processing and HDR processing options.
Enables or disables HDCP for all inputs and outputs simultaneously.
Configures the number of Multiviewers (one or two) for the unit.
Settings for output groups, rotation, format, and assigning outputs to Screens/Aux.
Optimizes VPU resources by grouping multiple outputs for use in Screens.
Explains output capacity limits impacting Program outputs and Aux usage.
Steps to create an output group and assign it to a Screen.
Configures a DisplayPort output connected to a DPH104 for Screen display.
Assigns an output to an Aux Screen, considering layer quantity and capacity.
Procedure for creating a Screen, setting layer mode, and assigning output groups.
Steps to create an Aux Screen and assign an output, considering layer quantity.
Instructions on how to rename existing Screens or Aux Screens.
Sets pixel space and output settings for each screen (rate, position, rotation, AOI).
Displays a hierarchical view of Screen elements for easier configuration.
Enables and configures output rotation for output groups within a Screen.
Uses display patterns for testing and controlling output setup in Screens.
Applies a specific pattern to the entire screen for testing purposes.
Tests and controls how individual outputs are displayed within Screens.
Creates a grid-based canvas for standard shows with aligned displays.
Steps to create a grid canvas and assign output groups to cells.
Applies edge blending to create seamless projections between outputs.
Creates gaps (bezels) between outputs within a grid canvas.
Provides two modes (Auto, Custom) for manual canvas adjustments.
Utilizes bottom bar buttons for precise output positioning in Free type canvas.
Guides on creating a canvas with automatic size computation and output placement.
Instructions for creating a canvas with manually defined size and output placement.
Applies edge blending for seamless projections using the Free canvas mode.
Specific output settings applicable across all canvas types.
Configures DPH104 outputs within a grid based on selected layout.
Defines a cropped area for display, removing unused portions.
Corrects pitch differences in outputs, especially for LED video walls.
Sets input groups and formats, including grouping live inputs for single layer use.
Combines multiple inputs into a single source to save layers and optimize processing.
Steps to group inputs, set layout, and define expected signal format.
Configures four 3G-SDI inputs for 2SI format for recomposed 4K source.
Sets expected image resolution for image slots and manages image capacity.
Details available image slots based on IPU count and slot capacity.
Assigns expected image resolution and capacity to image slots.
Creates background sets for each Screen by assigning inputs and images.
Defines background sets by assigning sources to output groups for Screens.
Procedure to create background sets for screens with single output groups.
Steps to create background sets for screens with multiple output groups.
Clears a selected background set from the virtual canvas.
Removes a source content from all associated background sets.
Configures Multiviewer settings such as label and signal parameters.
Sets signal parameters like mode, format, color space, and color depth for Multiviewers.
Applies patterns to Multiviewers for testing and calibration purposes.
Adjusts image properties like colorimetry, user gain, temperature, and gamma.
Displays all outputs in a grid view, showing resolution, capacity, and label.
Opens detailed settings for a selected output, including renaming and blinking LEDs.
Sets the format mode and specific format for all outputs within a group.
Applies patterns to all outputs in a group for testing and calibration.
Configures signal parameters like color space, depth, SDI standard, DVI mode, and HDCP.
Adjusts image properties like colorimetry, user gain, temperature, and gamma for outputs.
Displays all inputs in a grid, showing resolution, signal type, and usage status.
Opens detailed settings for an input, including renaming and general buttons.
Configures signal type, HDCP, black/freeze options, and HDR processing for input groups.
Overrides input signals with patterns for troubleshooting and calibration.
Adjusts brightness, contrast, saturation, hue, sharpness, and pulldown for input groups.
Sets aspect ratio and input crop for input groups.
Corrects input aspect ratio in all layers by setting content ratio and fill option.
Crops input images to remove black bars or unwanted areas.
Applies Chroma Keying or Luma Keying to content for transparency effects.
Steps to configure Chroma Keying, including hue selection and tolerance adjustments.
Steps to configure Luma Keying, including brightness selection and tolerance adjustments.
Manages image files transferred to the LivePremier unit.
Lists the supported image file formats for the LivePremier unit.
Details maximum supported image dimensions and file size.
Procedure for uploading image files from a computer to the unit's library.
Instructions for downloading image files from the unit's library to a computer.
Procedure for removing image files from the unit's library.
Options for managing the image library using the unit's front panel.
Assigns uploaded images to image slots for use in layers.
Displays all image presets in a grid view with associated information.
Opens settings for an image slot, allowing renaming and configuration.
Resizes images to fit the slot's capacity if the resolution is too high.
Steps to load an image from the library into an image slot.
Assigns timers to image slots, allowing them to be used in layers.
Configures image signal parameters, including HDR processing and BBC mapping.
Sets aspect ratio and crop for image slots, affecting layers using the slot.
Corrects the image aspect ratio across all layers using the slot.
Crops image content to keep only the desired area.
Create and manage custom formats for LED walls and non-standard displays.
Step-by-step guide to creating a new custom format using CVT or Full mode.
Procedure to modify existing custom formats and save changes.
Removes a custom format from the formats library.
Manages EDID metadata from displays to indicate preferred formats.
Stores EDIDs from connected devices and custom formats in a memory bank.
Saves EDIDs from inputs and outputs into the EDID bank.
Replaces an input's preferred format using an EDID from the bank.
Applies a template format to an EDID for use as an input preferred format.
Applies a custom format to an EDID for use as an input preferred format.
Downloads EDID data from the unit to a computer.
Uploads EDID files from a computer to the unit.
Removes a custom EDID from the EDID bank.
Manages audio routing with and without Dante network, supporting up to 64 channels.
Procedures for restarting or factory resetting the Dante audio card.
Assigns audio channels from receivers to transmitters, mixing all audio channels.
Assigns all audio channels from a receiver to all channels of a transmitter.
Assigns one single audio channel from a receiver to one transmitter channel.
Generates up to four timers (current time, countdown, stopwatch) for display.
Steps to create and configure timers, including type, format, and offset.
Manages timers (run, pause, stop) directly from the Live menus.
Assigns timers to image slots for display in Screens and Aux Screens.
Controls the device externally using inputs/outputs and provides feedback.
Details the GPIO pin layout and connection specifications.
Explains how to use On/Off pins to control the LivePremier unit's power state.
Configures GPI and GPO actions within the Web RCS interface.
Main interface for controlling a show, managing layers, and transitions.
Describes the Program (PGM) and Preview (PRW) windows for screen control.
Customizable workspace views for Screens and Aux Screens.
Filters to manage the visibility of Program, Preview, and Screen windows.
Allows resizing and reordering of Screen windows within the interface.
Saves the current workspace layout and visibility as a view memory.
Loads, edits, saves, or reverts previously saved view memories.
Manages view memories by renaming, hiding, or deleting them.
Accesses sources like Inputs, Images, Program Screens, and Background sets.
Tools and layers available for the corresponding Screen, including PGM/PRW controls.
A tool for easily placing layers within a Screen using Mosaic or Cascade modes.
Controls for Screen elements like clearing, copying, loading, and saving memories.
Buttons in the bottom bar for layer positioning, alignment, scaling, and aspect ratio.
Manages screen transitions, including type, preset toggle, T-Bar, and Take Cut.
Displays and configures properties for a selected layer (source, position, opacity, crop).
Arranges layers automatically using predefined templates in the layout editor.
Manually adjusts layer position and size using drag-and-drop or properties panel.
Assigns content (inputs, images, colored layers, backgrounds) to a layer.
Steps to assign content from sources to a selected layer.
Configures a layer with a solid color using hexadecimal codes or color picker.
Assigns background sets to a Screen's background layer.
Sets a solid color for the background layer of a Screen.
Removes content from one or multiple layers, emptying them.
Keys content using an input or image as an alpha channel for transparency.
Explains that Cut & Fill feature requires enabling and uses resources of two layers.
Configures the Cut & Fill effect by enabling it and selecting the Cut content.
Adjusts the transparency level of a layer using a value from 0 to 256.
Sets layer crop in percentage and aspect ratio for content filling.
Applies layer borders, including edge settings, color, size, and opacity.
Creates a smooth effect around content without enabling a visible border.
Applies shadow effects to layers, including position, X/Y, opacity, and round corners.
Applies color filters like Black and White, Negative, Sepia, or Solar to layers.
Enables horizontal and vertical flipping effects for layers.
Defines opening and closing animations for layers during Take.
Selects transition types and directions for layer opening and closing.
Sets timing for layer opening and closing transitions using graphs.
Configures layer transition speed using linear or custom speed curves.
Displays content on Aux Screens, which do not consume processing resources.
Lists features not supported by Aux layers, such as seamless transitions or alpha channels.
Accesses the Memories tab for saving and loading layer settings.
Saves/loads multiple Screen memories at once, used for loading settings on all Screens.
Saves current Screen settings as a Master memory, selecting Screens and layer settings.
Creates a Master memory by referencing existing Screen memories.
Loads a Master memory, applying its settings to selected Screens.
Loads a user-defined Master memory automatically when the unit powers on.
Loads, modifies, and saves changes to an existing Master memory.
Saves/loads the layer settings for a single Screen or Aux Screen.
Saves the current settings of a Screen as a Screen memory.
Loads a saved Screen memory, applying its settings to a Screen.
Modifies and overwrites an existing Screen memory with new layer settings.
Quickly overwrites or reverts a loaded Screen memory with new settings.
Saves/loads the settings for a single selected layer.
Saves the current settings of a selected layer as a Layer memory.
Loads a saved Layer memory, applying its settings to a layer.
Modifies and overwrites an existing Layer memory with new settings.
Renames Master, Screen, or Layer memories for better organization.
Assigns a color to memory slots for visual identification.
Rearranges memory slots to create a custom order.
Removes selected Master, Screen, or Layer memories.
Provides guidelines for widget placement and source usage in Multiviewers.
Describes the interface elements of the Multiviewers menu.
Lists available sources (Inputs, Images, Timers, Screens) for Multiviewers.
Manages timer playback directly within the Multiviewers source panel.
Configures how Preview Screens are displayed within widgets.
Tools for selecting, editing, and managing widgets within a Multiviewer.
Tool for arranging widgets within a Multiviewer using custom grids.
Buttons for snapping, aspect ratio, and visibility control in the layout editor.
Settings for individual widgets, including view, source, and position/size.
Manually adjusts widget position and size using drag-and-drop or properties.
Arranges widgets automatically using predefined templates in the layout editor.
Manually positions and sizes widgets using drag-and-drop or property settings.
Assigns content from sources to a selected widget.
Saves and loads Multiviewer configurations, including widget settings.
Saves the current Multiviewer configuration to a memory slot.
Loads a saved Multiviewer memory, applying its settings.
Loads a Multiviewer memory automatically upon unit startup.
Modifies and overwrites an existing Multiviewer memory.
Renames Multiviewer memories for better organization.
Assigns a color to Multiviewer memory slots for visual identification.
Rearranges Multiviewer memory slots into a custom order.
Instructions for cleaning the removable air filter for optimal performance.
Provides solutions for common issues, such as Web browser access problems.
Guides on installing the RC400T controller, including wrist rest removal.
Details the different areas and functions of the RC400T controller.
Describes the top area components like power button, LCD, and encoder for configuration.
Information on using the optional XLR lamp for lighting the controller.
Explains the function of the Program/Preview key for mode switching.
The multi-purpose area for Screen composition and memory loading.
Customizable area for user-defined features and actions.
Controls for triggering transitions (Take Cut, Step Back, TAKE) and T-bar.
Details the connectors and ports located on the rear panel of the RC400T.
Initial setup steps for connecting and starting the RC400T.
Instructions for powering on the RC400T controller.
Procedure for safely powering down the RC400T controller.
Steps to configure the RC400T's network settings and connect to LivePremier.
Manages multiple LivePremier units remotely using the RC400T.
Instructions for upgrading the RC400T and LivePremier firmware.
Resets the RC400T controller to its default factory settings.
Controls the enabling or disabling of the T-bar functionality on the controller.
Overview of controlling LivePremier features using the RC400T.
Selects operating modes for rows on the RC400T's selection area.
Assigns sources (inputs, images) to layers within a selected Screen via RC400T.
Clears assigned sources from layers using the RC400T's Source None key.
Assigns background sets to Screens using the RC400T's BKG sets mode.
Clears background sets from Screens using the RC400T's BKG None key.
Loads a Layer memory via RC400T, applying settings to a selected layer.
Loads a Screen memory via RC400T, applying settings to a selected Screen.
Loads a Master memory via RC400T, applying settings to multiple Screens.
Selects Screens for transitions and triggers transitions using RC400T.
Loads a Multiviewer memory via RC400T, applying settings to a selected Multiviewer.
Using Shot Box² and Control Box² for recalling memories and triggering transitions.
Using Elgato Stream deck with Companion or Universe software for LivePremier control.
| Brand | Analog way |
|---|---|
| Model | LivePremier Aquilon RS alpha |
| Category | Projector Accessories |
| Language | English |