3
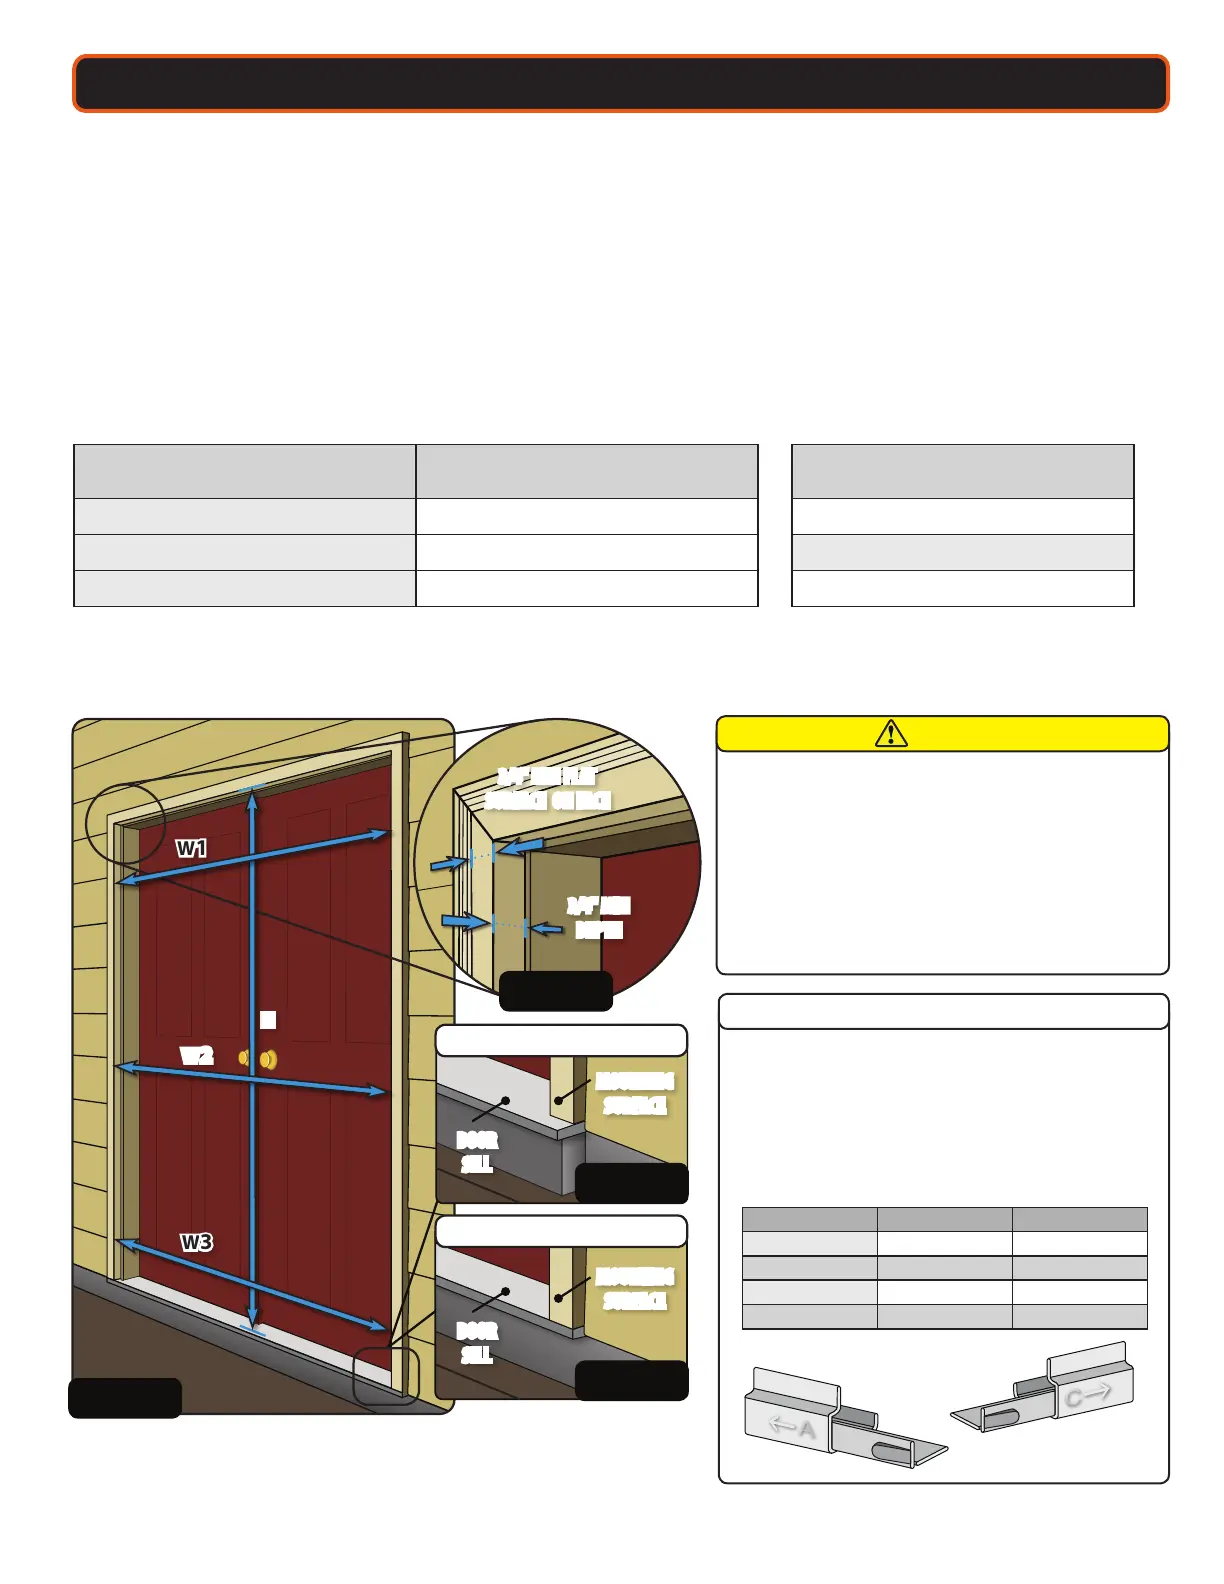
To install the retractable insect screen door, you must verify that the opening width, height and mounting surface are suitable size to
properly install into the opening.
1. Measure the width at the top (W1), middle (W2), and bottom (W3) of the opening (see Figure 1). Measure from the inside of the exterior trim.
Utilizing the narrowest width, reference chart below.
2. Measure the height at the center of the opening, from the bottom of the exterior trim at the top of opening down to the sill at the bottom of
opening. Reference chart for height compliance.
Configuration Widths
(Adjustable Width - Use for Step 1b)
Opening Widths
(Configuration Ranges)
Opening Heights
72 Configuration 70" – 72" 80"
(80" – 80 ⁄")
68 Configuration 68" – 69 ⁄" Also Available in
See Appendix A
(Pg. 10) Less than 68" 78" (78"–78 ⁄") or 84" (84"– 84 ⁄")
3. Make sure that the exterior trim meets the mounting surface requirements to accommodate the retractable insect screen assembly (see Figure 2).
The assembly needs 3/4" at surface on exterior trim face and 3/4" minimum depth of mounting surface.
MEASURE - VERIFY MOUNTING SURFACE REQUIREMENTS AND MEASURE DOOR OPENING
Verify that the exterior brickmould, trim board or casing (exterior trim) is rmly attached to the opening structure and is a material that is suitable
to suciently fasten the retractable insect screen to the door opening. The performance of the retractable insect screen could be eected over
time if it is not suciently fastened to the opening.
Figure 1
W3
H
W2
W1
Figure 2
3/4" MIN
DEPTH
3/4" MIN FLAT
SURFACE ON FACE
Figure 3a
Figure 3b
No Modication Required
See Appendix B
MOUNTING
SURFACE
MOUNTING
SURFACE
DOOR
SILL
DOOR
SILL
If the Door Sill doesn’t extend past the Mounting Surface
or does not have sucient support, product damage, injury
or both may occur.
•
If the Door Sill extends past your exterior trim Mounting Surface
and is supported, no modication is required (see Figure 3a).
•
If the Door Sill is extended without support or not extended
(see Figure 3b), you will need to add support blocking.
See Appendix B (on page 10).
CAUTION
Track Extenders A and C
Not all openings require the use of Track Extenders. They are
for reinforcing the screen assembly at the wider ranges of the
conguration. The track extenders can not be used at narrower
ranges of the congurations as screen interference will occur.
Reference the chart below detailing when to use the screen
extenders and when not to use them.
Opening Width Configuration Track Extender
71" – 72" 72" Config. Yes - Needed
70" – 70 ⁄" 72" Config. Not needed
69" – 69 ⁄" 68" Config. Yes - Needed
Less than 69" 68" Config. Not needed
IMPORTANT
A
A
C
C
Track Extender A
Track Extender C
 Loading...