4
A
A
(Passive Screen)
Passive
Screen
ASSEMBLE
SCREEN
TRACKS &
HOUSINGS
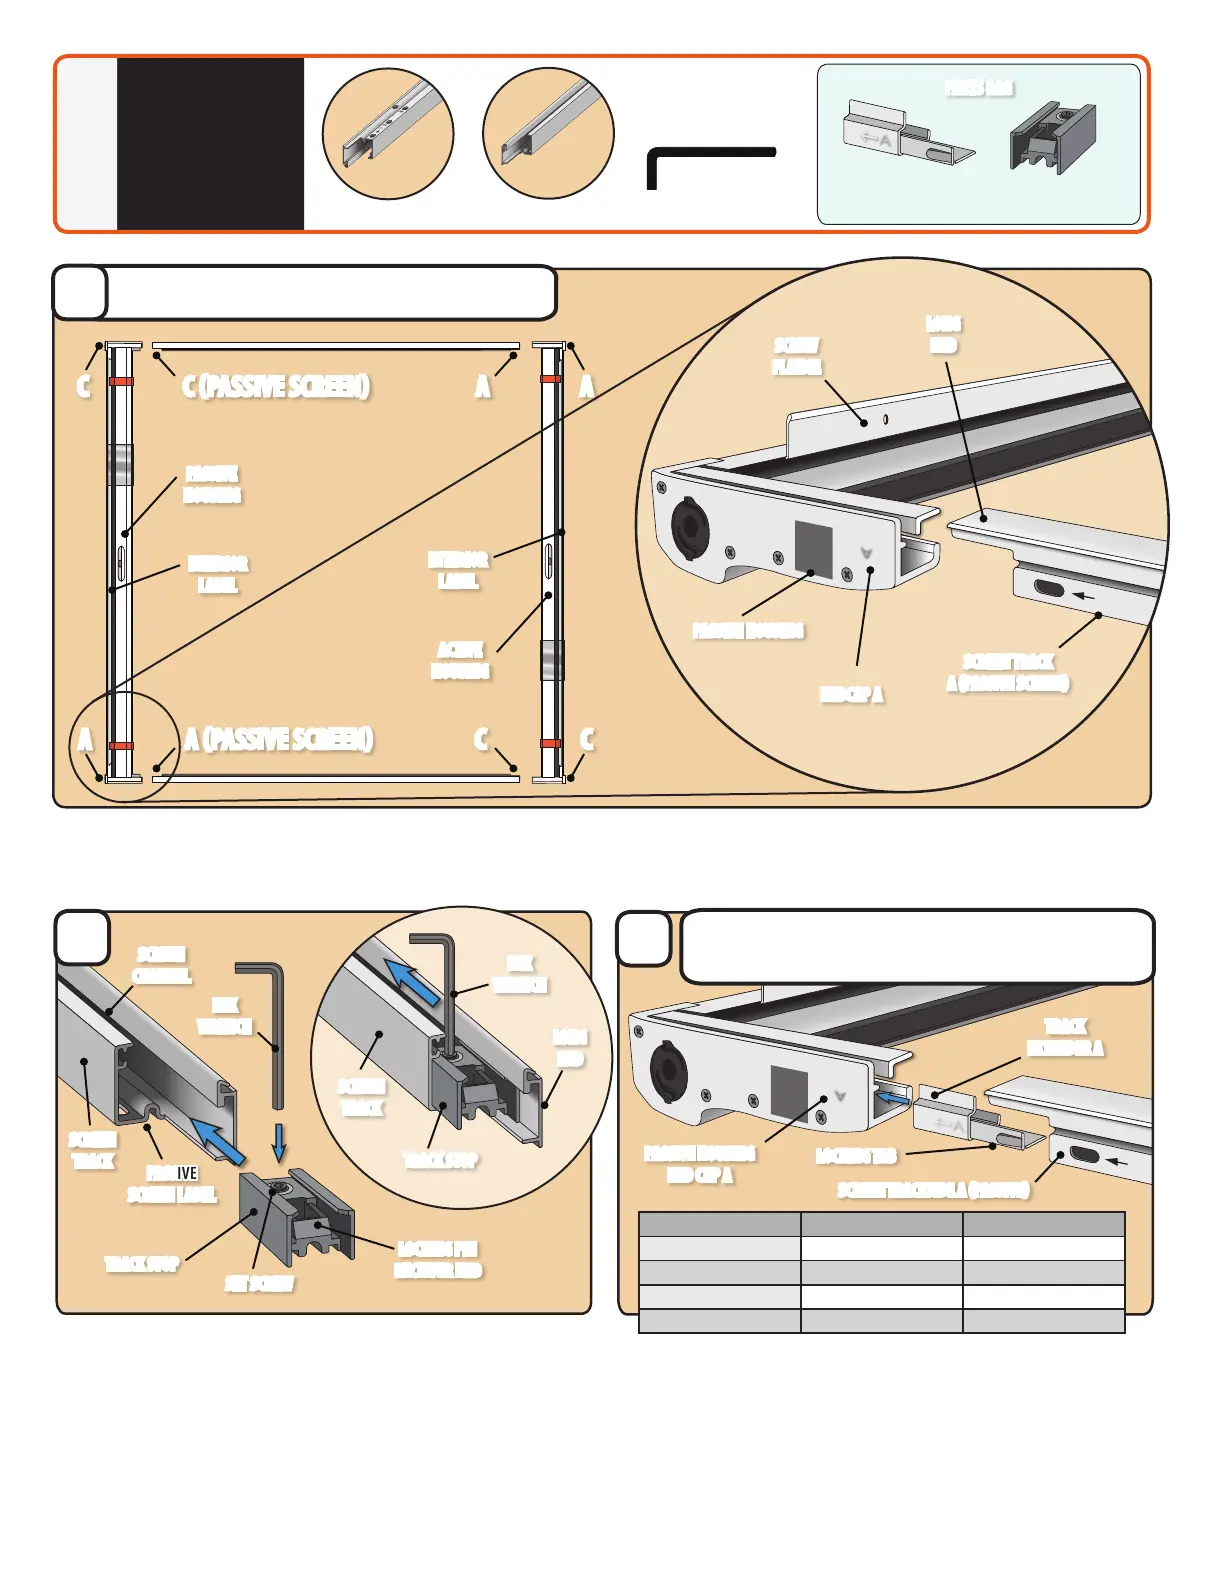
1
a1 Unpack both housings and screen tracks onto a non-abrasive surface, with the housing's side labeled Interior facing up. Leaving the screens in the retracted
position, arrange the components so the letters marked on the Screen Tracks and the letters marked on the Housing Endcaps align (A to A, C to C, Passive A
to Passive Screen A and Passive C to Passive Screen C). Screen Tracks should be orientated with Long End up, and labeled side facing out from the assembly.
Note: Active Housing has fastener clips and 68 & 72 inch markings. The Passive Housing is labeled PASSIVE on the end caps.
INTERIOR
LABEL
INTERIOR
LABEL
PASSIVE
HOUSING
ACTIVE
HOUSING
SCREEN TRACK
A PASSIVE SCREEN
SCREW
FLANGE
LONG
END
PASSIVE HOUSING
ENDCAP A
A C C
C A A
Screen Track Screen Track
ALL ITEMS DURING THE ASSEMBLY STEPS SHOULD BE ARRANGED
LAYING FLAT ON THE GROUND ON A SOFT NON ABRASIVE SURFACE.
a
A
Passive
Screen
A
(Passive Screen)
A
A
b1 At the end of the Screen Track labeled (Passive Screen) A, rotate the
Screen Track so labeled side is down and the Screen Channel is up.
b2 Insert Hex Wrench into the Set Screw in the Track Stop.
b3 Insert Track Stop into the Screen Track with the Hex Wrech so the Set Screw
slides into Screen Channel rst followed by Locking Pin Receiver end.
b4 Slide the Track Stop to approximately the middle of the Screen Track.
Tighten the Set Screw enough to prevent the Track Stop from moving.
b5 Repeat for Screen Track end labeled (Passive Screen) C. Rotate both screen
tracks back to original position, so the long ends of Screen Tracks are up.
c1 If your opening width is between 69" and 70" or 71" and 72" you will
need to insert the Track Extenders into the Passive Housing End Caps.
If your opening does not fall into these ranges, skip to Step d.
c2 Position the thicker end of the Track Extender A toward Passive
Housing End Cap A with the Locking Tab toward the Screen Track.
c3 Slide the Track Extender all the way into the Passive Housing
End Cap A, and repeat these steps for side C.
b
c
SET SCREW
TRACK STOP
LOCKING PIN
RECEIVER END
TRACK STOP
PASSIVE HOUSING
END CAP A
LOCKING TAB
TRACK
EXTENDER A
HEX
WRENCH
HEX
WRENCH
LONG
END
PASSIVE
SCREEN LABEL
SCREEN
CHANNEL
SCREEN
TRACK
SCREEN
TRACK
SCREEN TRACKSIDE A PASSIVE
Tools
Recommended:
Track Stops (Qty 2)
Track Extenders
if required (Qty 2)
PARTS BAG
A
A
Use Track Extender Only:
If your opening width is between 69" & 70" or 71" & 72", see Page 3 for details.
A PASSIVE SCREEN
C PASSIVE SCREEN
Opening Width Configuration Track Extender
71" – 72" 72" Config. Yes - Needed
70" – 70 ⁄" 72" Config. Not needed
69" – 69 ⁄" 68" Config. Yes - Needed
Less than 69" 68" Config. Not needed
3/32 Hex Wrench
(provided)
 Loading...