Do you have a question about the AnyTone AT-D578UV Mobile and is the answer not in the manual?
Access the official Connect Systems website to find and download the latest firmware releases.
Save the downloaded firmware files into a dedicated directory on your computer's desktop.
Extract the contents of the downloaded zip file to organize firmware components and documentation.
Install the specific CPS software version required for the firmware update process.
Browse to the 'D578UV V1.09N FW' folder within the extracted files.
Locate the specific '.spi' file that contains the radio's firmware.
Power on the radio while pressing specific buttons (MENU + EXIT) to enter the firmware update mode.
Start the CPS application and navigate through the 'Tool' pulldown menu to select 'Firmware Upgrade'.
Grant permissions, set COM port/speed, and select the '.spi' firmware file from the directory.
Verify the firmware file opened successfully and check the model/version displayed in the software.
Click the 'Write' button to initiate the firmware data transfer to the radio.
Observe the progress bar indicating the percentage of firmware data written to the radio.
Confirm the 'Write Complete!' message, signifying the successful transfer of firmware.
Turn off the radio, then power on while pressing specific buttons to start the MCU reboot process.
Respond to the 'Are you sure you want to Initialize radio?' prompt to proceed with the reset.
Adjust or confirm the radio's date and time after the factory reset.
Allow the radio to boot up normally after the reset and firmware update.
Prepare to program the radio with the previously saved code plug.
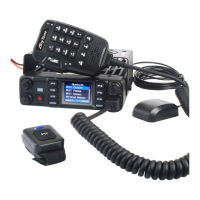
This document outlines the procedure for updating the firmware of the AnyTone AT-D578UV Mobile radio, a tri-band mobile device. The primary function of this guide is to walk users through the necessary steps to ensure their radio's software is current, thereby maintaining optimal performance and access to the latest features. The update process involves several key stages, from preparing the radio and computer to executing the firmware installation and performing a factory reset.
Before initiating any firmware update, a crucial usage feature emphasized is the necessity to save the radio's current code plug. This step is paramount because the update procedure will erase any existing code plug stored in the radio, meaning all personalized settings, channels, and configurations will be lost if not backed up. This highlights a critical maintenance feature: proactive data backup to prevent loss of user-specific configurations.
The first step in the update process is to locate and download the official firmware release. The document directs users to the Connect Systems website, specifically to the AT-D578UV software page. This ensures that users are obtaining the correct and officially supported firmware files, a vital aspect of proper device maintenance and functionality. The website lists various CPS (Customer Programming Software) versions and baseband updates, each with a corresponding release date. For example, CPS Version 1.09 was released on June 25, 2020, and a Baseband Update on April 4, 2020. This structured release information helps users identify the most recent and relevant files for their update.
Once the firmware file is downloaded, it is recommended to store it in a dedicated directory on the desktop, such as "AnyTone Firmware Updates." This organizational tip is a simple yet effective usage feature that helps users keep track of their files and streamlines the update process. The downloaded file is typically a zip archive, which needs to be unzipped before proceeding. Unzipping the file reveals a directory containing several sub-folders and files, including "A read me first," "D578UV APP for Android mobilephone," "D578UV BT Upgrade 10036," "D578UV V1.09N CPS," "D578UV V1.09N FW," "display screens," "JSON to CSV Conversion Program," "Programming Guides," and "User manual," along with the original zip file. This comprehensive set of files indicates that the firmware package includes not only the core firmware but also related software, documentation, and utilities, enhancing the overall user experience and providing resources for various aspects of radio management.
The next step involves installing the CPS (Customer Programming Software) version D578UV V1.09N CPS. After successful installation, an icon for the CPS will appear on the desktop. This software is essential for interacting with the radio and performing the firmware upgrade.
To prepare the radio for the update, users must first connect the power to the radio and then connect the programming cable between the radio and the computer. This physical connection is a prerequisite for the software to communicate with the device.
A specific sequence of button presses is required to put the radio into firmware update mode. With the radio turned off, users must press the MENU key and the EXIT key simultaneously, and then press the power button. It is crucial to wait for the screen to go blank, then wait five seconds, and finally release all keys. The LED on the radio should then begin flashing, indicating that it is ready for the firmware update. This precise button combination is a critical usage feature for entering the update mode, differing from the typical power-on sequence.
Once the radio is in update mode, users need to launch the newly installed CPS. Within the CPS, navigate to the "Tool" pulldown menu and select "Firmware Upgrade." This action will likely trigger a "User Account Control" prompt, asking for permission to run "QX_Firmware_Update.exe." Users must click "Yes" to proceed.
The "Firmware Update" window will then appear. Here, users must click "Open Update File." This will open a file browser, where they need to locate the specific firmware program, "D578UV_V1.09n_20200612.spi," which was extracted earlier from the downloaded zip file. Double-clicking this file will load it into the firmware update utility, and a "File Open Succeeded!" message will confirm the successful loading.
In the "Firmware Update" window, it is important to verify that the "Com Speed" is set to 921600 and that the "Duplex" box is checked. The "Com Port" may vary depending on the computer and the USB cable connection, so users should select the correct port. The Model number should display "D578UV" and the Version should show "V100," indicating that the correct firmware file has been loaded.
With the firmware file loaded and settings verified, users can click the "Write" button. A confirmation prompt, "Write to Radio, Continue?", will appear. Clicking "OK" will initiate the firmware writing process, and a progress bar will display the update status. Once the file is completely written to the radio, an acknowledgment message, "Write Complete!", will appear.
After the firmware update is finished, there is one final maintenance step: performing an MCU reboot. This action sets the radio's parameters back to a factory reset condition, ensuring a clean slate for the new firmware. To perform the MCU reboot, first turn off the radio. Then, press the channel selector button (the knob to the right of P4) and the P2 button simultaneously while turning on the power. If done correctly, the screen will display "Booting... Please Wait!" followed by "Are you sure you want to Initialize radio?". Users must then press the Menu Button to confirm the initialization. The radio will then display "Initialize Radio..." as it performs the reset.
After the initialization, the screen will show "Calibrate Date" with the current GMT offset, date, and time. Users can update these settings as desired or simply press the Menu button to confirm that the date is correct. Finally, after pressing the Menu button, the radio will boot up in its normal operating mode, displaying the AnyTone logo and then its standard operational screen, ready for the previously saved code plug to be programmed back into the device. This comprehensive process ensures that the radio is not only updated with the latest firmware but also properly initialized for optimal performance.
| Channels | 4000 |
|---|---|
| Modes | FM, DMR |
| GPS | Yes |
| Bluetooth | Yes |
| Zones | 250 |
| DMR Tier | Tier I & II |
| Operating Voltage | 13.8V DC ±15% |
| Frequency Range | 136-174 MHz, 400-480 MHz |
| Channel Spacing | 12.5kHz/25kHz |
| APRS | Yes |
| Display | Color TFT |