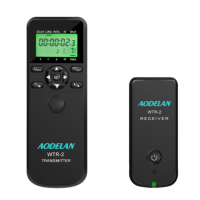
Wireless Remote Control RMT-P1BTA
User Manual
Thank you for purchasing an AODELAN product.
AODELAN RMT-P1BTA is a Remote Control which is compatible
with the Bluetooth
®
function. You can perform remote operations
such as shooting a still image, shooting a video, focusing and
zooming and etc. by connecting the RMT-P1BTA Remote Control
and a camera.
Please read this user manual as well as the user manual
provided with your camera which works with RMT-P1BTA before
use.
For your safety
Before using your product, please read the following safety
precautions carefully to ensure correct and safe use.
When using this unit in an aircraft or a hospital, follow the
instructions from the airline company or the hospital to avoid
possible interference with instruments or medical devices caused
by radio waves from this unit.
Do not disassemble or attempt to repair it.
Do not use the product in the presence of ammable or explosive
gas.
The product is not waterproof. Please keep away from rain, snow
and high humidity conditions.
Do not expose the product to high temperature over 45
℃
(e.g.
left in a car trunk).
Do not clean the product with organic solvent or alcohol-based
liquid.
A thorough explanation of how to use the product by an adult
is required when the product is used by children. Supervise
children while they are using the product.
Consult local authorities on the proper disposal or recycling of a
battery.
Declaration of Conformity USA
Product name: Wireless Remote Control
Trade name: AODELAN
Model number: RMT-P1BTA
FCC ID: 2AEJW-P1BTA
Manufacturer: Shenzhen Aodelan Technology Co., Ltd.
FCC Statement
This equipment has been tested and found to comply with the limits
for a Class B digital device, pursuant to part 15 of the FCC Rules.
These limits are designed to provide reasonable protection against
harmful interference in a residential installation. This equipment
generates, uses and can radiate radio frequency energy and, if not
installed and used in accordance with the instructions, may cause
harmful interference to radio communications. However, there is no
guarantee that interference will not occur in a particular installation. If
this equipment does cause harmful interference to radio or television
reception, which can be determined by turning the equipment off and
on, the user is encouraged to try to correct the interference by one
or more of the following measures:
Reorient or relocate the receiving antenna.
Increase the separation between the equipment and receiver.
Connect the equipment into an outlet on a circuit different from
that to which the receiver is connected.
Consult the dealer or an experienced radio/TV technician for
help.
Caution: Any changes or modifications to this device not
explicitly approved by manufacturer could void your authority
to operate this equipment.
This device complies with part 15 of the FCC Rules. Operation
is subject to the following two conditions: (1) This device may
not cause harmful interference, and (2) this device must accept
any interference received, including interference that may cause
undesired operation.
RF Exposure Information
The device has been evaluated to meet general RF exposure
requirement. The device can be used in portable exposure condition
without restriction.
RED 2014/53/EU
Declaration of Conformity EC
Hereby,
Shenzhen Aodelan Technology Co., Ltd.
declares that this product is in compliance with
essential requirements and other relevant provisions
of Directive 2014/53/EU. This product can be used
across EU member states. A copy of the Declaration of conformity
can be found at www.aodelan.net.
Parts and Functions of the Remote Control
(Figure 1)
(Figure 1)
1. Indicator
Indicates the camera’s operational state in accordance with the
Remote Control operation.
2. Focus/Zoom button
Adjusts the camera focus or zooms in/out the camera. Slide
the Remote Control’s ZOOM/FOCUS switch [7] to the position
suitable for your purpose.
3. Shutter-release button
Shoots a still image with the camera. When the camera is set to B
shutter (BULB) exposure, press the button to start the exposure,
and press it again to end the exposure.
4. REC (record) button
Starts recording a video with the camera.
5. AF-ON button
Activates the function assigned to the AF-ON button on the
camera, same as the AF-ON button on the camera.
6. C1 button
Activates the function assigned to the C1 button on the camera,
same as the C1 button on the camera.
7. ZOOM/FOCUS switch
Determines the function of the Focus/Zoom button [2].
FOCUS: Adjust the camera focus, you can ne-tune the focus.
ZOOM: Adjust the camera zoom, support electronic power zoom
and digital zoom.
8. Strap holder
9. Lock switch
Disables all the buttons on the Remote Control in order to
prevent unintentional operations.
10. Battery cover
Installing the Battery
1. Place a coin, or similar object, into the groove of the battery
cover on the back of the Remote Control, and then turn the
battery cover to “OPEN”.
(Figure 2-a)
2. Remove the battery cover and insert the supplied lithium
coin cell battery.
(Figure 2-b)
Insert the battery so that the + terminal is facing upward.
(
+
on the battery chamber indicates the direction of the
battery.)
3. Turn the battery cover until you reach “CLOSE”.
(Figure 2-a) (Figure 2-b)
Connecting the Remote Control and a camera with the
Bluetooth
®
function
Before connecting the Remote Control and a camera with
the Bluetooth
®
function, you must pair them together (device
registration).
The following is an example of a procedure for Sony
®
Interchangeable Lens Digital Cameras and Sony
®
digital still
cameras.
Before you start, check that the Remote Control’s LOCK switch
[9] is in the position to the opposite of “LOCK”.
1. On the camera, select MENU → (network)
→ [Bluetooth Settings] → [Bluetooth Function] → [On].
2. On the camera, select MENU → (network)
→ [Bluetooth Rmt Ctrl] → [On].
If the pairing screen appears on the camera’s screen,
proceed to step 4.
3. On the camera, select MENU → (network)
→ [Bluetooth Settings] → [Pairing].
4. On the Remote Control, press and hold the Shutter-release
button [3] and the + side of the Focus/Zoom button [2] at the
same time for at least 7 seconds.
(Figure 3)
(Figure 3)
5. When a confirmation message appears on the camera’s
screen, select [OK].
appears and pairing begins.
When pairing is complete, [Paired.] appears.
Precautions for Use
If pairing fails, the Remote Control’s indicator flashes rapidly. If
this happens, redo the procedure from the beginning.
In the following situations, pair the Remote Control and the
camera again.
-
When using the Remote Control to operate a different camera
(After having connected the Remote Control with a different
camera, you also must pair the Remote Control and the original
camera again when connecting to the original camera.)
-
When the camera’s network settings have been reset
If the Remote Control is not used for a period of time during a
Bluetooth connection, (no Bluetooth connection) may appear
on the camera’s screen.
Preventing unintentional operations
You can disable all the buttons on the Remote Control in order to
prevent unintentional operations while you carry it around.
1. Slide the LOCK switch [9] to the “LOCK” position.
(Figure 4)
(Figure 4)
2. To enable the buttons, slide the LOCK switch [9] to the
position to the opposite of “LOCK.”
Shooting a still image
1. Press the Shutter-release button [3].
(Figure 5)
Press the button halfway down to focus, and then press it all
the way down to shoot.
When the camera comes into focus by the auto focus
function, the Remote Control’s indicator turns on.
When shooting succeeds, the indicator turns on.
(Figure 5)
Shooting a video
1. Press the REC (record) button [4].
(Figure 6)
Video recording starts. To stop recording, press the REC
(record) button [4] again.
When recording starts, the Remote Control’s indicator turns
on. When recording stops, the indicator turns off.
(Figure 6)
Adjusting the camera focus
1. Slide the ZOOM/FOCUS switch to the “FOCUS” position.
(Figure 7-a)
2. Press the Focus/Zoom button [2] (+/
-
) to adjust the camera
focus.
(Figure 7-b)
(Figure 7-a) (Figure 7-b)
Precautions for Use
To adjust the camera focus, you must place the camera in manual
focus mode.
Zooming the camera
1. Slide the ZOOM/FOCUS switch [7] to the “ZOOM” position.
(Figure 8-a)
2. Press the Focus/Zoom button [2] (+/-) to zoom in/out the
camera.
(Figure 8-b)
(Figure 8-a) (Figure 8-b)
Precautions for Use
The zoom speed varies depending on the camera or lens.
The zoom function works with a camera or lens featuring a
built-in electronic power zoom. If the digital zoom function of the
camera is turned on, digital zooming will be performed.
Indicator activities
The Remote Control’s indicator lights/ashes in accordance with the
Remote Control operation or the operation or state of the camera as
described below:
Lights
when the camera comes into focus by the auto focus
function
when you shoot a still image by pressing the Shutter-
release button [3]
when you start recording by pressing the REC (record)
button [4]
while video recording is in progress
when pairing succeeds
when the camera receives focus/zoom (+/
-
) signals
from the Remote Control
Flashes
while pairing is in progress
while the self-timer is in operation
Flashes
rapidly
when the camera fails to receive operation signals
from the Remote Control
when pairing fails
Activating the camera’s C1 or AF-ON function
By pressing the Remote Control’s C1 or AF-ON button, you can
activate the function assigned to the camera’s C1 or AF-ON
button.
For details about the camera’s C1 or AF-ON button, refer to the
operating instructions supplied with your camera.
Specifications
Operating distance:
Approx. 10m / 32.8 ft.
Power:
3V CR2032 lithium coin cell battery
Operating environment
Temperature: 0°C – 40°C (32°F – 104°F)
Humidity: 85% or less (no condensation)
Dimensions (W × H × D):
Approx. 32
×
100
×
14mm (1.3
×
3.9
×
0.6in.)
Weight:
Approx. 28 g (1.0 oz) (without the battery)
Accessory:
Strap x 1
Specications and design are subject to change without notice.
Sony
®
and Bluetooth
®
mentioned in the manual are protected
trademarks which do not belong to Shenzhen Aodelan Technology
Co., Ltd.
Troubleshooting
Having this
problem
Possible causes and solutions
The Remote
Control fails to
work.
The Remote Control’s buttons are disabled.
Slide the Remote Control’s LOCK switch to
the position to the opposite of “LOCK.”
Pairing with the camera may be lost. Pair the
Remote Control and the camera again.
The Remote Control’s battery is out of power.
Replace the battery with a new one.
The Remote
Control fails to
adjust the camera
focus
The camera is not placed in manual
focus mode. On the camera, select
MENU → (Camera Settings1) → [Focus
Mode] → [MF] (Manual Focus), to place the
camera in manual focus mode.
The Remote
Control fails to
zoom in/out the
camera while
video recording is
in progress
The ZOOM/FOCUS switch is in the “FOCUS”
position. Slide the ZOOM/FOCUS switch to
the “ZOOM” position.
The camera or lens doesn’t support electronic
power zoom and the digital zoom function of
the camera is not turned on. On the camera,
select MENU → (Camera Settings2)
→ [Zoom Setting] → [On: Digital Zoom],
to turn on the digital zoom function of the
camera.