Note: Arrange the wire or fix it by tapes to avoid interfering
with the SATA Card slot to damage the wire.
1. Take the upper module and chassis module.
2. Fit the golden finger of the upper module to the SATA Card slot
of the chassis module.
Installing Top CoverInstalling Top Cover
3. Use the "+ shape" screwdriver to fix the sheet metal screws.
(4pcs)
SATA Card Slot
Golden finger
4. Install the Top Cover carefully to avoid scratching it.
Note: The Concave part of the Top Cover is toward the front
side.
1
4
2
3
Concave part
Mini PCI InstallationMini PCI Installation
ex. Wireless LAN mini Cardex. Wireless LAN mini Card
ex. TV Tuner mini Cardex. TV Tuner mini Card
SODIMM slots are designed in high and low positions which are
very easy to recognize. Insert the module straight down to the
SODIMM slot with fingers and press down firmly until the SODIMM
module is securely in place.
2. Put the memory module with correct direction. Notice there's one
key position to make sure direction is correct.
3. Plug in memory module into SODIMM slot with angle 20 ~ 30
°.
Make sure memory module plug into slot completely.
4. User finger to push memory module vertically until the tabs lock
memory module tightly. Now, the memory modules have been
plugged properly with horizontal flat.
Upgrade / Installing Memory ModulesUpgrade / Installing Memory Modules
Key
30
°
30
°
TabTab
TabTab
1. There're tabs which located in the side of SODIMM holder. Detach
the existing memory from the memory slot.
2. Use the " + shape" screwdriver to detach the HDD screw. Remove
the existing HDD from the upper module.
Upgrade / Installing hard disk driveUpgrade / Installing hard disk drive
1
4
3
2
6. Connect the MPI-SATA Card with the connector of the ODD drive
and HDD
7. Use the "+ shape" screwdriver to tighten two screws to fix
MPI-SATA Card with ODD drive and HDD.
Note:Avoid scratching the golden finger of the MPI-SATA.
1. Take the upper module. Use the "+ shape" screwdriver to detach
the MPI-SATA Card screws and disassemble the MPI-SATA Card.
Golden Finger
SATA HDD
Connector
ODD
Connector
3. Install the new HDD into the upper module.
4. The hard disk device has to be fixed to the white plastic fixture
with four HDD screws.
5. The opertion sequence is screw 1-2-3-4
3
2
1
4
1
3
2
4
or
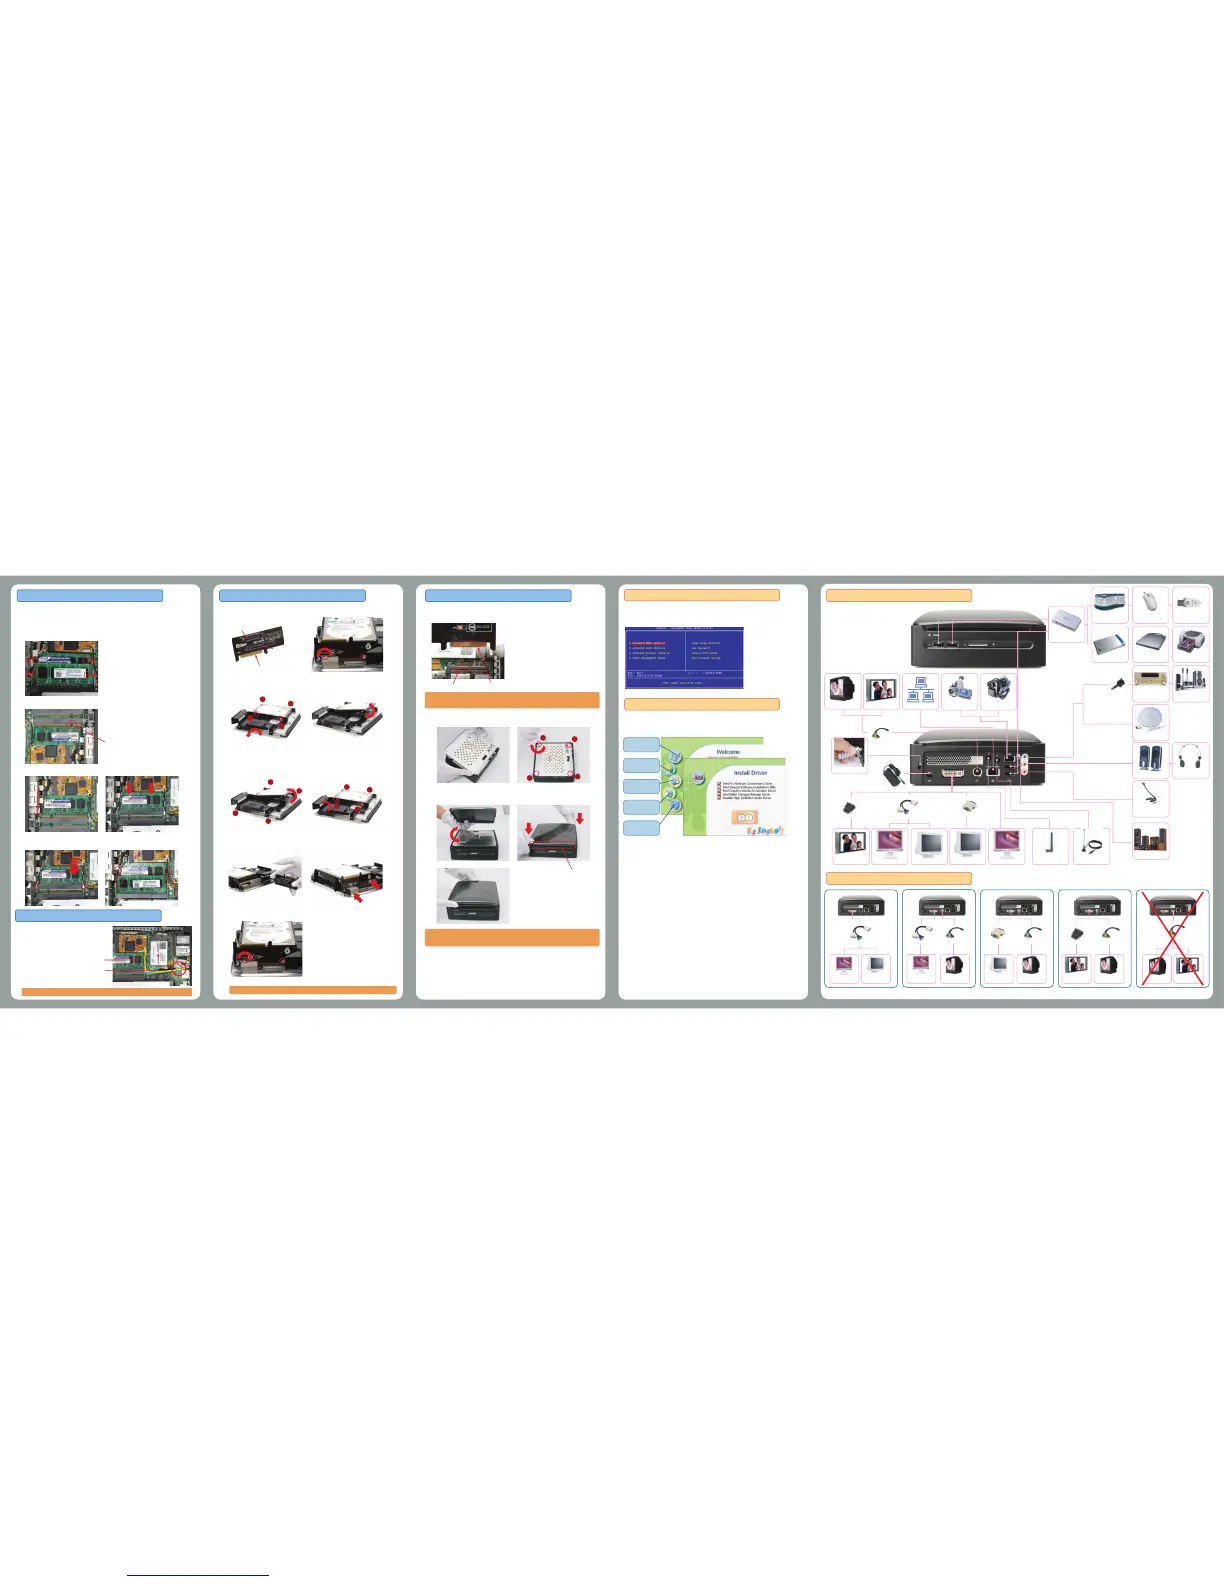
CamcorderDV
HDMI TV
oror
Dual DisplayDual Display
LCD Monitor
Digital Audio
Decoder
5.1 or 7.1
Speakers
Audio in
S/PDIF Out
Line in
or
or
PC
Microphone
Mic_in
Speaker Out
PC EarphoneSpeaker
5.1 Speakers
or
Switch by Utility
Software
Wireless
Antenna
TV Tuner
Antenna
InternetHDTVTV
or or
(One time one
signal only)
YPbPr / YPbPr /
Composite / Composite /
S-Video CableS-Video Cable
90W DC 19V
Power Adapter
Security Lock
USB HDD USB Combo
USB
Keyboard
USB Mouse
Printer
Flash Memory
Disk
USB Hub
DVI to HDMI DVI to HDMI
AdapterAdapter
LCD Monitor
CRT Monitor
DVI to DVI + DVI to DVI +
VGA CableVGA Cable
DVI to VGA DVI to VGA
ConverterConverter
(MP965-DR only) (MP965-DR only)
(MP965-D only)
CRT Monitor
LCD Monitor
Support DVI
CRT Monitor
Support VGA
DVI to DVI + DVI to DVI +
VGA CableVGA Cable
YPbPr / YPbPr /
Composite / Composite /
S-VideoS-Video
CableCable
TV
CRT Monitor
Support VGA
DVI to VGA DVI to VGA
ConverterConverter
TV
LCD Monitor
Support DVI/VGA
YPbPr / YPbPr /
Composite / Composite /
S-VideoS-Video
CableCable
TV
TV
(Support HDMI)
DVI to HDMI DVI to HDMI
AdapterAdapter
YPbPr / YPbPr /
Composite / Composite /
S-Video CableS-Video Cable
TV HDTV
or
Back Panel ConnectionsBack Panel Connections
Installing DriverInstalling Driver
BIOS Setup when 1st Power OnBIOS Setup when 1st Power On
After finishing the setting of connect correct cable, power on and enter the
BIOS Setup screen, then press <DEL> during POST (Power On Self Test).
Choose "Load Setup Defaults" for recommended optimal performance.
You can use the autorun menu of Bonus CD disc. Choose the utility and
driver from the icons at left side, and then click on the "GO" button to
complete installation automatically.
Install
Driver
Install
Utility
Browse CD
Contents
Readme
Exit CD
YPbPr / YPbPr /
Composite /Composite /
S-VideoS-Video
CableCable
DVI to DVI + DVI to DVI +
VGA CableVGA Cable
(MP965-DR only)
(MP965-D only)
(MP965-DR only)
(MP965-DR only)
miniPC Duo provides two Mini Card
slots for users to upgrade this PC
functions. Now, the Mini Card can
have digital TV Tuner and Wireless
LAN mini card…etc. for expansion.
Note: Arrange the mini card wire and fix it by wire clip.
 Loading...