EasyManua.ls Logo

ApneaLink Air User Manual

ApneaLink Air
2 pages
To Next Page IconTo Next Page
Page #1 background imageLoading...
Page #1 background image
!
Getting'Started'
Remove!the!device!from!the!bag.!It!will !arrive!with!all!sensors!attached!to!the!
device.!Do'not'disconnect'the'sensors'from'the'device.'You!will!also!find!tape!
strips!included!in!the!bag!and!possibly!an!extra!set!of!batteries!(for!multiple!
night!use).!
!
1. Pull!the!belt!around!your!body.!Thread!the!end!of!the!belt!through!the!
slot!on!the!effort!sensor!and!fasten!the!tab!to!the!belt.'
2. Check!that!the!belt!is!secure!and!comfortable!and!that!the!device!is!
positioned!over!center!of!your!chest!(females!position!above!breasts).'
3. Slide!the!finger!sensor!cable!clip!onto!the!belt.!The!clip!should!be !on!the!
same!side!of!you r!body!as!the!finger!sensor.'
!
1. Inse rt!the!prongs!into!your!nostrils.!Make!sure!the!curved!side!is!
pointing!towards!the!back!of!your!nose.!
2. Loop!the!plastic!tubing!around!your!ears.!
3. Pull!the!slider!up!towards!your!chin!uni t!the!pla stic!tubing !is!secure!
and!comfortable.!Use$provided$tape$to$secure$cannula$to$each$cheek!
!
!
Fitting'the'Cannula'
Fitting'the'Fin ger ' Sensor'
Slide!the!gray,!rubber!finger!sensor!over!your!finger.!!It!
can!be!positioned!on!any!finger!but!should!not!be!used!
on!a!finger!with!dark!nail!polish!or!acrylic!fingernails.!
Use$the$provided$tape$to$secu re$the$fin ger$sensor$cable$to$
the$back$of$your$hand.$
1. Press!and!hold!the!power!button!in!the!center!of!the!device!for!
about!2!seconds!or!until!the!light!turns!on.!
2. Chec k!tha t!the!lights!next!to!the!sensor!connections!are!green.!The$
lights$may$blink$back$and$forth$from$red$to$green,$this$is$normal$and$
should$resolve$to$steady$green$once$you$fall$asleep$and$are$still.!If!the!
lights!are!solid!red!readjust!the!sensors!and!make!sure!they!are!
positioned!correctly!on!your!body.!
3. Go!to!sleep!as!normal.!
Ending'the'Test'
1. Press!the!power!button!for!about!2!seconds.!
2. Chec k!tha t!the!test!complete!indicator!light!is!lit!and!green.!This!
means!the!test!is!complete.!If!the!test!c omplete!indicator!light!is!red!
contact!the!testing!fa cility.!
3. Press!and!hold!the!power!button!for!about!2!seconds!to!power!off!
the!device.!
Fitting'the'B elt'
ApneaLink'Air'
Patient'instructio ns'
Returning'the'Device'
1. Remove!the!cannula!from!your!nose!and!the!sensor!from!your!
finger.!
2. Remove!the!belt!from!your!body !and!place!the!device!and!the!
attached!sensors!back!into!the!bag!it!came!in.!
3. Place!the!bag!and!completed!paperwork!into!the!mailing!box!the!
device!w as!shipped!in.!
4. Place!the!i ncluded!shipping!label!on!the!box!(c overing !the!
original!shipping!label)!and!ship.!
Starting'the'Test'
Instrucciones$e spañolas$en$revés$
Question and Answer IconNeed help?

Do you have a question about the ApneaLink Air and is the answer not in the manual?

ApneaLink Air Specifications

General IconGeneral
Device TypeHome Sleep Apnea Testing Device
ManufacturerResMed
Data StorageInternal memory
ConnectivityUSB
Intended UseTo assist in the diagnosis of sleep apnea
MeasurementsApnea-Hypopnea Index (AHI)
Battery LifeMinimum 8 hours of operation time
MemoryUp to 48 hours of data
CompatibilityCompatible with ResMed software for data analysis
Battery Type2 x AAA batteries

Summary

Getting Started

Fitting the Belt

Secure the Belt

Thread belt end through effort sensor slot, fasten tab, and ensure secure, comfortable fit. Position device centrally on chest.

Attach Finger Sensor Clip

Slide the finger sensor cable clip onto the belt on the same side as the finger sensor.

Fitting the Cannula

Insert Cannula

Insert prongs into nostrils with curved side pointing back. Loop tubing around ears and pull slider up for a secure fit.

Secure Cannula to Cheek

Use provided tape to secure the cannula tubing to each cheek.

Fitting the Finger Sensor

Position Finger Sensor

Place rubber finger sensor on any finger, avoiding dark nail polish or acrylics. Secure cable to hand with tape.

Starting the Test

Power On and Check Lights

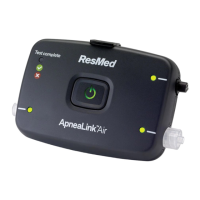
Press and hold power button for 2 seconds. Check sensor connection lights are green. Blinking green is normal; solid red requires readjustment.

Begin Sleep Session

Go to sleep as normal after confirming sensor lights are steady green.

Ending the Test

Confirm Test Completion

Press power button for 2 seconds to turn off. Check test complete indicator light is green. Red light means contact facility.

Returning the Device

Remove Sensors

Remove cannula from nose and sensor from finger.

Pack Device

Place device and sensors back in original bag. Include bag and paperwork in the mailing box.

Ship Device

Attach the provided shipping label over the original label on the box and mail.