EasyManua.ls Logo

Aprilaire 8051 - User Manual

Aprilaire 8051
2 pages
Print Icon
To Next Page IconTo Next Page
Loading...
Model 8051 Flush Mount Sensor
Installation Instructions
INTRODUCTION
INSTALLATION INSTRUCTIONS
The 8051 is a temperature sensor. It can be used to remotely measure temperature with compatible Aprilaire
®
thermostats and support modules.
1. Select a location for mounting the sensor.
Locate the sensor as you would locate a thermostat.
•Mountonaninteriorwall,inafrequentlyoccupiedspace.
•Keepthesensor18”awayfromanoutsidewall.
•DONOTmountthesensor:
– Behinddoors,incornersorotherdeadairspaces.
– Indirectsunlightornearlamps,appliances,dimmer
switchesorothersourcesofheat.
– Onanoutsidewallorwallexposedtoanunconditioned
space (i.e. garage).
– Intheflowpathofasupplyregister,instairwaysornear
outside doors.
– Onawallwhereaconcealedpipeorductworkcould
influencethesensor.
– Nearsourcesofelectricalinterferencesuchaslight
switches.
Maximumwirelengthfromthesensortothethermostatorsupport
moduleis300feet.
2. Install the sensor – see back page.
3. Disconnect power to the thermostat or support module to
which the sensor will be wired.
CAUTION
Damage to components can occur if power is not
disconnected.
4. Verify the sensor resistance.
Use an ohm-meter or multimeter to measure the resistance
ofthesensor.Measureatthewiresnearthethermostator
supportmoduletocheckanywiresplices.Confirmtheresistance
corresponds (within 5%) to the temperature where the sensor
is installed.
Temperature (°F) Resistance (k )
30 34.6
40 26.1
50 19.9
60 15.3
70 11.9
80 9.4
90 7.4
100 5.9
5. Wire the sensor to the component.
CAUTION
Excessive bare wire can lead to shorts. Strip only as much
insulation as is necessary.
•Thesensorisnotpolarityspecific.Eithersensorleadmaybe
connected to either terminal on the component to which it is
wired.Toselecttheappropriateterminalsforwiringpleasesee
theinstallationmanualforthethermostatorsupportmodule.
•Usecarewhenroutingandstrippingthewire.Sharpbends(kinks)
or cuts in the wire (particularly susceptible where the insulation
hasbeenstripped)canleadtoeventualconductorfailure.
6. Reconnect power to the thermostat or support module to
which the sensor is installed.
Sensor Specifications
Voltage 20-30VAC
Resistance@25°C(77°F) 10k
Tolerance@25°C(77°F) ±3%
Thefollowingtableshowsthecorrectresistanceatvariousambient
temperatures without the sensor wires attached to a thermostat or
support module.
61000944A AA 8051 Flush Mount Sensor Install.indd 1 3/28/12 11:38 AM
Question and Answer IconNeed help?

Do you have a question about the Aprilaire 8051 and is the answer not in the manual?

Summary

Introduction to the Aprilaire 8051 Sensor

Installation Instructions for the 8051 Sensor

Select Sensor Mounting Location

Guidance on selecting the appropriate interior wall location for the sensor, avoiding specific areas.

Install the Sensor

Instruction to proceed with sensor installation, referencing the back page for details.

Disconnect Power

Critical safety step to disconnect power before making electrical connections to prevent damage.

Verify Sensor Resistance

Procedure for checking sensor resistance with an ohmmeter to ensure accuracy within 5%.

Wire the Sensor

Details on connecting the sensor wires, including polarity, wire handling, and maximum length.

Reconnect Power

Final step to restore power to the thermostat or support module after wiring is complete.

Overview

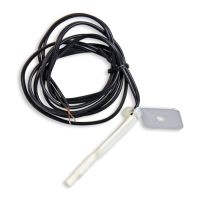
The Aprilaire Model 8051 Flush Mount Sensor is a temperature sensing device designed for remote temperature measurement in conjunction with compatible Aprilaire thermostats and support modules. Its primary function is to provide accurate ambient temperature readings to a connected control system, enabling precise climate management within a space.

Function Description

The 8051 sensor operates by detecting the surrounding air temperature and converting it into an electrical resistance value that can be interpreted by a connected thermostat or support module. This allows the control system to monitor the temperature in a specific area, independent of the location of the main thermostat. This remote sensing capability is particularly useful in situations where the thermostat's location might not accurately represent the temperature of the occupied space, such as in large rooms, areas with drafts, or zones with varying heat sources. By providing a more representative temperature reading, the 8051 sensor helps the HVAC system maintain optimal comfort and energy efficiency.

Usage Features

The installation and usage of the 8051 sensor are designed to be straightforward, with several key features contributing to its ease of integration and reliable performance:

  • Location Flexibility: The sensor is intended for flush mounting on an interior wall in a frequently occupied space. This allows for discreet placement that blends with the room's aesthetics while ensuring it measures the temperature of the area where occupants spend most of their time.
  • Optimal Placement Guidelines: To ensure accurate temperature readings, specific guidelines are provided for sensor placement. It should be mounted at least 18 inches away from an outside wall and avoided in locations that could skew readings. These include behind doors, in corners or dead air spaces, in direct sunlight, near lamps, appliances, dimmer switches, or other heat sources. It should also not be placed on an outside wall or a wall exposed to an unconditioned space (like a garage), in the flow path of a supply register, in stairways, near outside doors, on a wall where concealed pipes or ductwork could influence the sensor, or near sources of electrical interference such as light switches. Adhering to these guidelines is crucial for the sensor to provide reliable data to the control system.
  • Flush Mount Design: The sensor is designed for a flush installation, requiring a 1-inch diameter hole in the drywall or sheetrock. This design allows the sensor to sit nearly flush with the wall surface, minimizing its visual impact and preventing it from becoming an obstruction. The installation process involves drilling a precise hole and then pressing the sensor into place, with no fasteners required. This ensures a clean and integrated look.
  • Wiring Simplicity: The sensor is not polarity specific, meaning either sensor lead can be connected to either terminal on the component to which it is wired. This simplifies the wiring process, reducing the chance of incorrect connections. The maximum wire length from the sensor to the thermostat or support module is 300 feet, offering considerable flexibility in placement within a building.
  • Compatibility: The 8051 sensor is designed to work seamlessly with compatible Aprilaire thermostats and support modules. Users should refer to the installation manuals of these components for specific wiring instructions and terminal identification.
  • Temperature Reporting Accuracy: The flush mount design and recommended installation practices are critical for accurate temperature reporting. The sensor must protrude a minimal 1/64 inch from the wall to ensure it measures the ambient air temperature correctly and is not influenced by the wall's temperature.

Maintenance Features

While the 8051 sensor itself requires minimal ongoing maintenance, certain aspects of its installation and verification contribute to its long-term reliability and performance:

  • Pre-Installation Verification: Before final installation, it is recommended to verify the sensor's resistance using an ohm-meter or multimeter. This measurement should be taken at the wires near the thermostat or support module to check for any wire splices and confirm that the resistance corresponds (within 5%) to the temperature where the sensor is installed. This step helps ensure the sensor is functioning correctly before it is fully integrated into the system.
  • Careful Wiring Practices: During installation, it is important to use care when routing and stripping the wire. Excessive bare wire can lead to shorts, so only as much insulation as necessary should be stripped. Sharp bends (kinks) or cuts in the wire, particularly where insulation has been stripped, can lead to eventual conductor failure. Proper wiring practices contribute significantly to the sensor's longevity and consistent performance.
  • Power Disconnection During Wiring: A crucial maintenance-related step during installation is to disconnect power to the thermostat or support module before wiring the sensor. This prevents potential damage to components due to electrical surges or short circuits during the connection process.
  • Aesthetic Integration: The sensor disk can be painted or wallpapered prior to installation into the wall. This allows for seamless integration with the room's decor, ensuring that the sensor remains discreet and aesthetically pleasing over time. However, it is explicitly stated not to spackle or mud over the sensor itself, as this could impede its ability to accurately read temperature.
  • Robust Design: The sensor is designed to be pressed into the drilled hole without fasteners, indicating a robust fit that should remain secure over time, reducing the need for re-fastening or adjustments.

In summary, the Aprilaire Model 8051 Flush Mount Sensor is a reliable and discreet solution for remote temperature sensing, designed for easy installation and seamless integration with Aprilaire climate control systems. Its emphasis on accurate placement, careful wiring, and pre-installation verification ensures optimal performance and contributes to effective home climate management.

Aprilaire 8051 Specifications

General IconGeneral
TypeTemperature Controller
Model8051
DisplayLCD
Power Supply24V AC
Humidity ControlYes
Power Consumption1.5VA
DifferentialAdjustable
MountingWall-mounted

Related product manuals