This document describes the Aqua Control PRZERO Digital Timer, a watering programmer designed for outdoor use.
Function Description
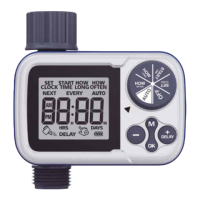
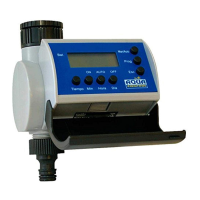
The Aqua Control PRZERO Digital Timer is a device used to automate watering schedules. It allows users to set the current time, define the start time for watering, specify the duration of watering, and set the frequency of irrigation. The device features a digital display for easy programming and monitoring of its status. It also includes special functions such as a rain delay and manual irrigation.
Important Technical Specifications
- Flow Rate: 30 l/min (8 GPM)
- Pressure Range: 0 - 8 Bar (0 - 145 PSI)
- Operating Temperature: 3 - 45°C (38 - 113°F)
- Power Source: 2x AA alkaline batteries
Usage Features
The timer's interface is designed for straightforward programming, featuring a central dial and several buttons.
Programming Steps:
-
Set Clock (AJUSTAR LA HORA):
- Rotate the dial to "SET CLOCK".
- Use the "+" and "-" buttons to adjust the hour (12/24h format).
- Press "OK" to confirm the hour.
- Use the "+" and "-" buttons to adjust the minutes.
- Press "OK" to confirm the minutes.
-
Start Time (HORA DE INICIO DEL RIEGO):
- Rotate the dial to "START TIME".
- Use the "+" and "-" buttons to set the desired watering start hour.
- Press "OK" to confirm the hour.
- Use the "+" and "-" buttons to set the desired watering start minutes.
- Press "OK" to confirm the minutes.
-
How Long (DURACIÓN DEL RIEGO):
- Rotate the dial to "HOW LONG".
- Use the "+" and "-" buttons to set the duration of irrigation, ranging from 1 to 59 minutes.
- Press "OK" to confirm the duration.
-
How Often (FRECUENCIA DE RIEGO):
- Rotate the dial to "HOW OFTEN".
- Use the "+" and "-" buttons to set the frequency of irrigation in hours or days.
- Press "OK" to confirm the frequency.
Special Functions:
-
Delay (RETRASO DEL RIEGO): This function allows you to pause the watering schedule for a set period, typically for rain.
- To activate: Rotate the dial to "AUTO". Press and hold the "DELAY" button for 5 seconds. The display will show "ON".
- To set duration: Use the "+" and "-" buttons to select a delay of 12, 24, 48, or 72 hours.
- To deactivate: Rotate the dial to "AUTO". Press and hold the "DELAY" button for 5 seconds. The display will show "OFF".
-
Manual Irrigation (RIEGO MANUAL): This allows for immediate, unscheduled watering.
- To activate: Rotate the dial to "AUTO". Press the "M" button once. The display will show "ON".
- To set duration: Use the "+" and "-" buttons to set the manual watering duration, from 1 minute to 4 hours and 59 minutes.
- To deactivate: Rotate the dial to "AUTO". Press the "M" button once. The display will show "OFF".
-
Turn Off (APAGADO DEL EQUIPO):
- Rotate the dial to "OFF" to completely turn off the device.
Display Indicators:
- Battery Indicator: An icon on the display indicates the battery level. Replace batteries when this icon appears.
- Irrigation in Progress (RIEGO EN CURSO): An icon indicates when watering is actively occurring.
- Auto (EN FUNCIONAMIENTO): Indicates the timer is operating according to the programmed schedule.
Maintenance Features
- Battery Replacement: The device requires 2 AA alkaline batteries. Ensure the battery compartment is completely dry when replacing them. Replace batteries when the low battery indicator appears on the screen.
- Filter Maintenance: The timer includes a filter. Regularly check the filter for accumulated dirt and clean it if necessary to ensure optimal performance.
- Storage: When not in use, especially in temperatures below 3°C, remove the timer from the hose faucet and store it indoors in a dry place, away from extreme temperatures, to prevent potential freeze damage.
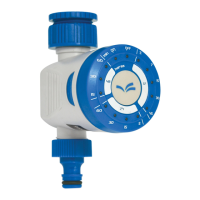
- Installation: Install the device only in outdoor environments and not horizontally. Do not submerge it in water or expose it to large amounts of dust.
- Troubleshooting:
- No display information: Check if new AA alkaline batteries are installed correctly with the correct polarity.
- Water not flowing at preset time: Verify the current time, watering time settings, rain delay status (deactivate if active), ensure the programmer is "AUTO" mode, and check if the tap is open. Replace batteries if dead.
- Cannot modify data: Ensure the programmer is not in "AUTO" or "OFF" mode. Rotate the dial to a setting status to make adjustments.
- Leaking thread: Check if the rubber gasket is in good condition and correctly placed. Ensure the tap thread conforms to the European BSP standard.