ADVERTÊNCIAS / LEMBRETE
• O programador PNR02 destina-se para o uso particular no jardim.
Foi concebido para o uso exterior. Permite controlar a água de rega de superfície do seu jardim.
NB : Funciona com contentores recuperadores de águas pluviais.
• Não deve ser utilizado com um objetivo industrial, com alimentos, produtos químicos, matérias inflamáveis ou explosivas.
• Para que a água não entre no compartimento de pilhas,
o programador deve estar ligado à torneira em posição vertical.
• Utilize este programador só com água fresca e cuja temperatura não deve exceder 40° C.
• A pressão de funcionamento deve situar-se entre 0 e 8 bares máximo (funciona sem pressão).
Atenção ! Precisa-se de uma pressão mínima para que funcione um sistema de rega gota a gota, enterrada ou de superfície.
• Não utilize pilhas recargaveis, mas só utilizar pilhas alcalinas novas e mudá-las ao inicio de cada estação.
Antes uma ausência prolongada, verificar o estado da pilha.
• Por tempo de gelo, tirar o programador da torneira e guarde-lo no interior até a primavera.
• O programador não deve ser deitado no lixo doméstico,
mas em recipientes especialmente concebidos
- Directiva RL2002/96/CE.
• Programador em conformidade com directiva europeia
N° 2004/108/EC - 93/68/EC.
Caracteristicas
tecnicas
Pressão máxima :
8 bares
T
emperatura
de fucionamento :
de 5°C a60°C
Duração das pilhas :
de 3 a 6 meses
(utilização normal)
ATENÇÃO !
Por timpo de gelo, tirar o
programador da torneira
e guarda-lo ao até a pri-
mavera.
Não esquecer de tirar as
pilhas do programador.
1
2
3
4
5
INSTALAÇÃO
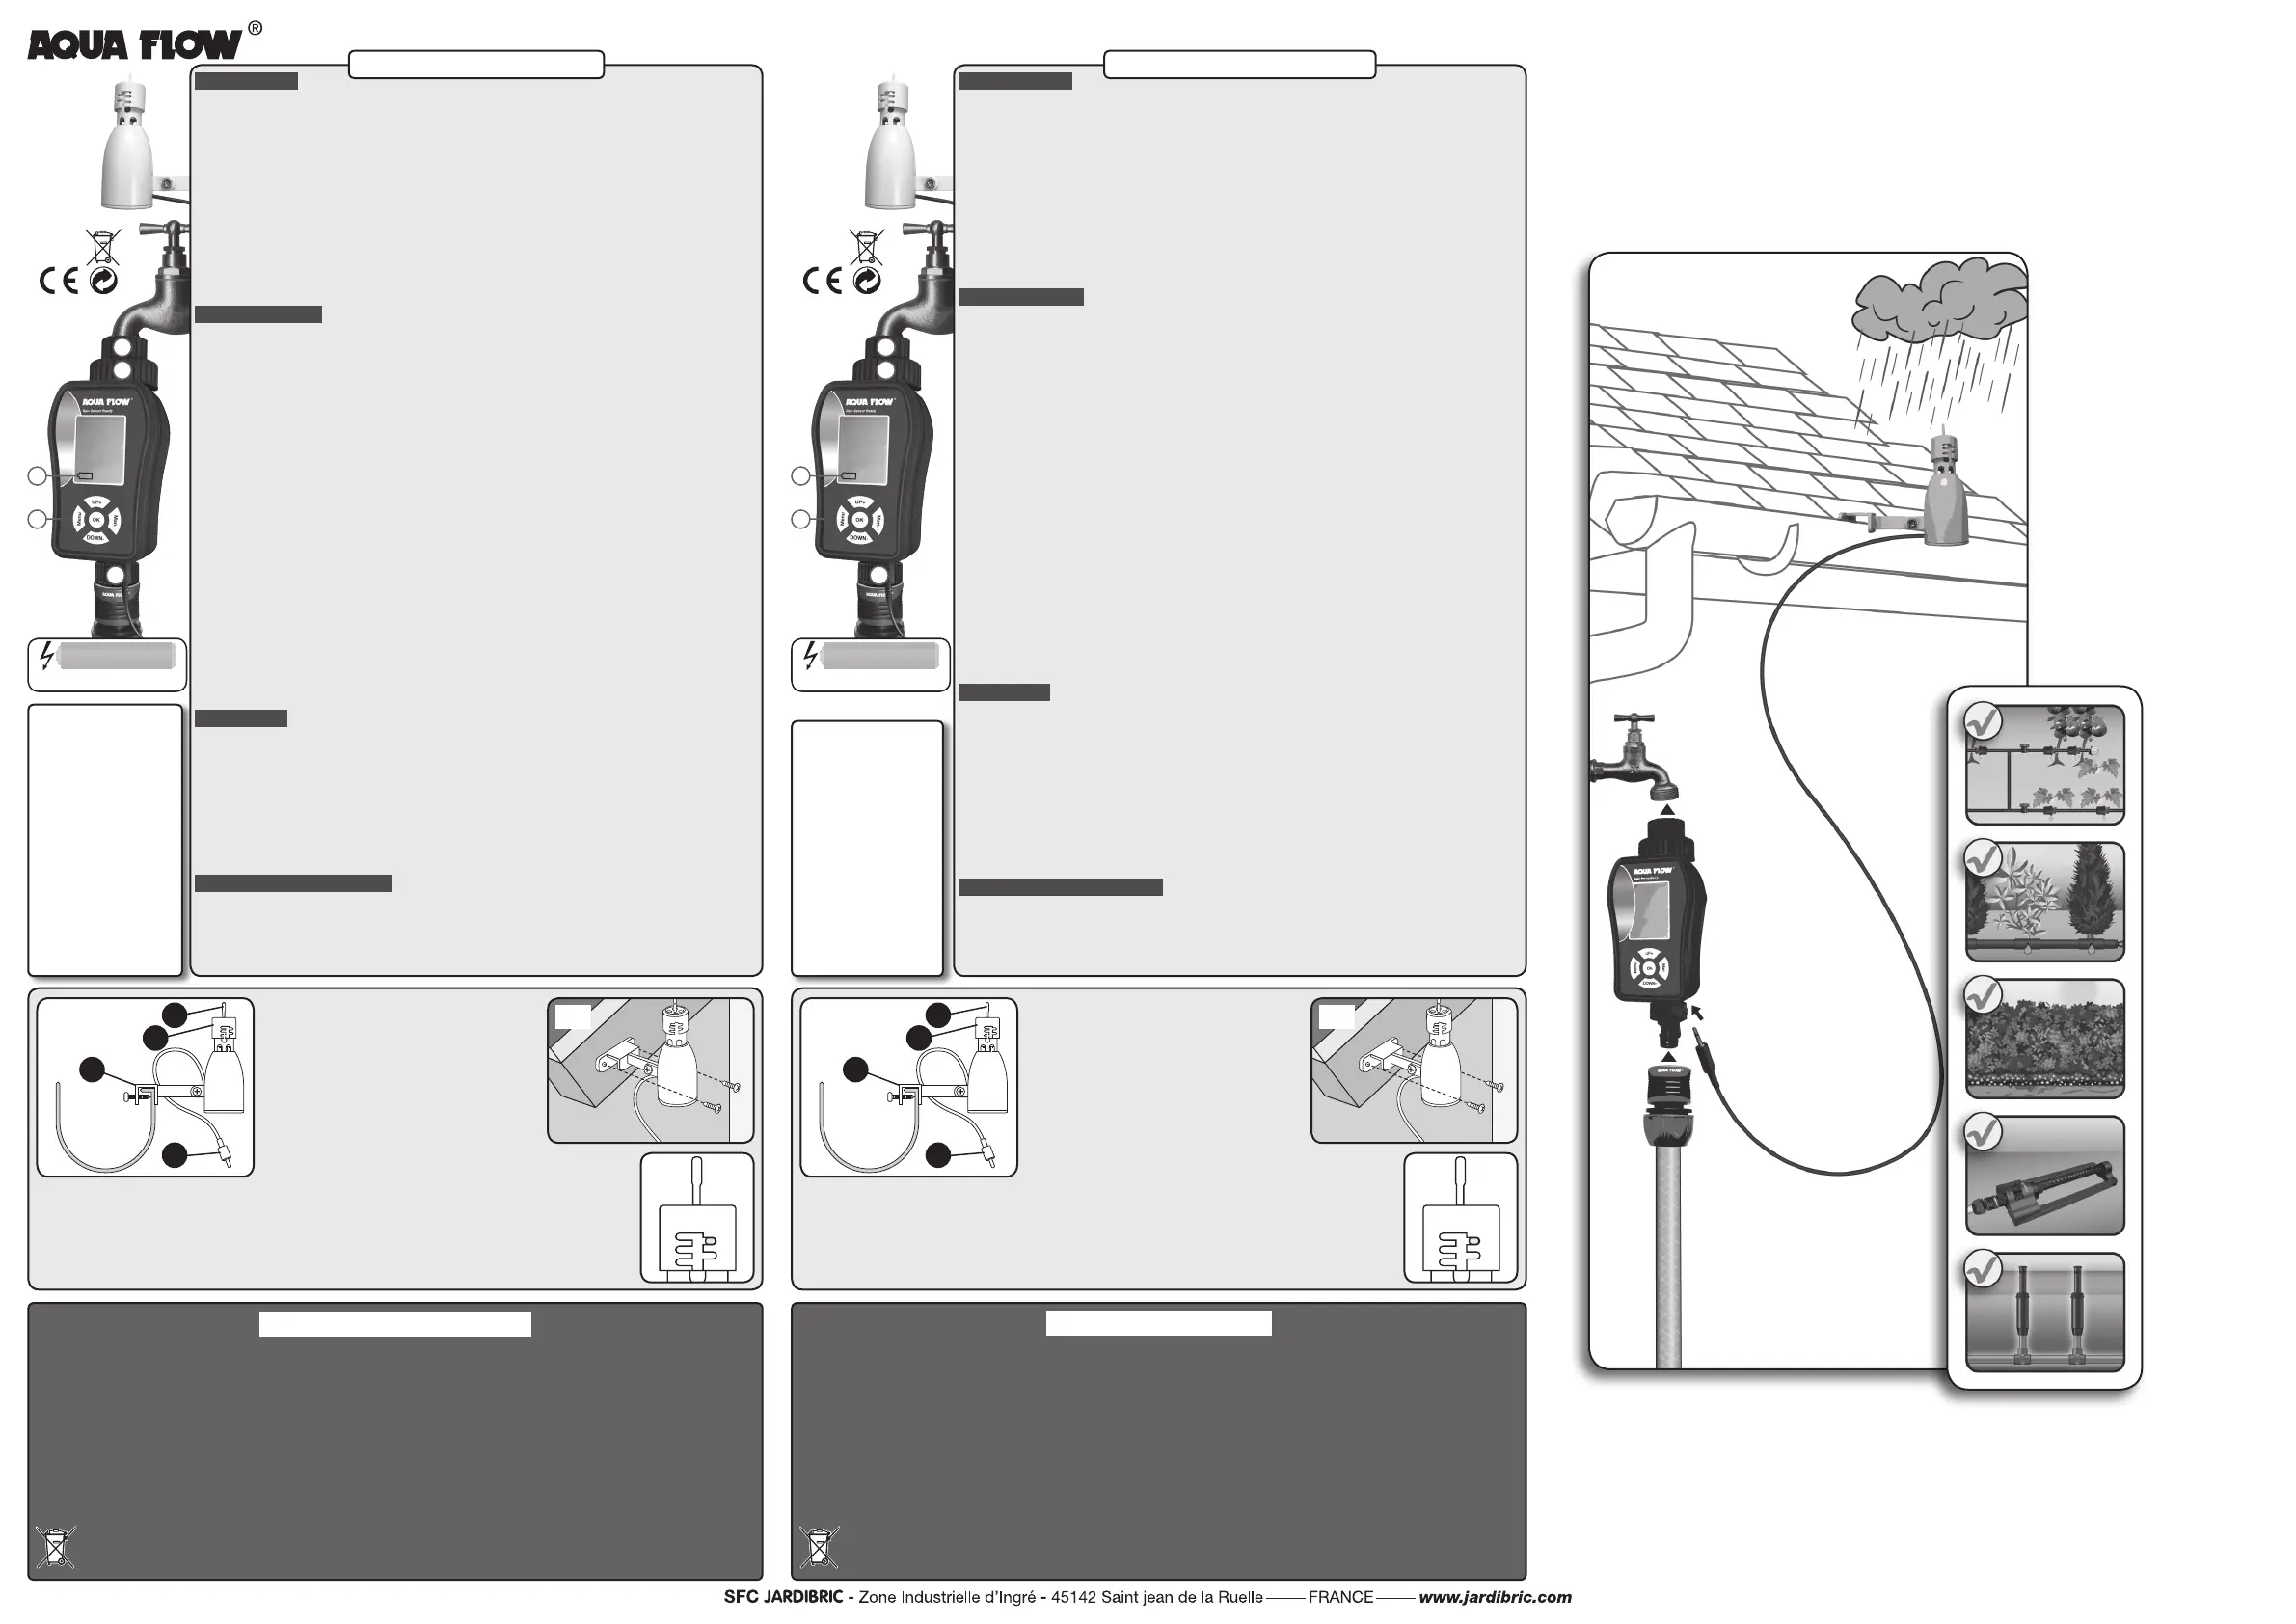
1.INSTALAÇÃO / MUDANÇA DE PILHAS :
Desapertar a tampa
(1)
da parte posterior do programador, instalar duas pilhas alcalinas AA de 1.5 V novas (não
incluidas). Fechar a tampa.
O sistema está activado : a esfera que permite a passagem da água dá uma volta completa e volta à posição fechada.
2.INSTALAÇÃO DO PROGRAMADOR :
manter o aparelho direito, desapertar o anilho de fecho (2) na parte superior do programador, apertar a porca (3)
na torneira, aparafusar o anilho de bloqueio e abrir a torneira (não utilizar alicates para apertar o anilho).
3.AJUSTAR A HORA :
• Carregar 1 vez no botão
MENU
, e carregar em
OK
• Carregar em
UP
o
DOWN
para ajustar as horas, e
OK
para confirmar
• Carregar em
UP
o
DOWN
para ajustar os minutos e
OK
para confirmar
• Por fim, carregar em
UP
o
DOWN
para ajustar o dia
(Mon=segunda, Tue=terça, Wed=quarta, Thu=quinta, Fri=sexta,Sat=sábado,Sun=domingo)
• Quando o dia actual pisca no ecrã, carregar em
OK
para terminar este regulação.
4.MUDAR AS PILHAS :
Se o símbolo das pilhas fracas pisca
(5)
, se devem mudar.
PROGRAMAÇÃO
1. SELECIONAR O PROGRAMA :
carregar duas vezes
MENU
e quando
PROG 1
aparece no ecrã carregar em OK para ajustar o programa.
2.PROGRAMAR A HORA DE INÍCIO DA REGA (= Start time) :
Carregar
UP
o
DOWN
para indicar a hora desejada. Confirmar carregando em
OK
em cada etapa.
3.AJUSTAR O TEMPO DE REGA (=Run time) :
Carregar
UP
o
DOWN
para indicar o tempo de rega desejado. Confirmar carregando em
OK
a cada etapa.
4.PROGRAMAR OS DIAS DE REGA (=Cycle time) :
Pode escolher todos os dias ou certos dias da semana conforme a necessidade.
Também é possível regar com intervalos de 1 até 15 dias.
• Selecionar os dias de rega :
No menu Cycle time quando no (s) día(s) em que quere regar pisca(m) (ex : Mon, Tue, Wed, etc...).
Carregar em
OK
para os selecionar, senão carregar no botão UP para passar.
NB : não utilizar a tecla DOWN para mecher o cursor.
• Ajustar uma rega com intervalos :
Se quere regar com dias de intervalo (de 1 a 15 días) por exemplo, todos os 3 dias,
carregar o botão
UP
até 03 aparecer no ecrã e confirmar carregando OK.
ATENÇÃO ! Para regar com intervalo, nenhum dia deve ser selecionado.
5.MUDAR OS DIAS DE REGA :
• Carregar duas vezes
MENU
e visualizar o programa desejado utilizando os botões
UP
ou
DOWN
e logo selecionar
com
OK
• Acrescentar / retirar um dia de rega :
Ex 1 :
se a segunda féria é selecionada, carregar duas vezes
OK
para retirá-la, ou carregar uma vêz
UP
se quere
deixá-la.
Ex 2 :
para acrescentar um dia não selecionado carregue OK quando pisca ou passar com UP
• Para regar com dias de intervalo :
Ex 3 :
verificar que nenhumo dos dias da semana é selecionado, carregar 7 vezes
UP
(o número de dias de intervalo
pisca), ajustar o intervalo com
UP
e
DOWN
e confirmar com
OK
.
EXEMPLOS
1.Regar às 18h00 de 3 em 3 dias durante 1 hora :
Carregar
MENU
duas vezes para visualizar PROG 1.
Carregar
OK
e carregar
UP
ou
DOWN
indicando “18” e confirmar com
OK
.
Depois, indicar “00” com
UP
ou
DOWN
para ajustar os minutos e confirmar com
OK
(Start time = 18h00). Ajuste o
tempo de rega indicando “1” com os botões
UP
e
DOWN
e carregar duas vezes
OK
(Run time=1h00).
Enfim, carregue
DOWN
, cycle time deve piscar (senão, retire todos os dias), indique 3 (days) com os botões
UP
ou
DOWN
e confirmar com
OK
. A rega começará todos os dias às 18h00.
2.Regar somente uma vêz durante 30 minutos (sem ciclo de rega) :
Carregar o botão
MAN
. Com os botões
UP
ou
DOWN
indicar ‘0’ para as horas e confirmar
OK
. Carregar o botão
UP
ou
DOWN
para ajustar os minutos (30 min). Enfim, confirmar com
OK
. A rega funcionará durante 30 minutos.
REGA EM MODO MANUAL
Carregar o botão
MAN
para definir um programa de rega pontual / imediato.
Carregar o botão
UP
ou
DOWN
para programar as horas e carregar
OK
para ajustar os minutos.
Quando a duração de rega desejada aparece no ecrã, carregar
OK
para começar a rega imediatamente
durante a duração programada. Para desactivar o modo manual, carregue novamente o botão
MAN
.
INSTRUÇÕES PNRDD
AA /LR6-1,5 V x 2
non inclus
-
no incluido
-
non incluso
não incluído
-
not included
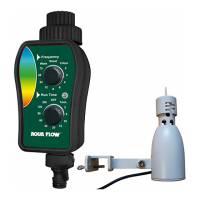
SENSOR DE CHUVA
Ligado ao programador de rega,
interrompe a rega quando chove :
• Composição (g. 1)
• Ligar o cabo (D)
do sensor de chuva ao programador
(ligação por debaixo).
• Regular a sensibilidade higrométrica :
Permite ajustar a sensibilidade do sensor de chuva conforme
a intensidade das precipitações de 3 até 25 mm.
Virar a tampa (B) e posicionar o gancho no ponto desejado.
NB : evitar utilizar a posição 3 mm
en caso de forte humidade.
• Teste gancho (A) :
carregar no gancho manualmente.
• Instalação :
com o soporte de montagem universal de
Clip (C)
, pode-se instalar o sensor na goteira, à beira do telhado num
alpendre, etc... o mais perto possível do programador. Também pode ser montado numa superfície inclinada, mas tem que ser
reposicionado em posição vertical.
• Enfim, o fio do sensor de chuva tem que ser ligado ao programador.
ATENÇÃO ! Nunca deixar sumergir-se dentro da água ou instalar dentro de uma goteira.
A
B
C
D
1
2
3
WARNINGS / REMINDER
• The PNR02 timer is only designed for private utilization for the garden.
It is exclusively designed for outdoor use to control sprinklers or irrigation systems.
NB : it can work with a recovery vessel of rain.
• It cannot be used for industrial purposes or be in contact with food, chemicals, flammable or explosive materials.
• To prevent water from entering into the battery compartment, the timer must be vertically connected to the tap.
• Use this timer with clean and freshwater only whose temperature does not exceed 40° C. Check the filter if necessary.
• Operating pressure must be between 0 and 8 bars maximum (works without pressure).
Warning! However, it takes a minimum pressure for a drip-drip watering system, buried and surface watering systems.
• Do not use rechargeable batteries, but use new alkaline batteries only and change them at the beginning of each season.
Before a long absence, check the battery status.
• Wintering : frost can damage the timer. In winter, the watering timer must be stored in a dry place where it is protected from
frost. Remove the battery.
• This watering timer should not be thrown in the household garbage,
but in specially provided for containers
- RL2002/96/CE Directive.
• Watering timer complies with the european directive
N° 2004/108/EC - 93/68/EC.
Specications
Maximum pressure :
8 bars
Operating tempera-
ture :
5°C to 60°C
Batteries’ life time :
3 à 6 months
(normal use)
REMINDER !
In case of frost, remove
the timer from the tap
and store it indoors
until spring. Remember
to remove the batteries
from the timer.
1
2
3
4
5
INSTALLATION
1. INSTALL / CHANGE BATTERIES :
Unscrew the cover
(1)
behind the timer, install 2 alkaline batteries 1,5 V (not included), rescrew the cover.
The system is activated : the sphere, which allows water passage, makes a full turn, then returns to closed position.
2. INSTALLATION :
Hold the device upright, unscrew the clamping ring located on the top of timer
(2)
on the top of timer, screw the female
nut
(3)
on your tap, rescrew the clamping ring and open the tap (don’t use tools to tighten the ring.)
3. SET TIME :
• Press
MENU
once, then press
OK
.
• Press
UP
or
DOWN
to set hours, then
OK
to confirm.
• Press
UP
or
DOWN
to set minutes, then
OK
to confirm.
• Finally, press
UP
or
DOWN
to set the day(s) (Mon, Tue, Wed, Thu, Fri, Sat or Sunday).
• When current day is flashing on screen, press
OK
to complete this setting.
4. CHANGE BATTERIES :
if the low battery symbol
(5)
is flashing, that’s means they must be changed.
PROGRAMMING
1. SELECT THE PROGRAM :
Press 2 times
MENU
, and when
PROG 1
appears on screen, press
OK
to set the
program 1.
2. ADJUST Start time :
Press
UP
or
DOWN
to indicate the desired time. Confirm by pressing on
OK
at each stage.
3. SET Run time :
Press
UP
or
DOWN
to indicate the desired duration. Confirm by pressing on
OK
at each stage.
4. PROGRAMMING Cycle time :
You can choose to water every day or some days of week according to your needs.
It is also possible to program watering every day or up to 15 differents days :
• Select all the watering days :
In menu
Cycle time
, when the day(s) you want to water are flashing (ex. Mon,Tue, Wed, etc..),
press
OK
to select them, otherwise press
UP
to pass them.
NB : don’t use
DOWN
to move the cursor.
• Set watering intervals :
If you choose to water with intervals (from 1 to 15 days) - For example, every 3 days,
press
UP
until
03
appears on screen and confirm by pressing
OK
.
Warning ! For a watering interval, all the days must be deselected.
5. CHANGE WATERING DAYS :
• press 2 times
MENU
, then select the program wanted using the
UP
or
DOWN
buttons,
then press
OK
to confirm.
• Add / remove a watering day :
Ex 1 : if monday was already selected, press one time
OK
to remove it, or press
UP
to keep it selected.
Ex 2 : to add a day that wasn’t selected, press
OK
while it’s flashing, or ignore it by pressing
UP
.
• To water with intervals :
Ex 3 : check that all week days are deselected, press 7 times
UP
(the number of intervall day(s) is flashing) :
adjust the intervall with
UP
and
DOWN
, then confirm by pressing
OK.
EXAMPLES
1. Watering 1 hour at 6 pm every 3 days :
Press
MENU
2 times to display
PROG 1
.
Press
OK
and press
UP
or
DOWN
to indicate ‘18’ press
OK
. to confirm (24 hours system).
Then, indicate
‘00’
by pressing on
UP
or
DOWN
for the minutes setting and confirm with
OK
(Start time = 6:00 pm).
Adjust watering time indicating ‘1’ by pressing on
UP
or
DOWN,
then press
OK
2 times (Run time = 1h00). Finally,
press
DOWN
, Cycle time should flash (if it isn’t the case, you must deselect all days), enter 3 (days) with
UP
or
DOWN
and confirm by
OK
.
The watering will be triggered every 3 days at 6:00 pm.
2. Watering 30 minutes only once (without watering cycle) :
Press
MAN
. Using
UP
or
DOWN
, indicate ‘0’ for hours and confirm with
OK
. Press
UP
or
DOWN
to set minutes
(30 min), then, confirm with
OK
.
The watering will be triggered for 30 minutes.
MANUAL WATERING MODE
Press
MAN
to set an immediate watering program.
Press
UP
or
DOWN
to program hours, then press
OK
to set minutes. When the desired watering time appears
on screen, press
OK
to immediately trigger watering for programmed time.
To turn off the manual mode, press the button
MAN
.
PNRDD INSTRUCTIONS
AA /LR6-1,5 V x 2
non inclus
-
no incluido
-
non incluso
não incluído
-
not included
RAIN SENSOR
Connected to your watering timer,
it will stop the watering when it’s raining :
• Components (g. 1)
• Plug the rain sensor’s jack (D)
on the watering
timer (plug at the next size down).
• Adjust the hygrometric sensistiveness :
This allows you to adjust the sensitiveness of the rain sensor
according to rainfall intensity from 3 to 25 mm.
Turn the cap (B) and push the pin at the bottom of the slot
wanted.
NB : avoid using the 3 mm position
in case of high humidity.
•Pin-test (A) :
press on the pin to test the detector manually.
• Installation :
using the universal fixing clip (C), you can install the rain sensor on a gutter, the side of a roof, a shed, etc... as
close as possible to the timer. It can also be fixed on an inclined surface, but it has to be put in vertical position.
• Finally,
the rain sensor’s wire must be connected to the timer.
WARNING ! Don’t immerse in water or install in a gutter.
A
B
C
D
1
2
3
 Loading...