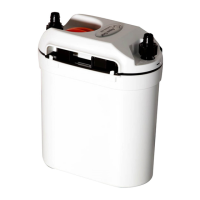
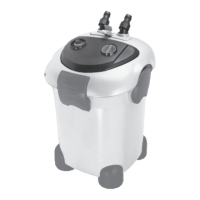
This document is a user manual for the Aqua One Ocellaris 3000 / 3000UV canister filter, designed for aquariums.
Function Description
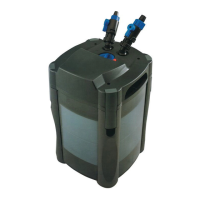
The Aqua One Ocellaris 3000 and 3000UV are external canister filters for aquariums, designed to provide comprehensive filtration for coldwater, tropical, and marine environments. The "UV" model includes an ultraviolet sterilizer for enhanced water clarity and pathogen control. The filter utilizes multiple media baskets to house various filter media, ensuring mechanical, biological, and chemical filtration. Water is drawn from the aquarium, passed through the filter media, and then returned to the aquarium, promoting a healthy and clean aquatic environment. The filter is equipped with an integrated tap connector for easy hose connection and disconnection, and a primer for convenient startup.
Important Technical Specifications
Ocellaris 3000:
- Number of Media Baskets: 3
- Dimensions: 38 x 38 x 52 cm
- Max Aquarium Volume: 600 L
- Maximum Flow Rate: 3000 L/hr
- Max Head Height: 2.0 m
- Filter Volume: 29 Litres
- Power Requirements: 220 – 240V
- Power Consumption: 40W
- Suitable for: Coldwater, Tropical, Marine
Ocellaris 3000UV:
- Number of Media Baskets: 3
- Dimensions: 38 x 38 x 52 cm
- Max Aquarium Volume: 600 L
- Maximum Flow Rate: 3000 L/hr
- Max Head Height: 2.0 m
- Filter Volume: 29 Litres
- Power Requirements: 220 – 240V
- Power Consumption: 50W
- Suitable for: Coldwater, Tropical, Marine
Both models come with a 2+1 year guarantee, with the additional year available upon online registration. The product is designed in Australia and manufactured in China.
Usage Features
The Ocellaris filter is designed for ease of setup and operation.
- Media Setup: The manual provides a recommended filter media setup, including Wool, Sponge (Black 35ppi), Sintered Glass Noodles, Sponge (Blue 15ppi), and Sintered Glass Substrate, arranged across the multiple media baskets. Users are instructed to remove media from plastic bags and rinse them before placement.
- Head Unit Installation: The head unit connects to the canister body with clips, ensuring a flush fit. Users are advised to check the impeller's spin by connecting to power briefly before final assembly.
- Tap Connectors and Hoses: The filter uses a set of taps and two pieces of hose. Hoses are secured to the hose tails with collars, and the taps attach to the filter head with a locking lever.
- Inlet/Outlet Pipes: The manual details the assembly of inlet and outlet pipes using joiners, elbows, u-pipes, and a strainer for the inlet. The outlet can be configured with either a duckbill outlet or a spray bar, with instructions to avoid making the spray bar too short to prevent back pressure and noise. Suction cups are provided for securing pipes to the aquarium glass.
- Starting the Filter: Two methods are provided for starting the filter:
- Method 1 (Primer): Involves unscrewing the primer cap on the head unit and filling the canister with water from the aquarium or a tap (with conditioner). Once full, the filter can be plugged in.
- Method 2 (Siphon): Requires temporarily detaching the outlet tubing, creating a siphon by sucking on the tube, and allowing the canister to fill completely before reattaching the outlet pipe to the aquarium.
- Safety Features: The manual emphasizes important safeguards, including the use of a "drip loop" for electrical cables to prevent water from reaching power outlets, ensuring dry hands when handling electrical components, and recommending a G.F.C.I (Ground Fault Circuit Interrupter) and surge protector. It also warns against operating the appliance if it's damaged, leaking, or malfunctioning.
Maintenance Features
Regular maintenance is crucial for optimal filter performance.
- Disassembly: The filter can be disassembled by releasing the four clips on the corners, lifting the head unit, and removing the media cover and baskets.
- Media Cleaning/Replacement: Filter sponges and white wool should be rinsed in a bucket of aquarium water (not tap water, to preserve beneficial bacteria) to remove dirt. White wool pads should be replaced regularly or when they can no longer be cleaned effectively. Sponges may also require eventual replacement. Biological media (sintered glass noodles/substrate) should be dunked in aquarium water to clear dirt without killing beneficial bacteria.
- Impeller Cleaning: The impeller should be cleaned whenever the filter is disassembled. This involves turning the head unit over, removing screws from the impeller cover, pulling off the impeller cap, and cleaning the impeller chamber and impeller shaft using a double-ended pipe brush. An aquarium-safe lubricant is recommended for the O-ring on the head unit during reassembly to ensure a better water seal.
- Hose and Tube Cleaning: Inlet and outlet tubes and hoses should be checked for residue buildup. They can be removed from the aquarium, flushed with hot water, and cleaned with a double-ended pipe brush to maintain flow rate.
- UV Maintenance (UV model only):
- Quartz Glass Sleeve Cleaning: The UV cover can be unscrewed and lifted off to access the quartz glass sleeve, which should be gently wiped with a damp cloth to remove accumulated debris.
- UV Lamp Replacement: The collar is unscrewed, the quartz sleeve is lifted off, and the UV lamp is pulled from its socket. The rubber cushion from the old lamp should be transferred to the new one. Reassembly is in reverse order. A sensor ensures the UV lamp operates only when the head unit is fully secured to the filter body. Users are warned not to look directly at the UV lamp when checking its functionality.
- Troubleshooting: The manual includes a troubleshooting section for common issues such as leaking, failure to prime, not starting, low water flow, and noise, offering solutions like checking O-rings, tubing, media, and impeller condition.