6
CALL FOR SERVICE 480-894-0770
AquaScienceAZ.com
6
Solutions For Life
INSTALLATION (CONTINUED)
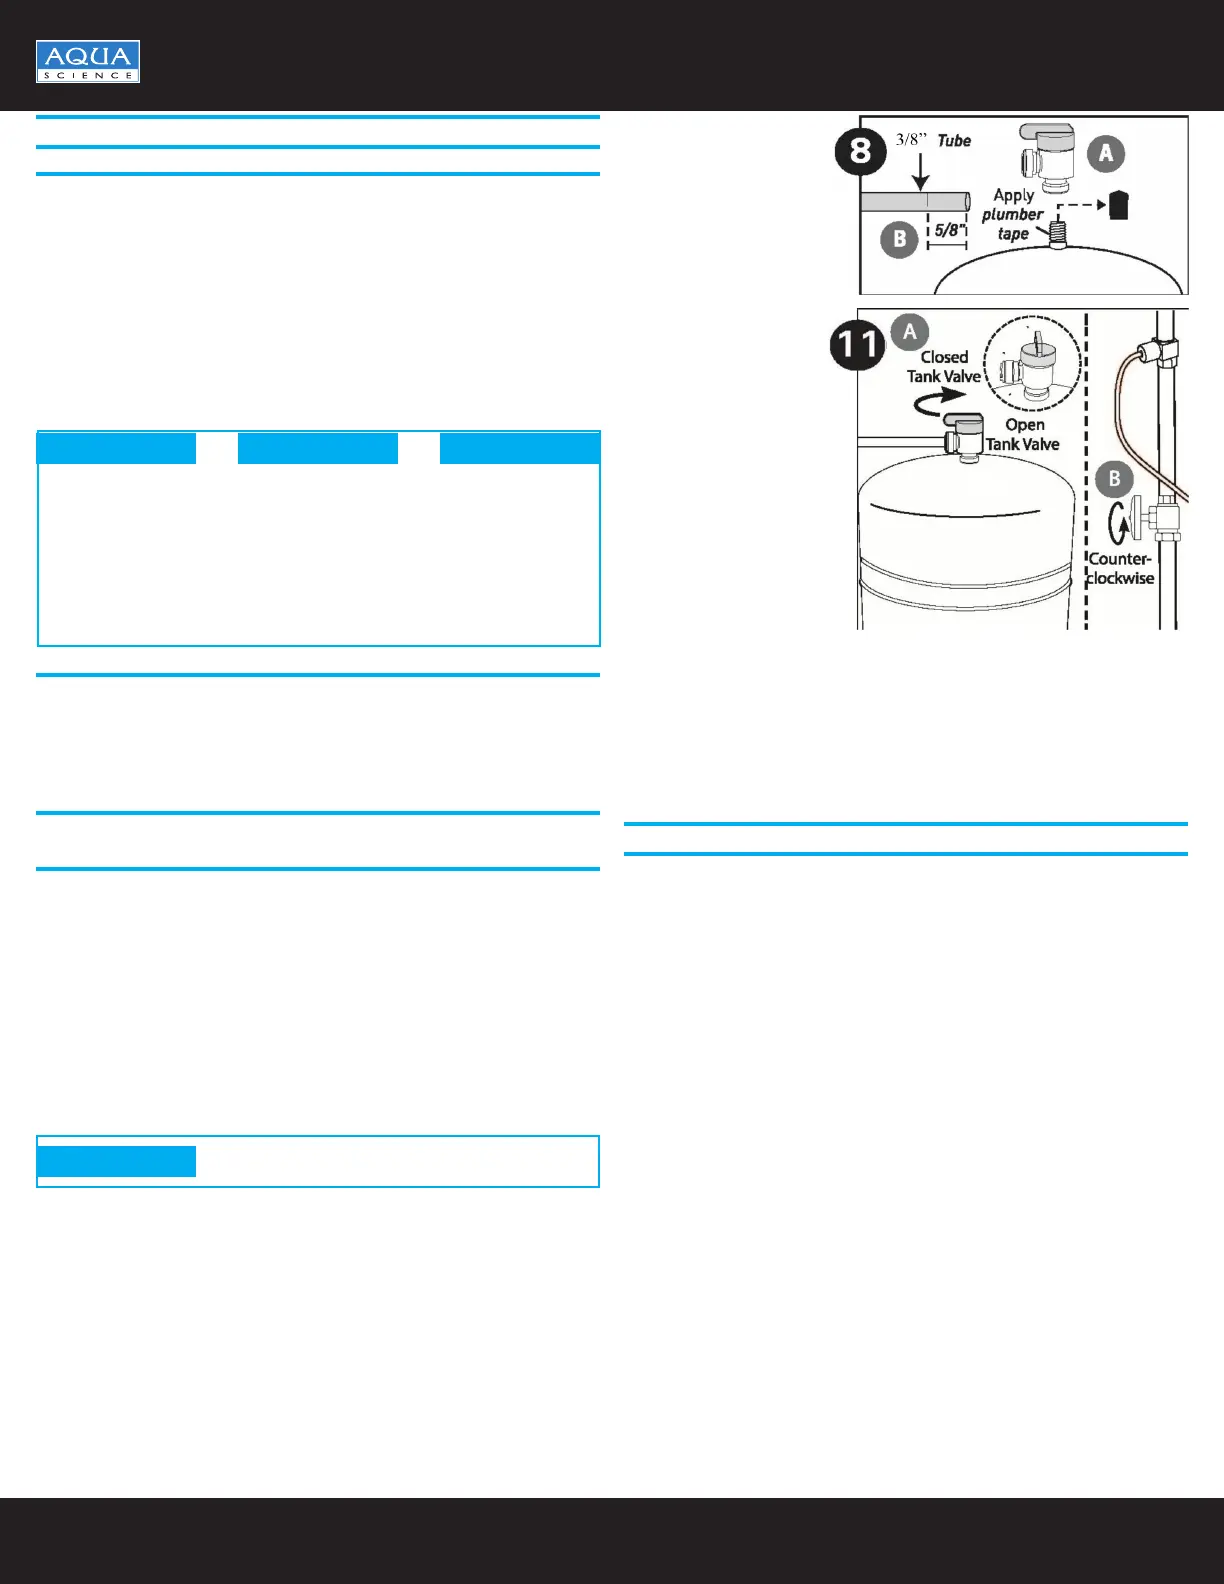
8. Connecting the Storage Tank to the System
1. To prevent leaks, apply 5 or more wraps of plumbers tape to threads on
tank. Thread the tank valve onto the top of the tank opening. Turn tank
so handle is in line with tubing.
2. Locate the 3/8-inch red tubing. Place a mark on the tubing 5/8-inch from
each end. Moisten one end of the tubing with water and insert with a
twisting motion into the port of the tank valve until the 5/8-inch mark
is ush with the quick connect tting. Then locate the tank near the
system’s installation area.
3. Cut the tubing to correct length. Install free end of tubing into quick-
connect tting on the post lter tee. Do not cut tubing.
4. Place entire system over mounting screws on wall and slide down.
CAUTION
• When the tank is full it weighs approximately 28.5 lbs. Provide ample
support under tank.
• The tank/valve connection will leak if not properly sealed. Plumbers tape
will normally seal the threaded connection.
• Make certain system is rmly attached to wall to prevent it from falling and
possibly becoming damaged.
• NOTE: Use caution not to bend or pinch the tubing behind the system
while attaching to mounting screws.
CAUTION CAUTION
9. Connecting the Supply Adapter and Inlet Filter
1. Locate remaining length of 1/4-inch yellow plastic tubing.
2. Push into quick connect tting on the system.
3. Cut the yellow tube to a length that will allow connection to the cold
water supply tting. Ensure the tubing does not kink. Push the tube into
the tting.
10. Faucet Operation
1. Simply turn the faucet a quarter turn and water will ow.
11. System Start-up
Note: The reverse osmosis membrane is treated with a food grade sanitizing
agent that may cause a undesirable taste. Although this is not harmful, it
should be ushed from the system if not previously ushed.
Note: The post polishing lter may contain ne black carbon particles. These
nes are harmless, but may make the water appear gray in color. The carbon
nes are ushed from the system with the rst tank full of water.
Note: The reverse osmosis system does not produce a high volume of water
on demand as would an ordinary lter. Water is produced at a slow, drop-
by-drop rate. The system requires about 2 to 4 hours to ll the storage tank.
As water is taken from the tank, the system automatically starts the cycle of
replacing the water used. When this is completed and the storage tank is full
again, the system automatically shuts-off thereby saving water.
CAUTION
Visually check the entire system for leaks. If a leak is
present, see “Troubleshooting”.ow.
1. Turn off valve at the top of storage tank. This valve is closed when the
valve handle is at a right angle to the tubing.
2. Turn on the cold water supply
3. Turn the faucet handle to the open position and let it drip for 30 minutes.
4. Completely open the cold water supply valve until it comes to a stop.
Allow the water to drip from faucet for another 2-3 hours. Then close the
faucet and open the valve on the top of the storage tank. The tank valve
is open when the handle of the valve is pointed at the tubing connection.
5. Allow three hours for the tank to ll. Continue to periodically check the
installation for leaks. After the storage tank is full, open the faucet to
ush the post lter of the black carbon nes we spoke of earlier. Allow
4-5 minutes for the storage tank to drain and ush the post lter. Close
faucet and allow the storage tank to rell.
Illustration Shows
Instruction #8
Illustration Shows
Instruction #11
NOTE: Initially, the water may appear cloudy. This is a result of air bubbles
trapped in the post lter. It is not harmful and will dissipate in a matter of a
day or so. It may take up to a week after installing a new post lter for all the
trapped air bubbles to dissipate.
The system is now ready for operation. You can now enjoy the quality water
from your new reverse osmosis system.
TESTING YOUR REVERSE OSMOSIS SYSTEM
It is highly recommended that you have your local dealer test the TDS of your
system with every lter change to make sure the system is performing to
expected standards.
 Loading...