8
CALL FOR SERVICE 480-894-0770
AquaScienceAZ.com
8
Solutions For Life
FILTER CHANGES
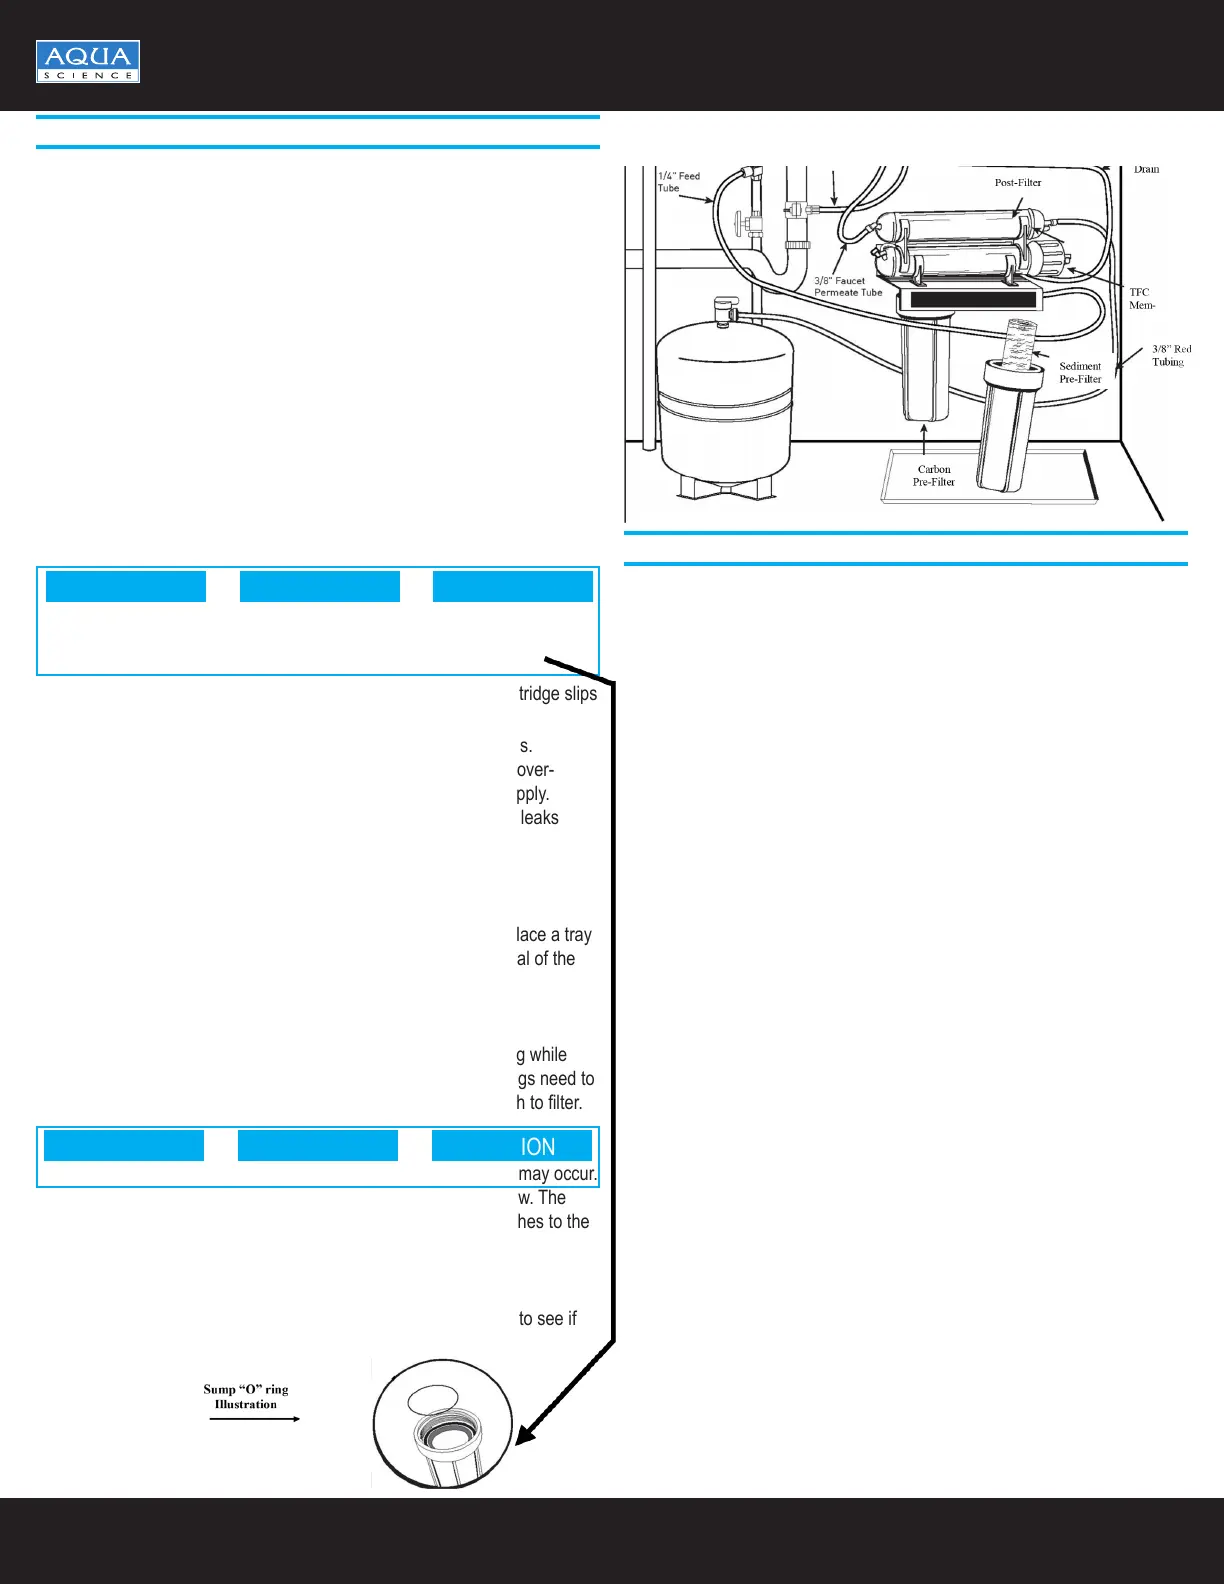
Replacing the Pre-Filter
The cartridges should be replaced every 6-12 months.
If your water contains a high amount of sediment, it may be necessary to
change the sediment cartridge more frequently. If your water contains a high
amount of chlorine, it may be necessary to change the carbon pre-lter (s)
more often.
1. Turn off incoming water supply and the storage tank valve. Place a tray
under the system to catch any water that may spill during the removal of
the lter housings.
2. Open faucet to release any water pressure.
3. Unscrew bottom of lter housings from caps using a lter wrench if
necessary. Discard used lters.
4. Remove black rubber “O”-ring from groove in housing. Wipe grooves and
“O”-ring clean, set “O”-ring aside.
5. Lubricate each “O”-ring with a coating of clean silicone grease. With two
ngers press each “O”-ring securely into the groove below the threads of
the appropriate housing
6. Insert cartridge in the bottom of the housings. Make sure the cartridge slips
over the standpipe in the bottom of the housing.
NOTE: Be sure to install cartridges in the proper housings.
7. Screw bottoms of housings back onto the caps securely, do not over-
tighten. Hand tighten should be sufcient. Turn on clod water supply.
Check for leaks. Continue to check periodically to make sure no leaks
develop.
Replacing the Post-Filter
Post-Filter should be replaced every 12 months.
1. Turn off incoming water supply and valve on the storage tank. Place a tray
under system to catch any water that may drip during the removal of the
post lter.
2. Open faucet to release pressure.
3. Remove lter from bracket and discard.
4. Remove tubes from ttings by pressing in collar around the tting while
pulling the tube with the other hand. Note: If quick connect ttings need to
be installed, tape tting with 5 wraps of plumbers tape and attach to lter.
5. Attach post-lter to bracket with the tee tting on the inlet end.
6. Attach tubes to ttings by pushing in until the tube stops. Check to see if
tube is in place by trying to gently pull tube out.
CAUTION CAUTION CAUTION
Ensure the tape is not touching the “O”-ring on the tting or a leak may occur.
NOTE: The lter has an arrow on it showing the direction of the ow. The
tee tting connects to the inlet side of the lter and the elbow attaches to the
outlet side.
NOTE: Hand tighten ttings, then tighten with a wrench 1/4 turn.
CAUTION CAUTION
The rubber “O”-ring provides the water tight seal between the cap and the
bottom sump. It is important that the “O”-ring be properly seated in the
groove below the threads of the housing or a leak may occur.
CAUTION
REPLACING THE REVERSE OSMOSIS MEMBRANE
About the Reverse Osmosis Membrane
When used under the operating conditions specied on page one of this
manual, your reverse osmosis membrane should last at least one to ve
years. You should replace the membrane after 18 to 60 months. Replace
it sooner if you notice the return of the unpleasant taste and odors or a
noticeable decline in the production rate. The precise life span of the reverse
osmosis membrane will depend on the quality of the water supply feeding
the system and the frequency with which you use the system. Frequent use
of the system prevents the ltered salt from building up on the membrane
as scale. The more water the system is required to produce, the longer the
membrane will last. You may wish to nd a variety of uses for your system to
prolong the life of the membrane.
During periods of non-use (such as during long vacations), remove the
membrane housing and place it in a sealed plastic bag. Store in the
refrigerator until you return.
NOTE: DO NOT FREEZE.
NOTE: If the system stands for two or three days with no use, the storage
tank should be drained.
Replacing the Membrane and Sanitizing the System
NOTE: It is recommended that you sanitize the system each time you change
the membrane. It is not necessary to sanitize the system when changing only
the lters.
NOTE: When installing a new membrane, it is recommended that you replace
the pre-lter and post-lter as well.
Removing the Membrane and Filters
1. Turn off the cold water supply. Allow ve minutes for the system to
depressurize. Place a tray under the system to catch any water that may
spill during the removal of the lter housings.
2. Open the drinking water faucet to drain storage tank. When tank is drained,
close faucet.
3. Disconnect the tubing from membrane housing. Hold the membrane with
one hand and re-move the cap with the other hand.
4. To remove the membrane, grasp the center tube of the membrane with
needle nose pliers and pull. Discard the old membrane. Screw cap back
on membrane housing without installing the new membrane. Reinstall the
tubing to housing at this time.
5. Unscrew lter housings from caps and discard old used lters.
 Loading...