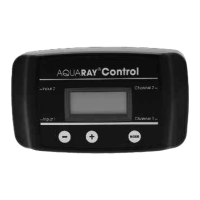
Parts List
1. AquaRay Control unit
2. Fixing kit
Installation
Self adhesive feet are supplied in the fixing kit and
can be placed in the circular indents on the back
of the unit. They will provide friction when placing
the AquaRay Control unit on a horizontal surface.
The unit can be mounted on a vertical surface
using the screws supplied in the fixing kit. These
engage into the keyhole slots on the back of the
unit.
When mounting the AquaRay Control unit,
please make sure there is enough space either
side to connect the PSU and lamps.
Once the unit is in position, connect the lamps to
the AquaRay Control unit by plugging them into
Channel 1 and Channel 2. Please note: if you
are only controlling ONE lamp, then Channel 1
should be used.
Then connect the PSUs to the AquaRay Control
unit by plugging them into Input 1 and Input 2.
Please note: if you are only controlling ONE
lamp, then Input 1 should be used.
2