Flush Valve (Automatic):
• Flushing the Membrane is critical to obtaining peak
performance from the RO unit.
• Flushing clears debris build-up on the Membrane.
• The Smart Buddie Booster Pump unit includes an internal
automatic valve that flushes the Membrane for 18 seconds
every time the unit is powered on.
• The internal valve allows water to bypass the 300 cc
flow restrictor located inside the Smart Buddie Booster Pump
housing. After 18 seconds, the valve will force the water to
pass through the flow restrictor and build pressure against
the Membrane.
• After flushing, Filtered Water production will begin.
Low Pressure Switch:
• The Low Pressure Switch will disconnect power if the
Source Water pressure is between 4.35 and 7.25 PSI.
• Shutting off the source water when the pressure is low
will prolong the life of the Pressure Pump.
High Pressure Switch:
• The High Pressure Switch will disconnect power
if the Filtered Water supply line pressure is between
33.35 and 36.25 PSI.
• Many RO unit installations connect to storage containers
that use float valves or pressure canisters that create pressure
on the Filtered water line. When the containers are full, back
pressure on the Filtered Water line is created.
• The Smart Buddie Booster Pump unit will disconnect
power to the Pressure Pump and prevent water flow to
the Membrane.
Pressure Pump:
• The Pressure Pump increases incoming water pressure
to 80 - 100 PSI.
• This higher pressure increases the effectiveness of
the RO unit.
• The Pressure Pump is low voltage and is powered by
the included transformer.
THINGS TO KNOW
General:
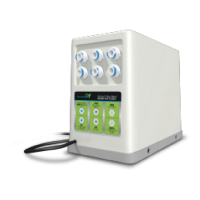
• The Smart Buddie™ Booster Pump has
three sets of connections, one set for the
Supply Water, one set for the Waste/Flush
Water and one set for the Filtered Water.
• The water will flow in through the top row
and out through the bottom row.
• The connections on the Smart Buddie
Booster Pump are “Double Press
Connections”. When connecting ¼” tubing,
you will feel the tubing stop twice before
it is fully inserted.
• To avoid putting pressure on the pre-filters,
the Smart Buddie Booster Pump should be
installed between the final pre-filter
(usually the Carbon) and the Membrane.
• Before setting up the Smart Buddie Booster
Pump, ensure that the power cord is not
plugged into an electrical outlet.
Smart Buddie
™
Instruction Guide
Smart Buddie
™
BOOSTER PUMP
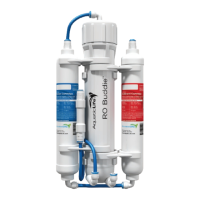
50 to 100 GPD RO Systems
IMPORTANT: Remove the flow restrictor on
the RO unit itself and use the flow restrictor
built into the Smart Buddie.