Do you have a question about the AquaticLife RO Buddie 75 GPD and is the answer not in the manual?
| Production Rate | 75 GPD |
|---|---|
| Membrane Type | Thin Film Composite (TFC) |
| Type | Reverse Osmosis System |
| Stages | 4 |
| Filter Life | 6-12 months |
| Pre-Filters | Sediment, Carbon Block |
| Post-Filter | Carbon |
| Water Temperature | 40-100°F |
| Inlet Water Pressure | 40-100 PSI |
Explains the process of removing contaminants using a semi-permeable membrane and waste/filtered lines.
Describes sediment and carbon block filters used before the RO membrane.
Warns about chloramines and advises checking local water supply, referencing page 19.
Lists RO Membrane Housing, 75 GPD RO Membrane, Sediment Cartridge, and Carbon Cartridge.
Details items like Float, Tubing, Check Valve, Flow Restrictor, and Faucet Adapters.
Lists recommended tools for installation, including wrenches and screwdrivers.
Describes the 5-micron sediment filter for trapping particulates like dirt, silt, and rust.
Explains the carbon block filter's role in reducing chlorine and conditioning water for the membrane.
Details the RO membrane's function in reducing impurities like TDS, arsenic, and lead.
Step-by-step guide on how to detach tubing from press fittings using the collar tool.
Instructions on properly inserting tubing into fittings, including the 'double push' method.
Emphasizes the importance of a clean, even cut using a razor blade for proper sealing.
Advises against using water of unknown quality and highlights limitations for copper tubing.
Specifies maximum pressure (80 PSI) and requirements for regulators or booster pumps.
Do not operate unattended; store unit properly if not used for over two weeks.
Details two connection options: Hose Bib Adapter and 2-piece Faucet Adapter.
Instructions for connecting tubing from the supply to the Auto-Shutoff Solenoid and Sediment Cartridge.
Details connecting tubing between the solenoid, check valve, and membrane housing.
Explains how to connect the filtered and waste lines to the floor drain or sink.
Outlines the procedure to flush the carbon cartridge for 5 minutes before installing the membrane.
Steps to remove existing tubing and unscrew the membrane housing lid.
Guide on inserting the membrane into the housing, ensuring proper gasket orientation.
Instructions for replacing the cap, tightening with the wrench, and re-attaching tubing.
Advises flushing the membrane for 30 minutes and discarding the initial water to remove preservative.
Connects the filtered water line to the float valve, preparing the system for use.
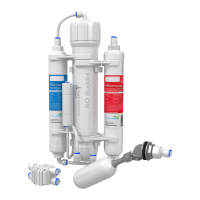
Visual representation of the entire RO system setup, including supply, waste, and filtered lines.
Explains how the membrane removes TDS and how sediment/carbon filters protect it.
Discusses sediment filter replacement frequency and its impact on water production.
Covers membrane longevity, production ratings, and factors like temperature and pressure.
Advises using plumber's tape (max three wraps) to seal leaks at threaded fittings.
Explains proper tubing insertion into fittings and the importance of a clean cut.
Suggests checking water supply and testing flow through cartridges if no water is produced.
Recommends using correction factors for temperature and pressure if production is low.
Recommended replacement intervals for Sediment and Carbon Block cartridges (3-6 months).
Recommended replacement interval for RO Membrane cartridge (12-24 months).
Provides MFG #, Amazon #, and Web Link for purchasing the Sediment Cartridge.
Provides MFG #, Amazon #, and Web Link for purchasing the Carbon Cartridge.
Warns about chloramines and provides purchase information for a special Chloramine Filter.
Details the 1-year warranty on the unit (excluding cartridges) and replacement policy.
Lists conditions that void the warranty, including misuse, accident, and improper installation.
Outlines required water quality parameters for warranty validity (TDS, pH, temperature, etc.).
Provides contact information and procedures for submitting a warranty claim.
