Do you have a question about the Arctic Air AR23E and is the answer not in the manual?
General safety precautions and responsibilities for using the equipment.
Safety measures to follow during the appliance installation process.
Guidelines for safe electrical connections and related work.
Safety protocols for performing inspection and maintenance tasks.
Safety requirements and recommendations for authorized repair work.
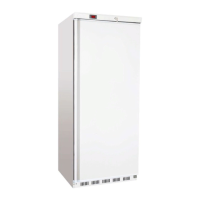
Overview of the manual's scope for refrigerators and freezers.
Steps to prepare the installation site before equipment delivery.
Procedures for checking equipment upon delivery for damage.
Information on where to find the unit's serial number.
Guidance on selecting an appropriate installation location for the unit.
Ensuring proper air circulation inside the cabinet.
Maintaining adequate space around the unit for airflow.
Necessary electrical connections and safety checks.
How to level the cabinet for optimal performance and door alignment.
Methods to ensure the unit is stable and secure.
Description of how refrigeration cycles function in refrigerators and freezers.
How to turn the unit on and off using the power switch.
Understanding the front panel controls and indicators.
Detailed functions like setting temperature, defrost, and keyboard lock.
Interpretation and handling of various alarm codes displayed by the unit.
Guidelines for cleaning the unit's inside and outside surfaces.
Schedule and method for cleaning the condenser coil.
Best practices for cleaning and maintaining stainless steel exteriors.
Proper cleaning and care for door gaskets to ensure sealing.
Addressing loose hinges and door alignment issues.
Ensuring the drain system is clear and functional.
Procedures for opening the top shroud and removing the bottom shroud.
Steps for replacing or adjusting cabinet doors.
Electrical schematic for the AR23E model.
Electrical schematic for the AR49E model.
Electrical schematic for the AF23 model.
Electrical schematic for the AF49 model.
Detailed wiring diagram for the AR23E unit.
Detailed wiring diagram for the AR49E unit.
Detailed wiring diagram for the AF23 unit.
Detailed wiring diagram for the AF49 unit.
Coverage details for the standard two-year warranty.
Information on the additional three-year compressor warranty.
Requirements for obtaining warranty service and proof of purchase.
Details on what is not covered by the warranty.
This document serves as the Installation, Operation, and Maintenance Manual for Arctic Air Commercial Reach-In Refrigerators and Freezers. It provides comprehensive guidelines to ensure the safe and efficient use of these commercial refrigeration units. The manual emphasizes the importance of reading it thoroughly before attempting any installation or operation procedures.
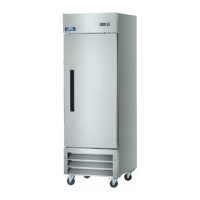
Arctic Air Reach-In Refrigerators and Freezers are designed for commercial use, providing reliable temperature control for storing food products. These units are equipped with a refrigeration system that maintains specific internal temperature ranges: 34°F to 38°F for refrigerators and -3°F to -7°F for freezers. The refrigeration cycles are managed by a controller that powers the condensing unit and evaporator fans. Evaporator fans run continuously in refrigerators and whenever the evaporator coil temperature is below 54°F in freezers, except during defrost cycles. The units feature anti-condensation heaters on the door frames that operate in conjunction with the compressor to prevent moisture buildup.
The control panel, located on the front of the unit, allows users to monitor and adjust various functions. It includes indicators for fan operation, defrost cycles, and compressor status. Users can display and change the set point temperature, initiate manual defrost cycles, and lock/unlock the keyboard to prevent unauthorized changes. The display also shows alarm codes, indicating potential issues such as room probe failure, evaporator probe failure, condenser probe failure, or temperature alarms (maximum, minimum, external, door open, or condenser).
The manual outlines several key usage features to optimize performance and ensure longevity. Proper installation is crucial, starting with site preparation. The installation location must have a level floor capable of supporting the unit's weight, adequate ventilation, and should not be near heat sources. For units on casters, the floor must be level. Electrical connections must comply with local, state, and federal regulations, and the unit must be connected to a protected power source of the correct voltage and amperage.
Inside the cabinet, it is important not to overpack the unit to ensure proper air circulation. Refrigerated air is discharged at the top rear and flows to the bottom. Obstructions can lead to evaporator coil freeze-ups, temperature loss, or water overflow from the drain pan. Shelves are designed with a rear turn-up to prevent obstructions, but users should still be mindful of items blocking airflow. Outside the cabinet, a minimum of two inches of clearance from all walls and 12 inches from the top is required for ample airflow.
The control panel allows for easy interaction with the unit. To display the set point, users press and release the SET button. To change the set point, the SET button is pressed and held for two seconds, then the Up or Down Arrow buttons are used to adjust the value, and SET is pressed again to save. Manual defrost can be initiated by pressing and holding the Defrost button for two seconds. The keyboard can be locked or unlocked by pressing and holding the Up and Down Arrow buttons for three seconds, displaying "POF" for locked and "Pon" for unlocked. Alarm codes can be displayed and reset using the Up and Down Arrow buttons and the SET button.
Regular maintenance is essential for the optimal performance and longevity of Arctic Air units. The manual provides detailed instructions for cleaning and inspection.
Cleaning the Condenser Coil: This should be done a minimum of every 90 days, or more frequently (every 30 days) if there is significant debris, dust, or grease accumulation. For light dust, a brush can be used. For heavier dust, a vacuum or compressed air is recommended. If grease is present, a refrigeration degreasing agent should be sprayed on the coil and blown through with compressed air. Failure to maintain a clean condenser coil can lead to high temperatures, excessive run times, compressor failures, and will void warranties. Crucially, a high-pressure water wash should never be used on the condenser coil, as it can damage electrical components.
Stainless Steel Care and Cleaning: Stainless steel surfaces should be cleaned with soft cloths or plastic scouring pads and alkaline-based or non-chloride cleaners. Steel pads, wire brushes, or scrapers should never be used. After cleaning, surfaces should be rinsed repeatedly and dried thoroughly. Routine cleaning with soap and water is recommended. For extreme stains or grease, a non-abrasive cleaner and plastic scrub pad (rubbing with the grain) can be used. Stainless steel cleaners are also available to restore the protective layer. Early signs of breakdown, such as small pits and cracks, should prompt thorough cleaning and application of a specialized cleaner to restore passivity. Acid-based cleaning solutions should never be used, and all food products, especially acidic ones like tomatoes and peppers, should be cleaned from stainless steel surfaces.
Gasket Maintenance: Gaskets require regular cleaning with warm soapy water to prevent mold and mildew buildup and maintain elasticity. Full-strength cleaning products should be avoided as they can make gaskets brittle. Sharp tools or knives should never be used to scrape or clean gaskets. Gaskets are designed for easy replacement; Dart style gaskets can be pulled out of the groove and new ones pressed into place.
Doors/Hinges: Over time, door hinges may become loose, causing doors to sag or pull out of the frame. Users should tighten the screws that mount the hinge brackets to the unit's frame. If this does not resolve the issue, a qualified service agent should be contacted. The manual also provides instructions for door replacement and adjustment, including how to open the top shroud, remove the door, preload the hinge cartridge, and re-install the door, ensuring it swings closed freely and the interior light functions correctly. Height adjustments can be made using plastic spacers/washers on the bottom hinge pin.
Drain Maintenance: The internal drain removes condensation from the evaporator coil, which then evaporates in an external condensate evaporator pan. Users should ensure the drain tube is connected from the evaporator housing to the pan and that all drain lines are free of obstructions. A level unit is important for proper drainage. Food products blocking drain lines are a common cause of water backup and overflow.
Safety Precautions: The manual stresses the importance of safety. All electrical work must be performed by certified technicians, and all facility electrical connections must comply with codes. Maintenance work should only be carried out by suitably trained personnel, and the appliance must be disconnected from the electrical supply with a lockout tag applied before any maintenance. All replacement parts not supplied by Arctic Air must be pre-approved. Repair work should only be performed by Arctic Air or authorized representatives. If the unit is laid on its side or back, it must be allowed to sit upright for a minimum of 24 hours before start-up to allow compressor oil to flow back to the sump, otherwise, compressor failure and unit damage may occur, voiding warranties. If the freezer vibrates excessively when the compressor is running, the compressor bolts should be loosened (but not removed).
| Total Capacity | 23 cu. ft. |
|---|---|
| Door Type | Solid |
| Number of Doors | 1 |
| Exterior Material | Stainless Steel |
| Refrigerant | R290 |
| Voltage | 115V |
| Shelves | 3 |