EasyManua.ls Logo

Arctic ALPINE 11 PRO - INSTALLATION REV.2 User Manual

Arctic ALPINE 11 PRO - INSTALLATION REV.2
1 page
Page #1 background imageLoading...
Page #1 background image
Question and Answer IconNeed help?

Do you have a question about the Arctic ALPINE 11 PRO - INSTALLATION REV.2 and is the answer not in the manual?
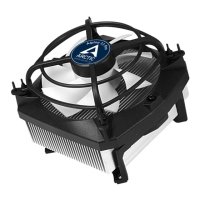
Arctic ALPINE 11 PRO - INSTALLATION REV.2 Specifications

General IconGeneral
Cooling Capacity95 W
Bearing TypeFluid Dynamic Bearing
Heatsink MaterialAluminum
Fan Dimensions92 mm
Connector4-pin PWM
CompatibilityIntel Socket 1150, 1151, 1155, 1156
Fan Speed500 - 2000 RPM (Controlled by PWM)

Summary

Preparation - Uninstall Stock Cooler

Clean CPU Surface

Remove old thermal paste residue from the CPU surface using a paper tissue.

Installation of Alpine 11 Pro Rev.2

Install Mounting Bracket

Mount the provided bracket onto the motherboard for the cooler installation.

Identify CPU Socket Type

Identify whether the CPU socket is type 1156 or 775 for correct installation.

Insert Push-Pins

Insert the push-pins through the mounting bracket and motherboard holes.

Position Cooler on CPU

Place the cooler onto the CPU, aligning it with the installed push-pins.

Secure Cooler with Screws

Tighten the screws on the push-pins to secure the cooler to the motherboard.

Install Fan onto Heatsink

Attach the cooling fan to the heatsink of the cooler.

Connect Fan Cable

Connect the CPU fan cable to the designated connector on the motherboard.

Cooler Clearance Check

Ensure the cooler does not interfere with surrounding motherboard components.

Thermal Compound Information

Pre-applied Thermal Paste

The heatsink comes with pre-applied thermal compound for optimal performance.

Related product manuals