11 / 44
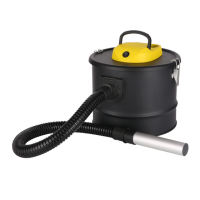
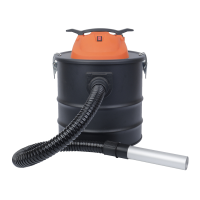
3. “SUCTION” FUNCTION: connect the flexible metal hose (7) to
the suction connection (8)
“BLOW” FUNCTION: connect the flexible metal hose (7) to the
blow connection (2).
Note - insert the hose fitting in the guides on the relative
connection (2 or 8) and turn it clockwise to lock it in place.
4. “SUCTION” FUNCTION: Make sure that the material to be
sucked up has cooled down.
Note – be careful because it may be cool on the outside but
still hot on the inside and, when it comes in contact with the air,
it may become incandescent again.
5. Position the aluminium pipe (6) near the material to be sucked
up or blown.
6. Make sure that the switch (10) is set to “0”, then insert the plug
in the power outlet.
7. Turn on the unit by turning the switch (10) to position “I”.
8. “SUCTION” FUNCTION: Suck up the ash using the aluminium
pipe (6).
“BLOW” FUNCTION: direct the aluminium pipe (6) towards the
material to be blown.
9. After use, turn the unit off by turning the switch (10) to position
“0”.
10. Remove the plug from the power outlet.
11. Remove the flexible hose by turning the fitting counter-
clockwise. Empty out the container (9), clean the filter (11) and
the hoses (6 + 7) as indicated in the “MAINTENANCE”
paragraph.
MAINTENANCE
NOTE: it is advisable to carry out the cleaning operations outdoors
Disconnect the plug from the power outlet before performing
any cleaning and maintenance operation.
Disconnect the hose (7) by turning it counter-clockwise, open the
locking clip (4), remove the cover (9) and remove the filter (11).
- Empty out the container (5) and, if necessary, wash it with water.
- Empty out the hoses (6-7) and, if necessary, wash them with
water.
- Clean the filter (11):
 Loading...