14
9
11
10
groove of the
plastic ball
12
13
Make sure you have all the components before beginning installation. To
prevent damage, attach the motor to the support rod on a soft surface or
use the polystyrene contained in the package.
-Open the carton box and take out the fan (fig. 1)
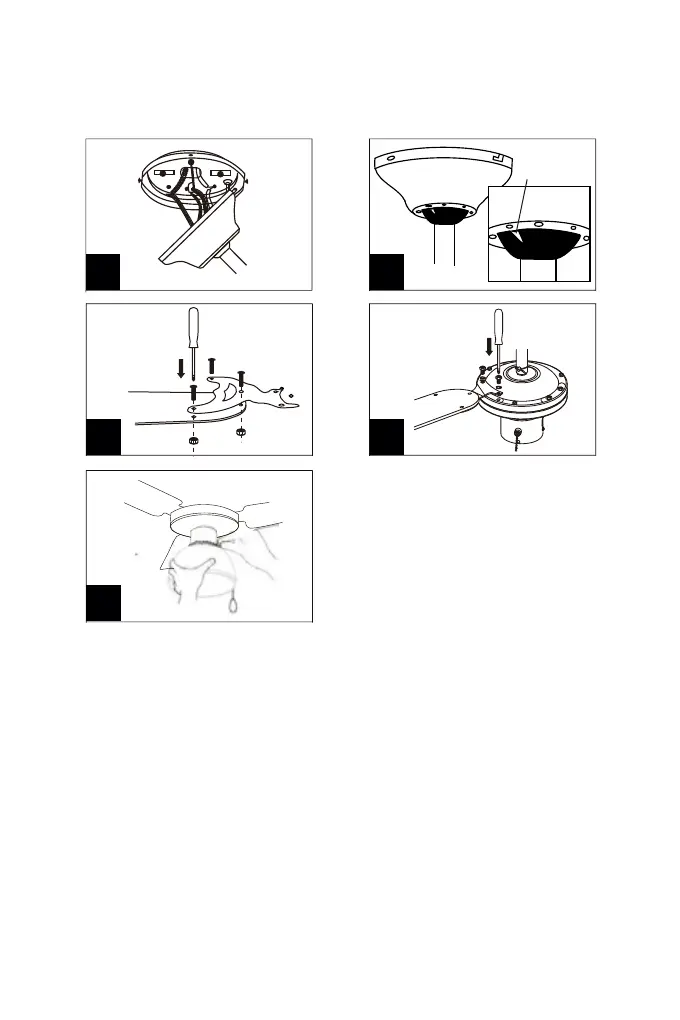
-Assemble the support plate on the ceiling using two or more screw
anchors and appropriate washers. Attention: the provided screw are for
wood joist. The electric cables coming out from the ceiling must be insert
on the central holes of the support plate (fig. 2).
- Remove the safety stopper and washer from the safety pin then remove
the safety pin from the support rod (fig. 4). Insert the support rod through
the cap.
-Loosen the screw placed on the bottom part of the support rod and
insert the electric cables coming out from the motor through the support
rod (fig. 5).
-Fix the support rod to the motor housing using the safety pin and lock it
using the washer and the safety stopper (fig. 6 and 7).
-Tighten the screw placed on the bottom part of the support rod (fig. 8).
-Unscrew the 4 screws placed on the support plate.
-Hang the fan to the hook on the support plate using the cap’s hole and
connect the electrical cables (fig. 9). NB: arrange the electrical
connection as shown in fig. 3.
-Remove the fan from the hook and fix the cap to the support plate
making sure the holes of the cap are coincident to the holes of the
support plate. Fix the cap by using the 4 screws previously unscrewed.
ATTENTION: make sure to tighten the screws very well and that the
groove of the plastic ball fit the jut of the cap (fig. 10).
-Fix the blade support to the blades by using the provided screws and
nuts (fig. 11). N.B: The blades are double face - one side is wood and
another side is wood with straw insert. Before fix the blades support take
care of the blades’s side that you prefer.
-Unscrew the screws and washer from the motor and remove the paper
protection. Place the blades with blade support on the motor making sure
that the holes are coincident and fix them by using the washer and
screws previously unscrewed (fig. 12).
-Install the light bulb (E27 type Max 60W not provided) in the lamp holder
-Install the decorative glass and fix it using the provided screws. Take
care to do not tight the screws too much or the decorative glass can get
broken (fig. 13).
 Loading...