Do you have a question about the Argos Samuel Shorty Bunk Bed and is the answer not in the manual?
Important safety warnings and advisories for bunk bed use, including age limits and strangulation hazards.
Guidelines for cleaning the bunk bed using a damp cloth and mild detergent, avoiding harsh chemicals.
Practical tips for assembly, including checking bolts and ensuring proper tightening for safety and stability.
List of necessary tools for assembly, including a crosshead screwdriver and an Allen key.
Advice on assembly, such as not fully tightening bolts until the end and aligning parts correctly.
Step 1: Attaching end posts with upper side safety rails and lower side rails, not fully tightening bolts.
Step 2: Fixing lower rails to end panels, ensuring correct orientation for bed entry, without fully tightening.
Step 3: Attaching the upper front safety rail to end posts, aligning holes for ladder, not fully tightening.
Step 4: Attaching the upper back safety rail to end panels, repeating Step 3 for the opposite side.
Step 5: Attaching the ladder to the upper front safety rail and lower rail using bolts and nuts.
Step 6: Inserting and locking slats into the upper safety rails by pushing them firmly into place.
Step 7: Inserting and locking slats into the lower rails by pushing them firmly into place.
Step 8: Attaching straps around end slats and upper side safety rails using screws.
Step 9: Inserting plastic caps into the top of end posts and lower rails to cover exposed holes.
Step 10: Securing the bunk bed to the wall using provided straps for safety, after all parts are positioned.
Tips for drilling into walls and ensuring correct screw and wall plug selection for secure mounting.
Overview of different wall types and corresponding suitable wall plugs for secure and safe installation.
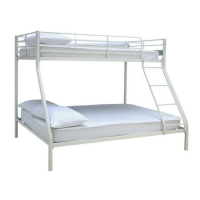
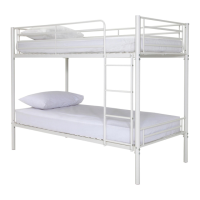
| Type | Bunk Bed |
|---|---|
| Material | Wood |
| Color | White |
| Bed Size | Twin |
| Assembly Required | Yes |
| Weight Capacity | 100 kg per bed |